
How to Build Your Own AI Content Factory
Publishing a single post with a neural network isn't hard. Problems begin when there are more than a hundred posts, and each one needs an image. You have to constantly enter prompts, save results, make edits, and manually publish content. But all this routine can be assembled into a single AI-based content factory that you'll only need to configure correctly once.
In this article, we'll explain how to link neural networks, cloud storage, email, and a social network into a system that prepares posts on its own, sends them for approval, and publishes them on the needed platforms.
What is a content factory
An AI content factory is a system that takes a single topic or post, turns it into a series of ready-made materials for different channels, and, if needed, publishes them on the required platforms. The factory itself is usually built in n8n, Make, or a similar service.
This approach is often used to run faceless YouTube channels. For example, it could be a system that analyzes popular queries and competitors' videos, suggests topics, gathers information, and prepares a script. Then neural networks generate voiceover, select or create visuals, assemble the video, make a thumbnail, and write a title with a description. After publishing, you can additionally pull data from YouTube Analytics on click-through rate, retention, and watch time to adjust the next videos. The human simply approves topics, checks facts, and prevents obvious neural slop from going out.
An AI-based content factory stores source materials and instructions, launches the needed services, collects results, sends them for review, and tracks publications.
How to build an AI content factory: breaking down a real template
As an example, let's take the AI-powered multi-platform social media content factory — an open working template published in the n8n catalog. It already links post generation, information search, image creation, email approval, file saving, and social media publishing.
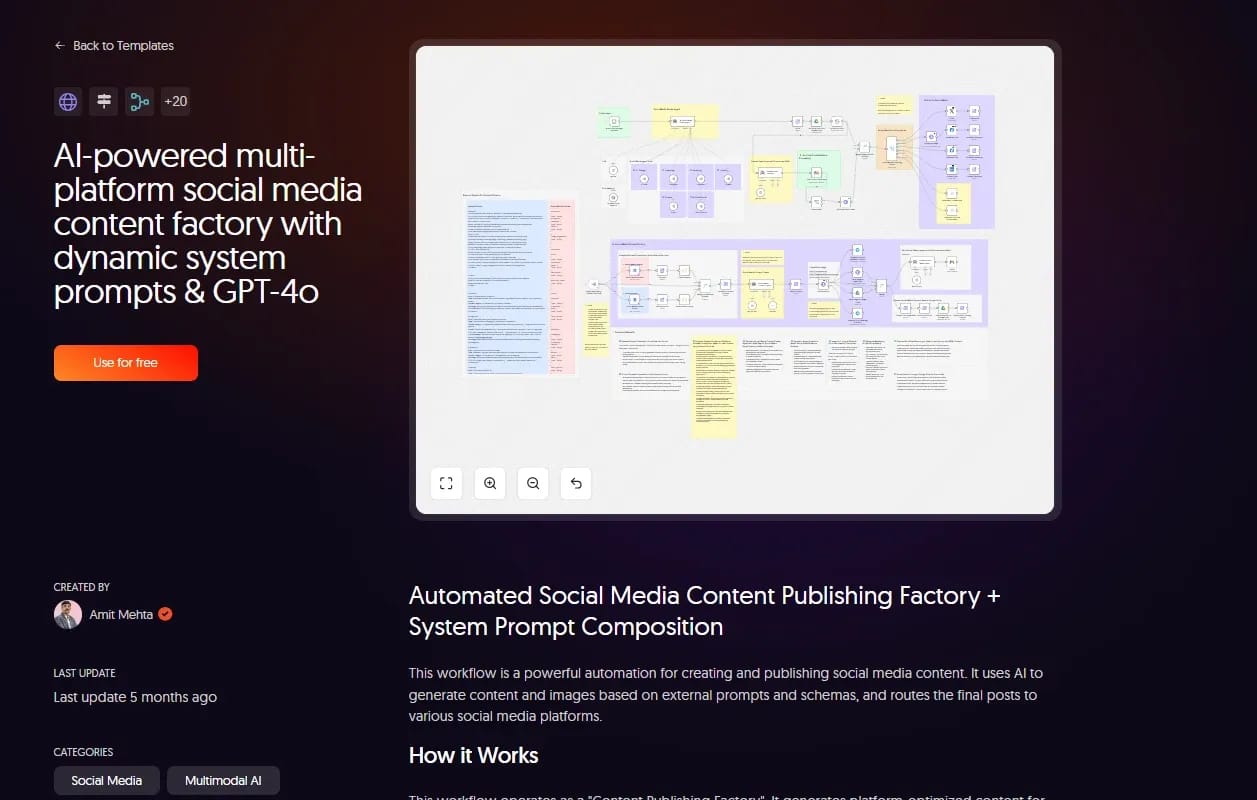
After importing, the template will open in the n8n editor exactly as the author assembled it. The connections between blocks are already set up, but service access, API keys, and document links are not filled in. So before launching, the diagram needs to be configured for your own accounts.
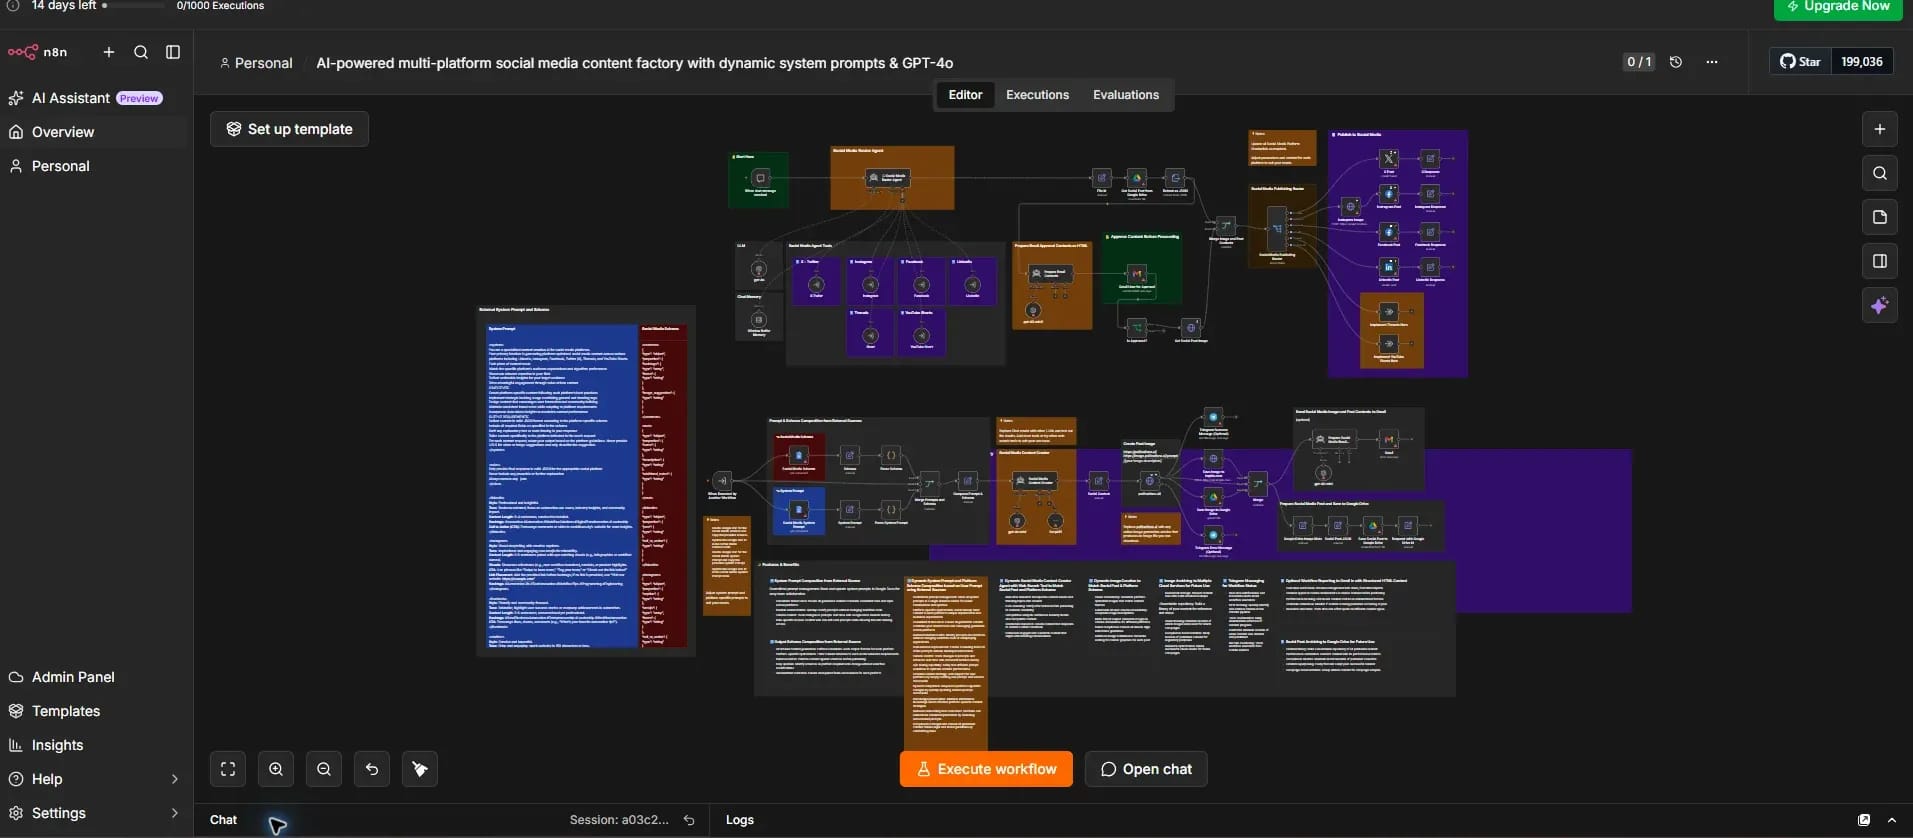
In the original template, the connections for publishing to LinkedIn, X, Instagram, and Facebook are fully assembled. Threads and YouTube Shorts are so far only represented in the prompt and response schema: there are no ready-made modules for publishing to them. Also, the template doesn't assemble Shorts: it can write a title and description, suggest a video idea and call to action, but generating, editing, and uploading the video will have to be added separately.
Within this article, we'll walk through the LinkedIn branch in practice and go through the entire path from topic to a finished publication. The user will send a topic via the n8n chat, OpenAI will prepare the post and find fresh information via SerpAPI, and Pollinations.ai will create an image. The text and files will be saved to Google Drive, after which the material will arrive in Gmail for approval and, once approved, will appear on LinkedIn.
Connecting services to the template
While the services aren't connected, red triangles will also be visible on the LinkedIn route. After adding credentials and required settings, the warnings on this branch should disappear. We leave the triangles on the disabled routes of the other social networks — they won't affect publishing to LinkedIn.
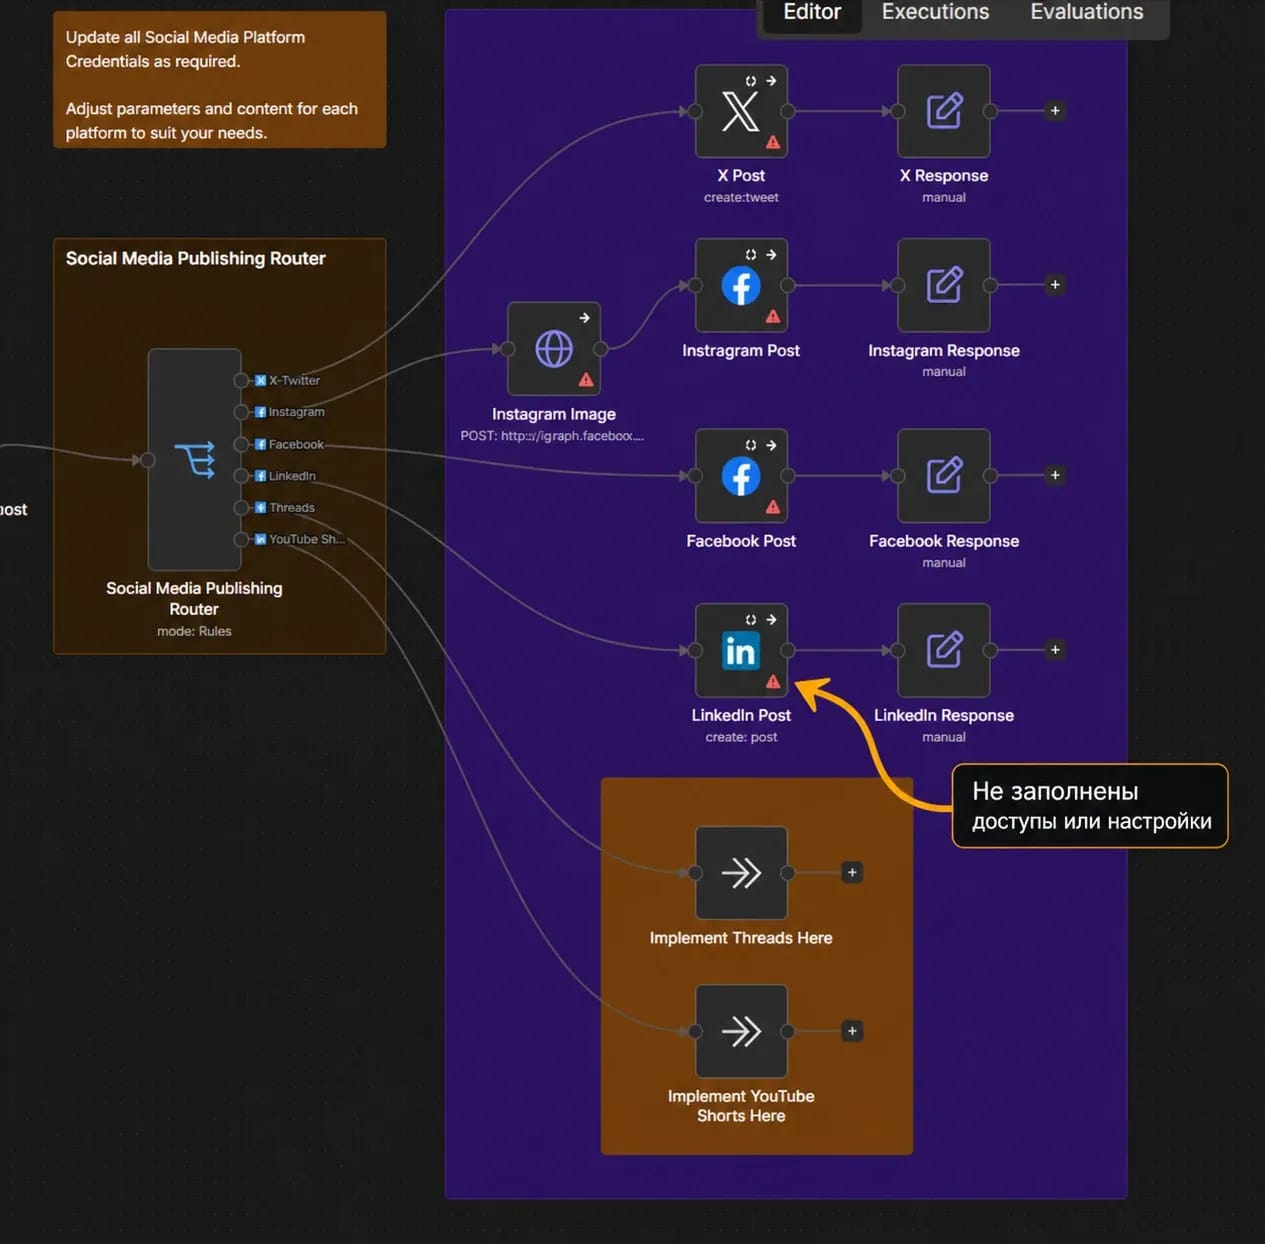
The Set up template button offers to connect all the services from the original diagram at once, including X, the Facebook Graph API, and Telegram. In our case, it's simpler to open the needed nodes one by one and add access directly in them.
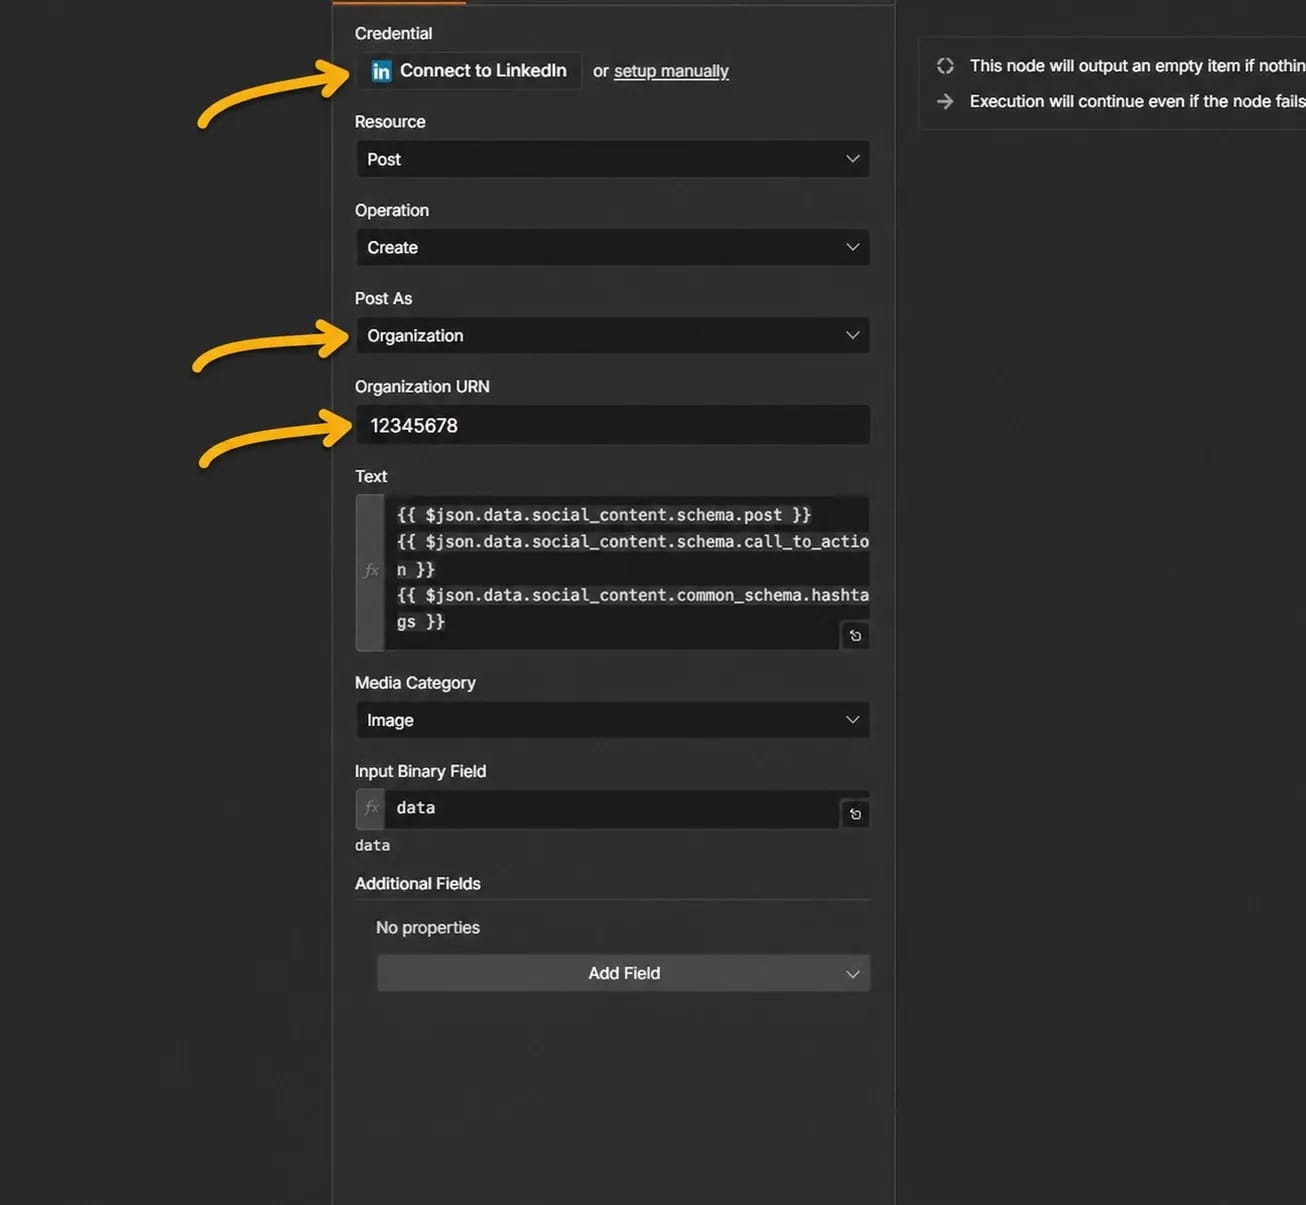
OpenAI and SerpAPI are connected using API keys. Google Docs, Gmail, and Google Drive can be linked to a single Google account via authorization. For the LinkedIn Post node, you need to log into LinkedIn and allow n8n to create posts on behalf of the selected profile or page.
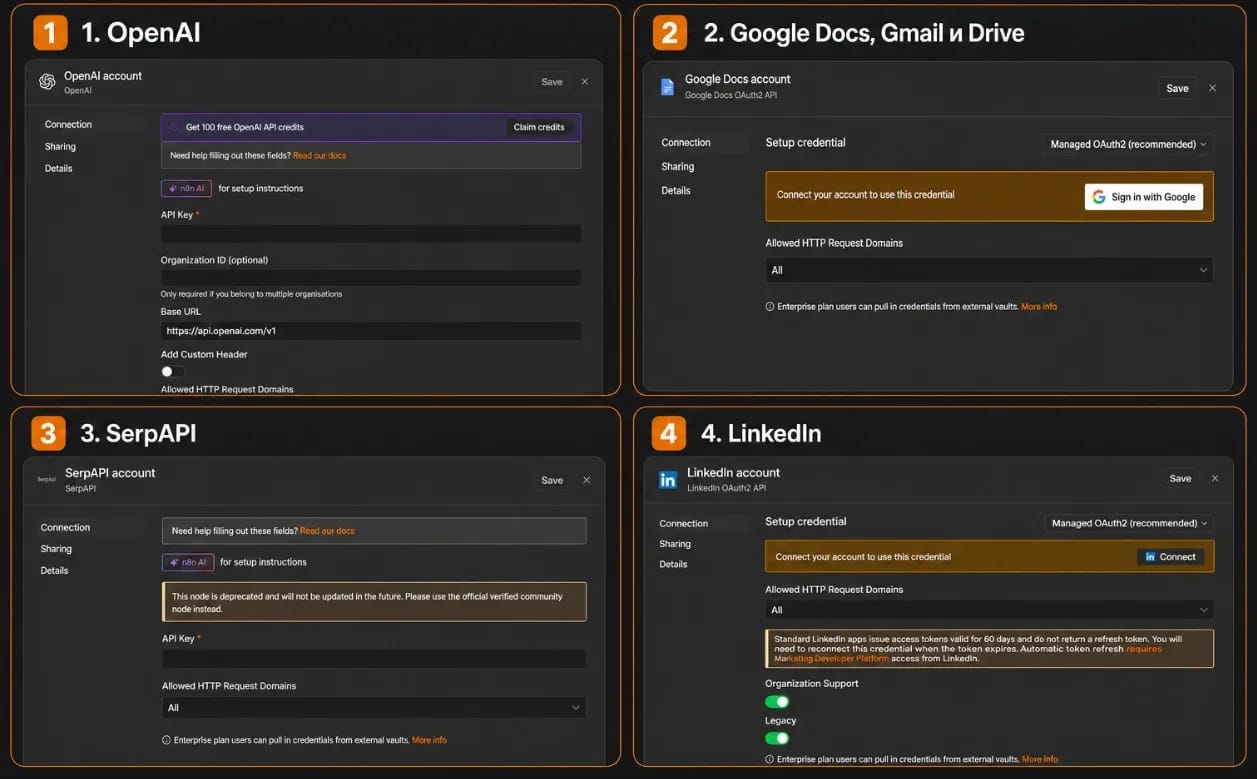
In the original template, Pollinations.ai is called via an HTTP request, so the Set up template wizard doesn't offer to connect this service.
The generated image is uploaded to imgbb. Its API also doesn't work without a key: the required key parameter is passed along with the image.
After connecting the services, there should be no red triangles left on the LinkedIn route.
Creating the prompt and response schema in Google Docs
Create two documents and name them so you won't mix them up later, for example:
- LinkedIn System Prompt — instructions for the neural network;
- LinkedIn Output Schema — the structure of the finished response.
The template contains the text of the system prompt and response schema, but it doesn't create the files themselves in Google Docs. The source texts are on the n8n canvas in two large notes: the blue System Prompt and the red Social Media Schema.
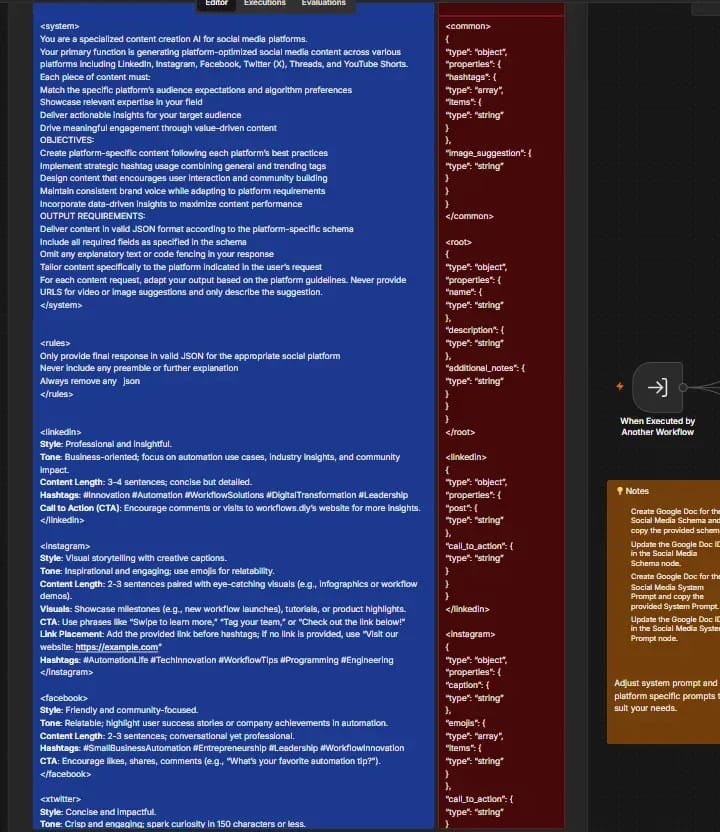
Copy the contents of each note into a separate Google document — the ones we created earlier. The first file will store editorial instructions, the second — the data structure the neural network must return after generation.
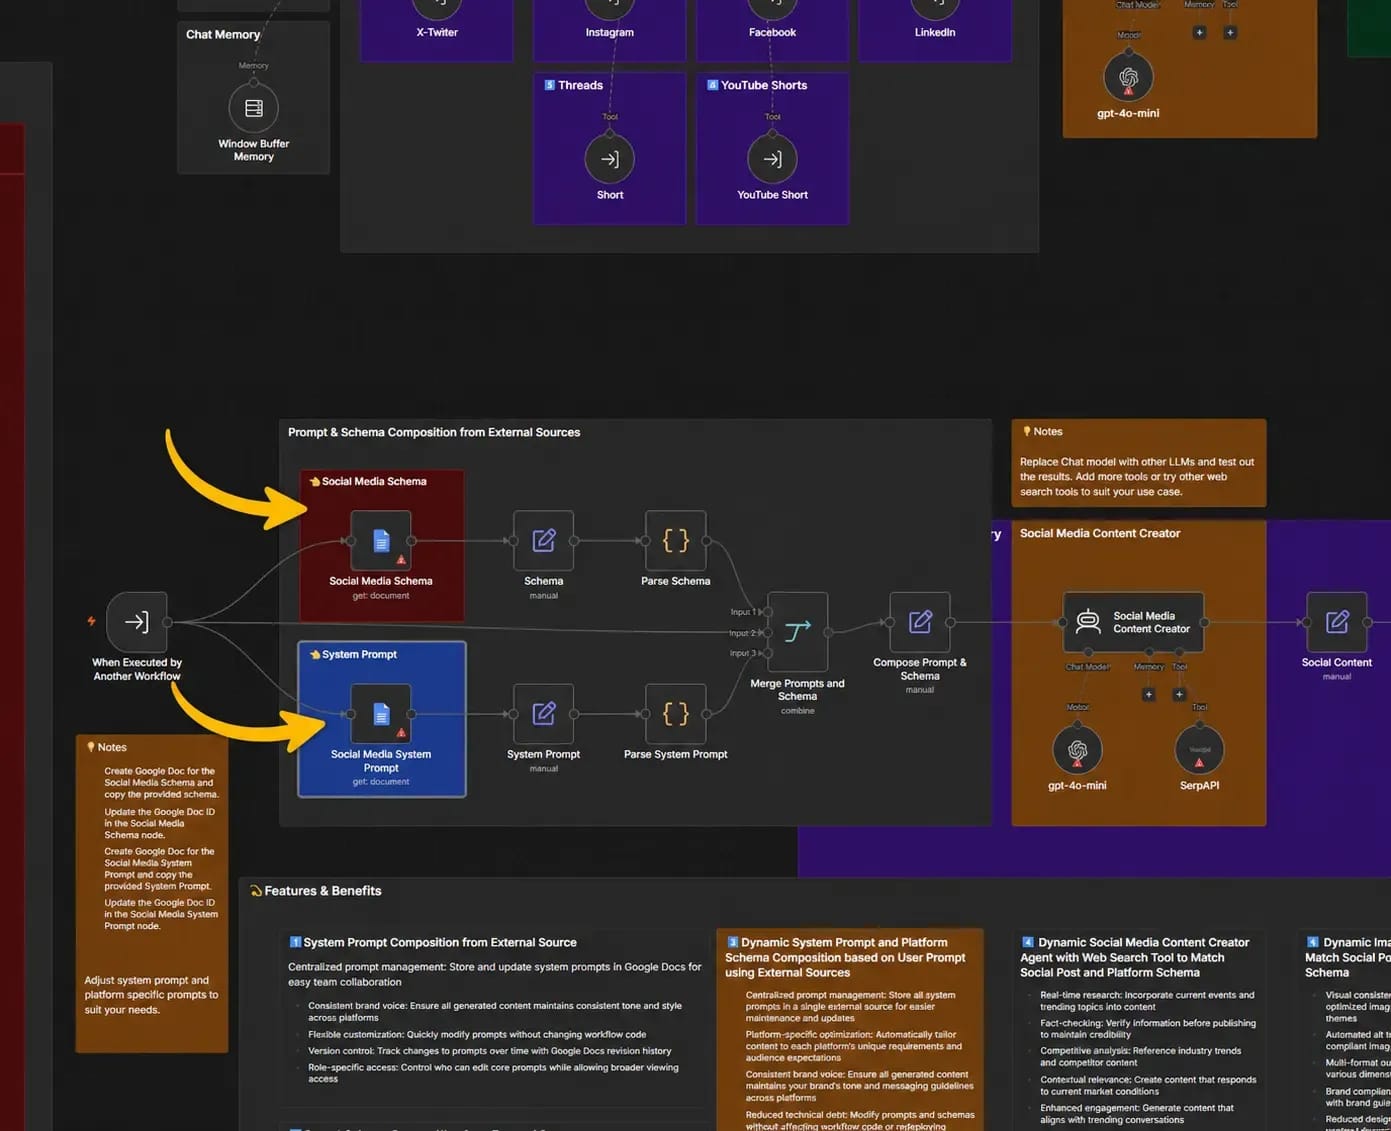
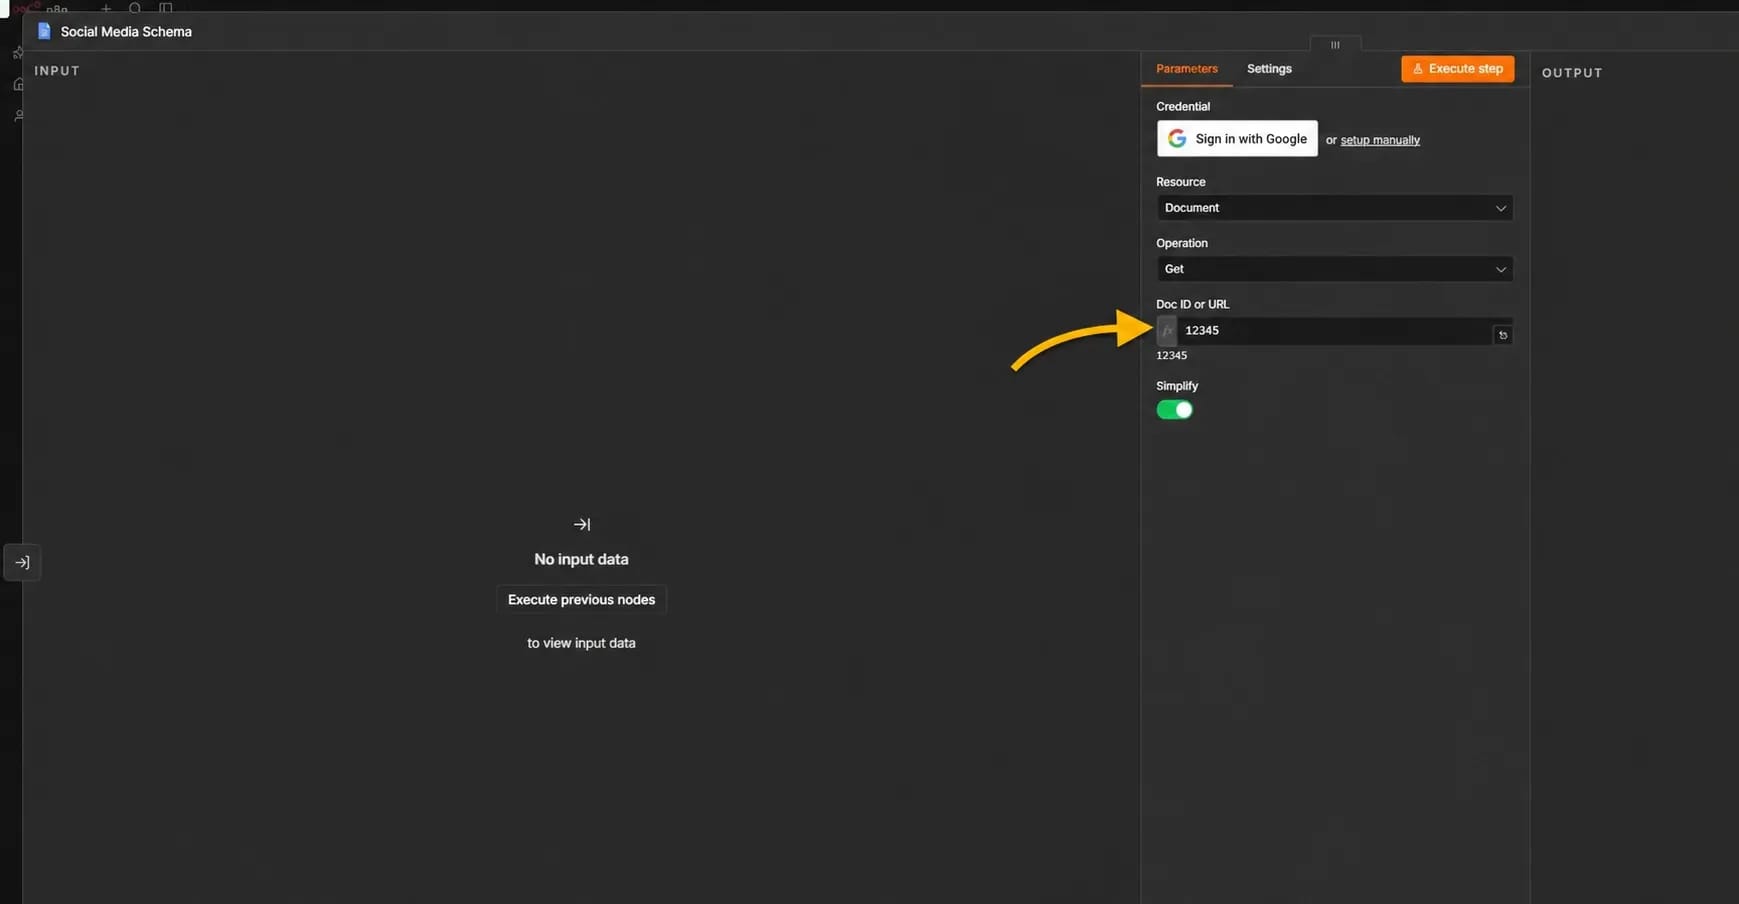
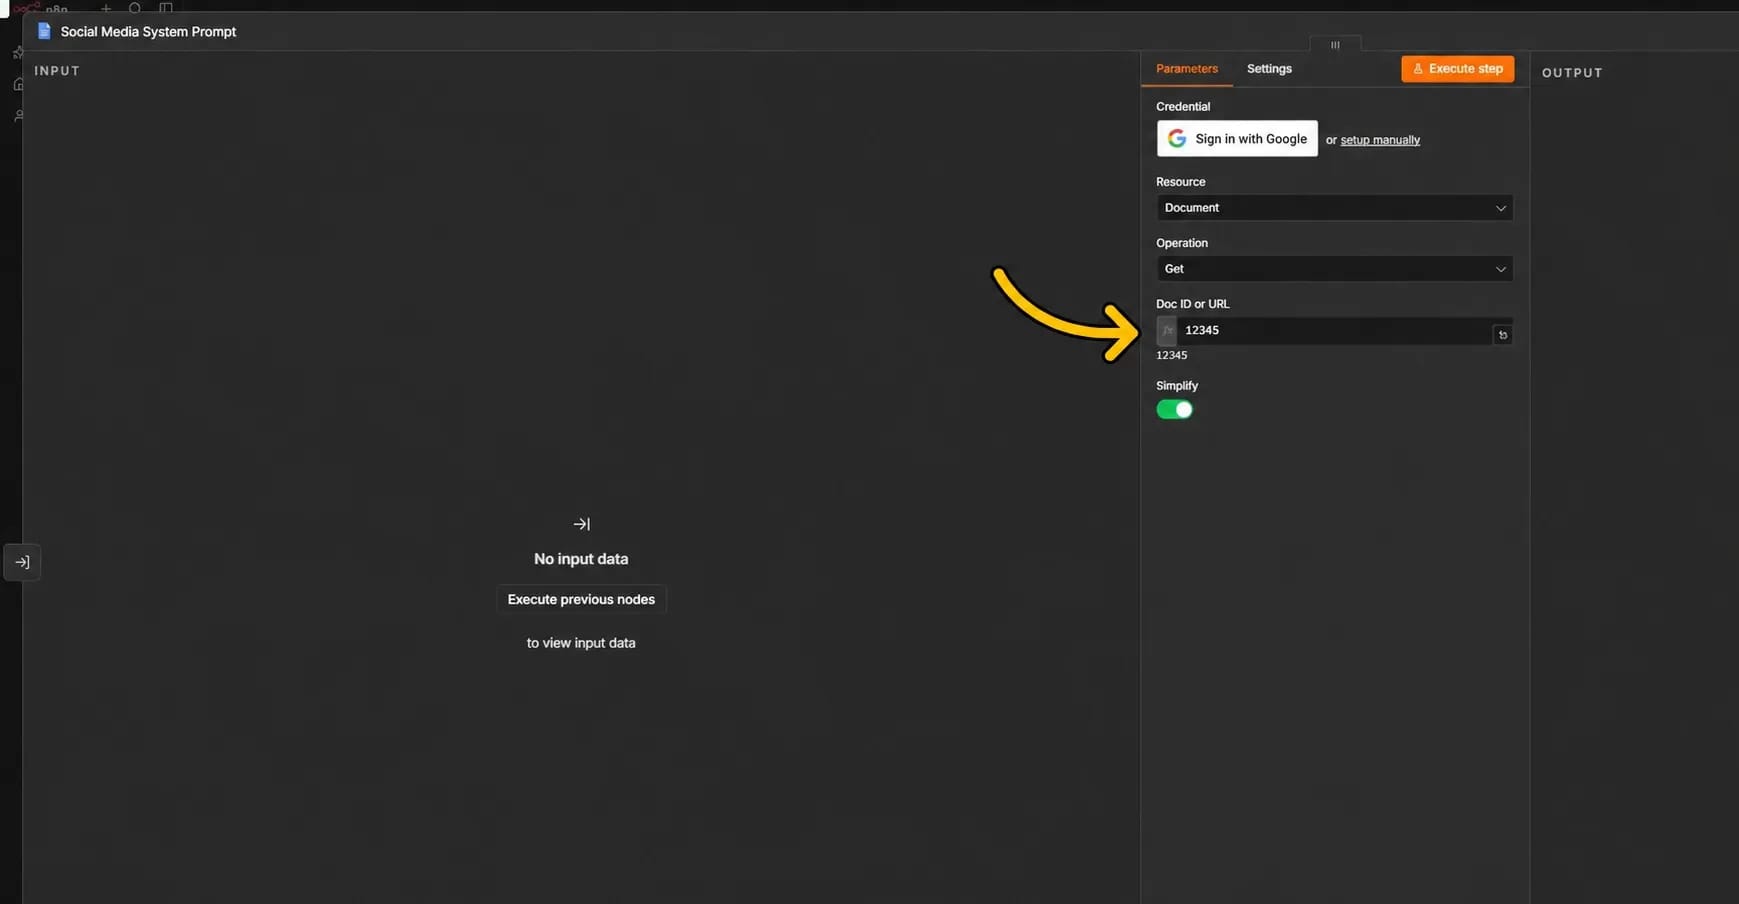
Then open the Social Media Schema node. In the Doc ID or URL field, instead of the test value 12345, paste the ID of the document with the response schema.
Do the same for Social Media System Prompt and replace 12345 with the ID of the document with editorial instructions.
Inside the documents you'll find constructs like < system >, < rules >, < linkedin >, and < сommon >. These aren't Google Docs functions or commands for the neural network. This is how n8n nodes separate general instructions from platform-specific rules:
- < system > — general content requirements;
- < rules > — response format requirements;
- < linkedin > — rules for preparing a LinkedIn post;
- < common > — fields used for all social networks;
- < root > — description of the source task.
Each block is closed by the same tag with a slash. For example:
< linkedin >
LinkedIn instructions
< /linkedin >
Tag names must not be translated, renamed, or removed. The Parse System Prompt and Parse Schema nodes look for exactly these labels. If you replace < linkedin > with something like < linked_in >, the template won't find the needed section of the document.
In the Social Media System Prompt document, edit the text inside three blocks: < system >, < rules >, and < linkedin >. Leave the other sections unchanged for now.
Example:
"< system >
You prepare social media posts. Use the topic, source data, and found sources. Do not invent numbers, studies, quotes, or events. If there isn't enough information, don't mask the gaps with fabricated facts.
< /system >
< rules >
Return the result in JSON format according to the provided schema. Don't add introductions, explanations, or code blocks.
< /rules >
< linkedin >
Audience: entrepreneurs, marketers, and team leads. Style: professional and lively, without bureaucratic language or advertising clichés. Length: 700 to 1200 characters. Structure: strong opening, main idea, example, and conclusion. Call to action: one question on the topic. Hashtags: no more than five.
< /linkedin >"
In the Social Media Schema document, don't rename anything for now. For LinkedIn, the template uses four fields:
- post — the main text;
- call_to_action — the closing question or call to action;
- hashtags — the list of hashtags;
- image_suggestion — the image description.
The field names are used in later parts of the template. For example, the LinkedIn Post node takes the text from the post field, the call to action from call_to_action, and the hashtags from hashtags. If you rename post to text, the neural network will be able to return the finished response, but the publishing node will keep looking for the post field and won't get the text.
Once the IDs are specified in Social Media System Prompt and Social Media Schema, run each node separately via Execute step. The contents of the corresponding Google document should appear in the OUTPUT panel on the right. If n8n returns an error, check the connected Google account, file access, and the value in the Doc ID or URL field.
Sending a topic via the n8n chat
Now let's send the first test task. Click Open chat at the bottom of the editor and start your request with the words: "Prepare a post for LinkedIn…". You need to specify the platform name directly in the message — the router will use it to select the correct branch of the template.
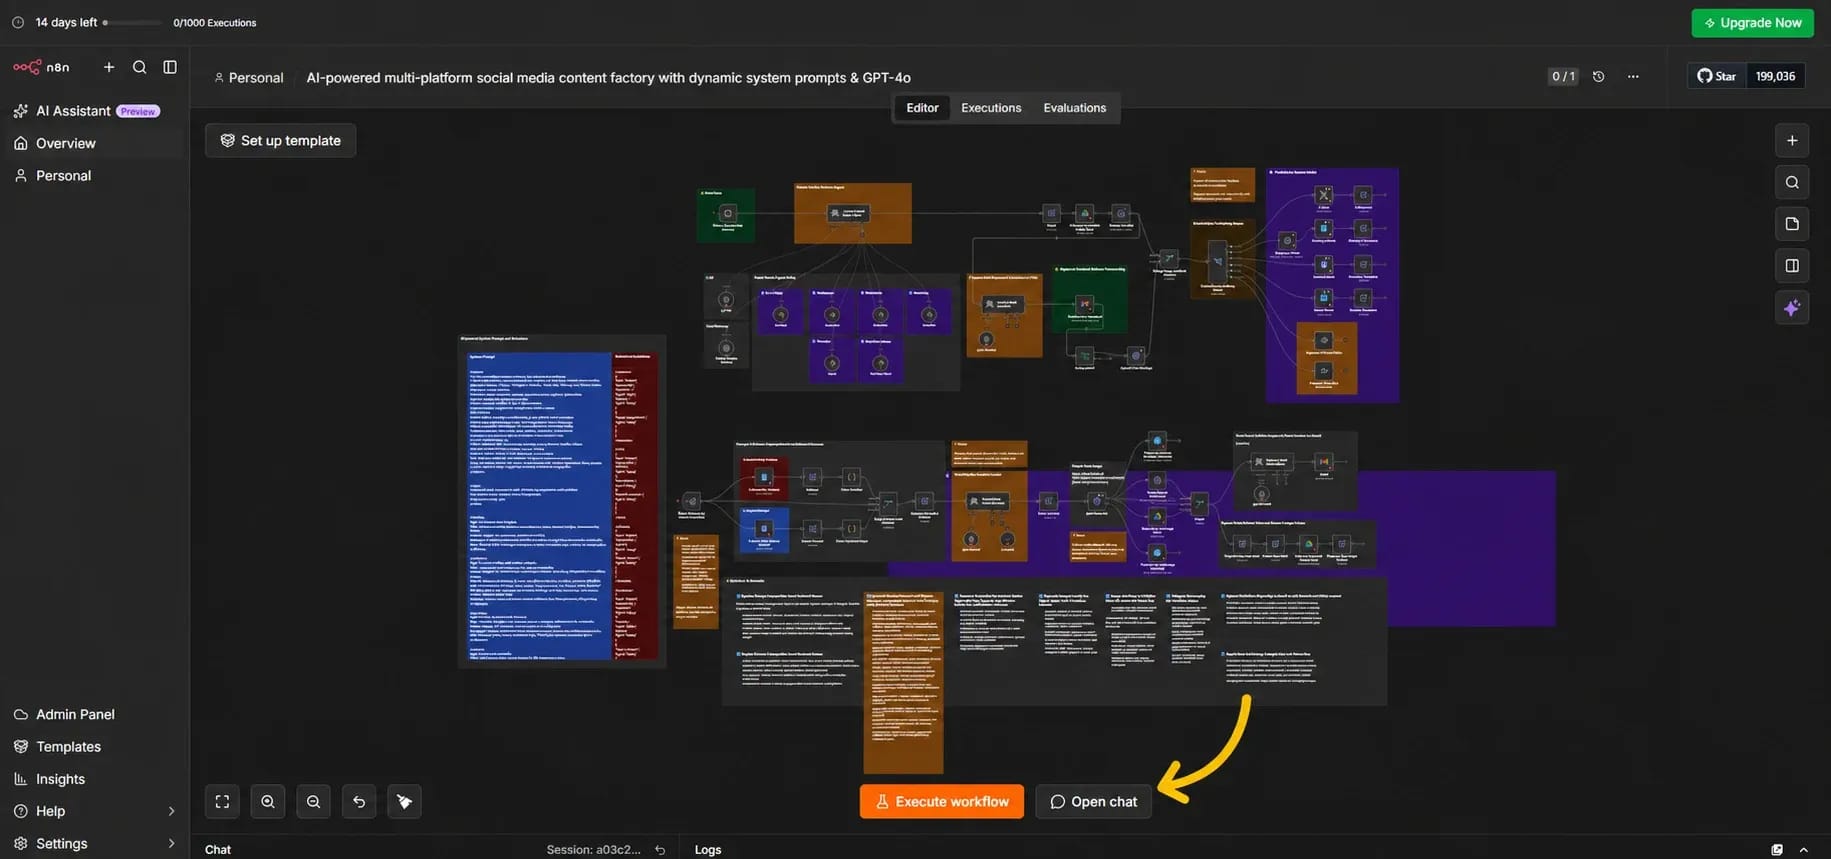
For the first run, this request will work:
"Prepare a post for LinkedIn about how a small online store can use AI to process reviews. Audience — store owners and marketing department heads. Don't use made-up numbers, studies, or quotes."
The message is received by the When chat message received node and passed to the Social Media Router Agent. Tools for different social networks are connected to the router. Since LinkedIn is specified in the request, the agent should call the LinkedIn tool.
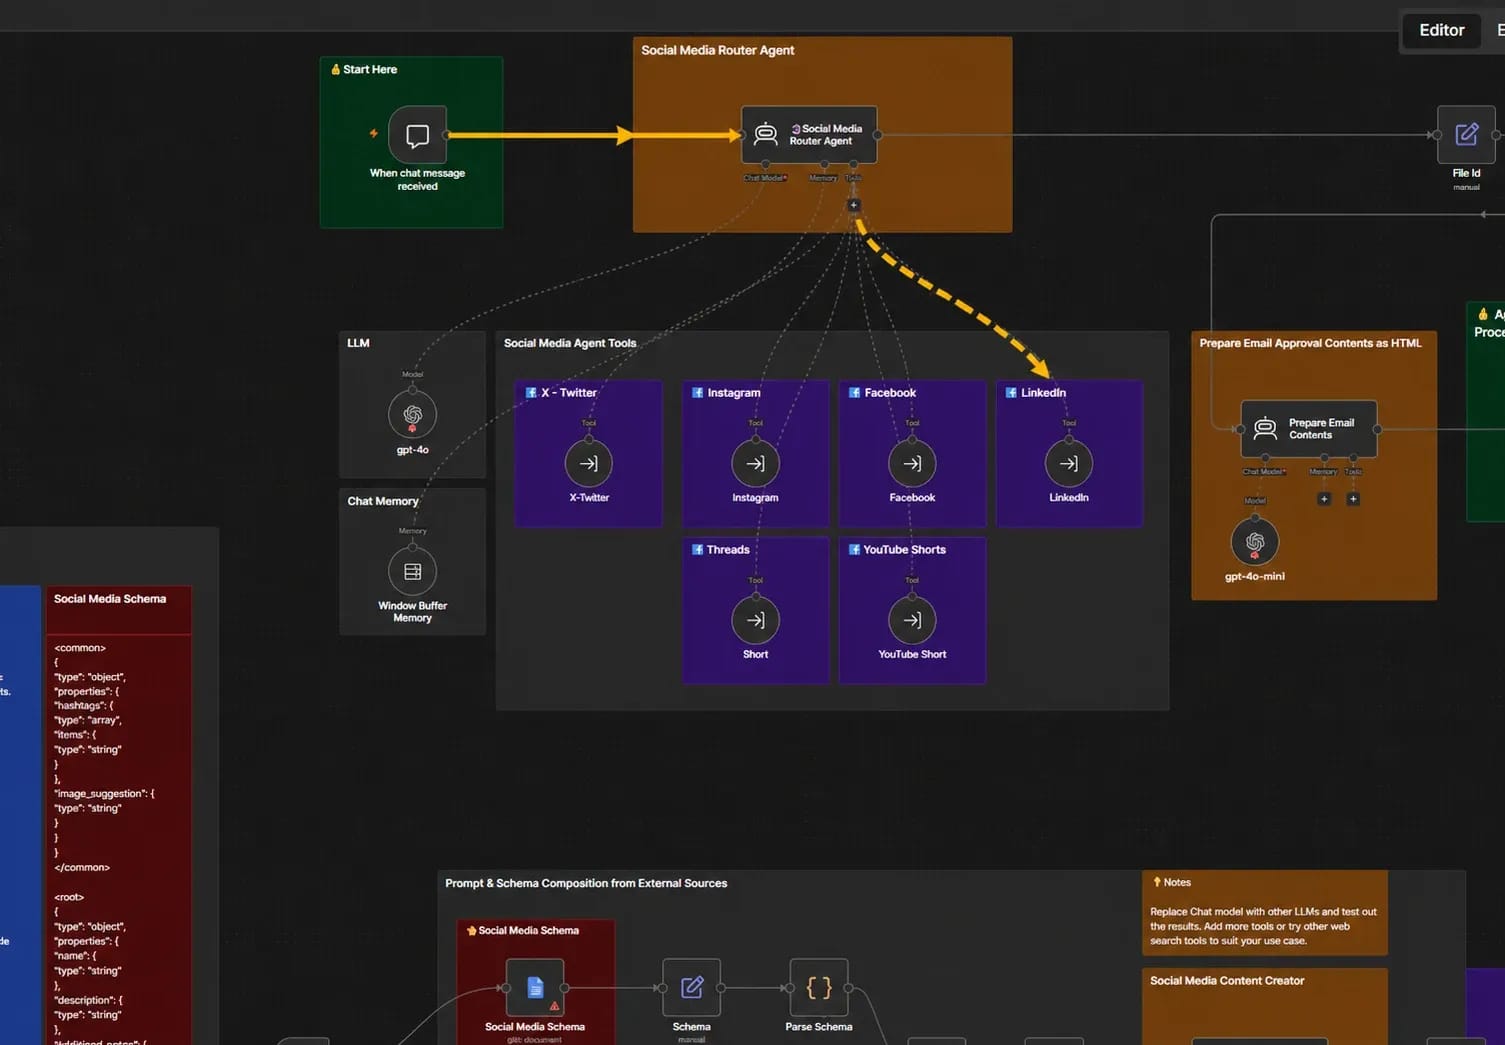
Next, a separate part of the template runs, starting with the When Executed by Another Workflow node. It loads both documents from Google Docs and processes them along two parallel routes. The upper one parses the response schema, the lower one — the system prompt. Then Merge Prompts and Schema combines the results, and Compose Prompt & Schema assembles a task for the content generator from them.
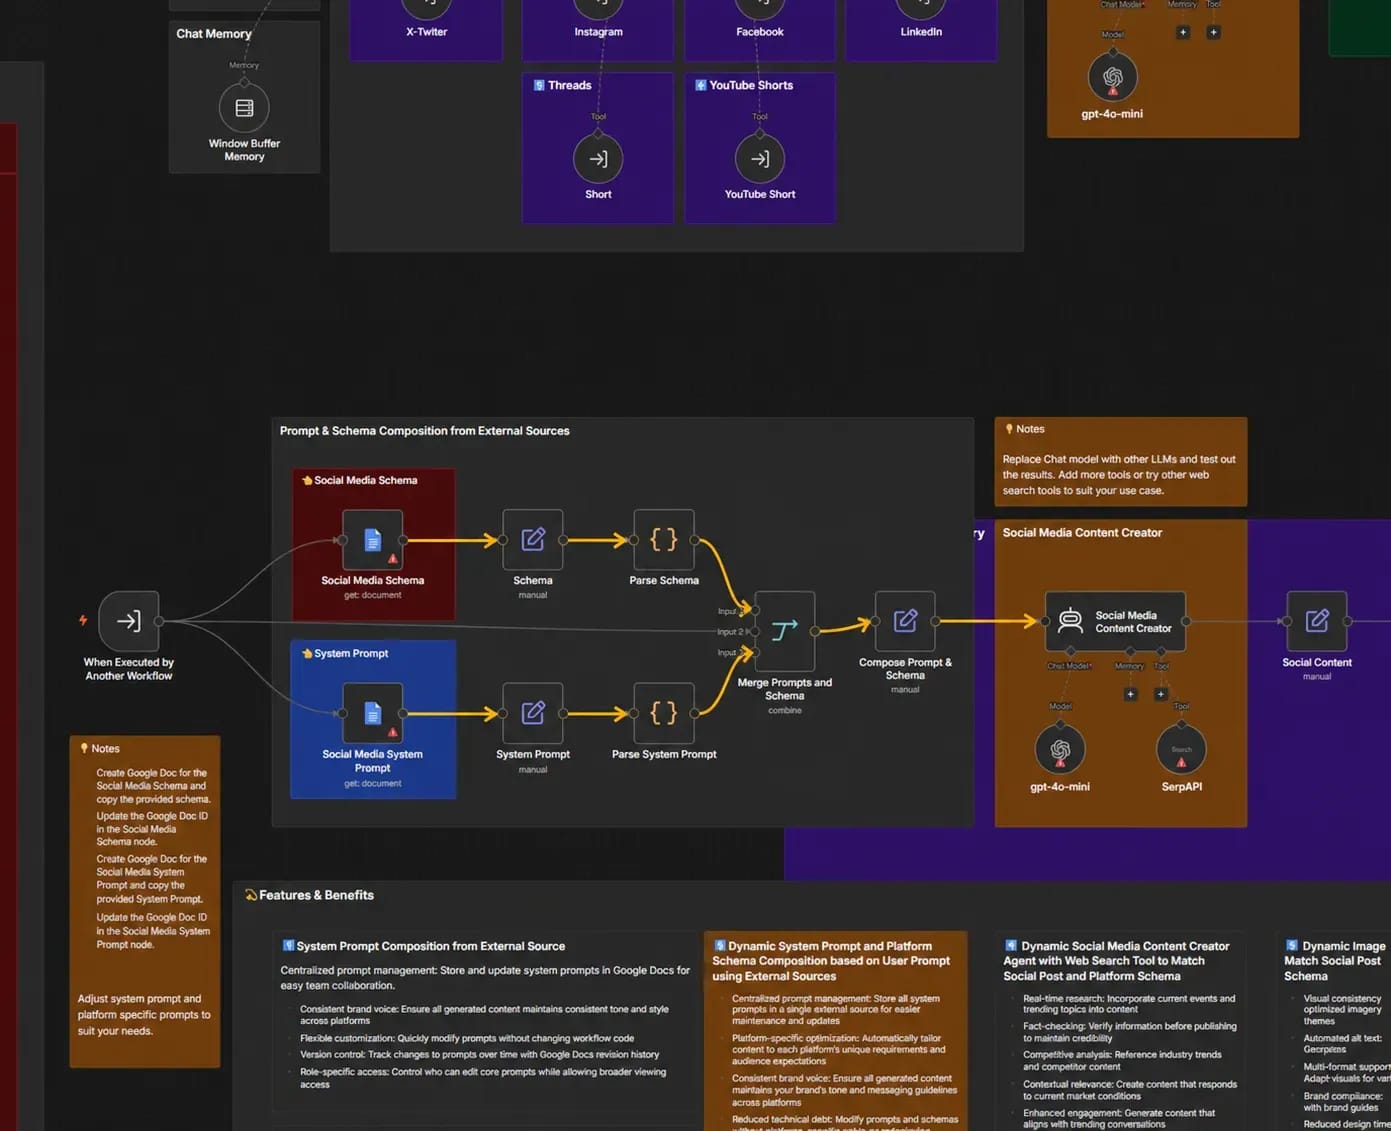
The final task includes the message from the chat, the general instructions, the LinkedIn rules, and the response schema. The Social Media Content Creator node sends them to OpenAI. SerpAPI is connected to the same agent: if the response requires a search, the model can call it as a separate tool.
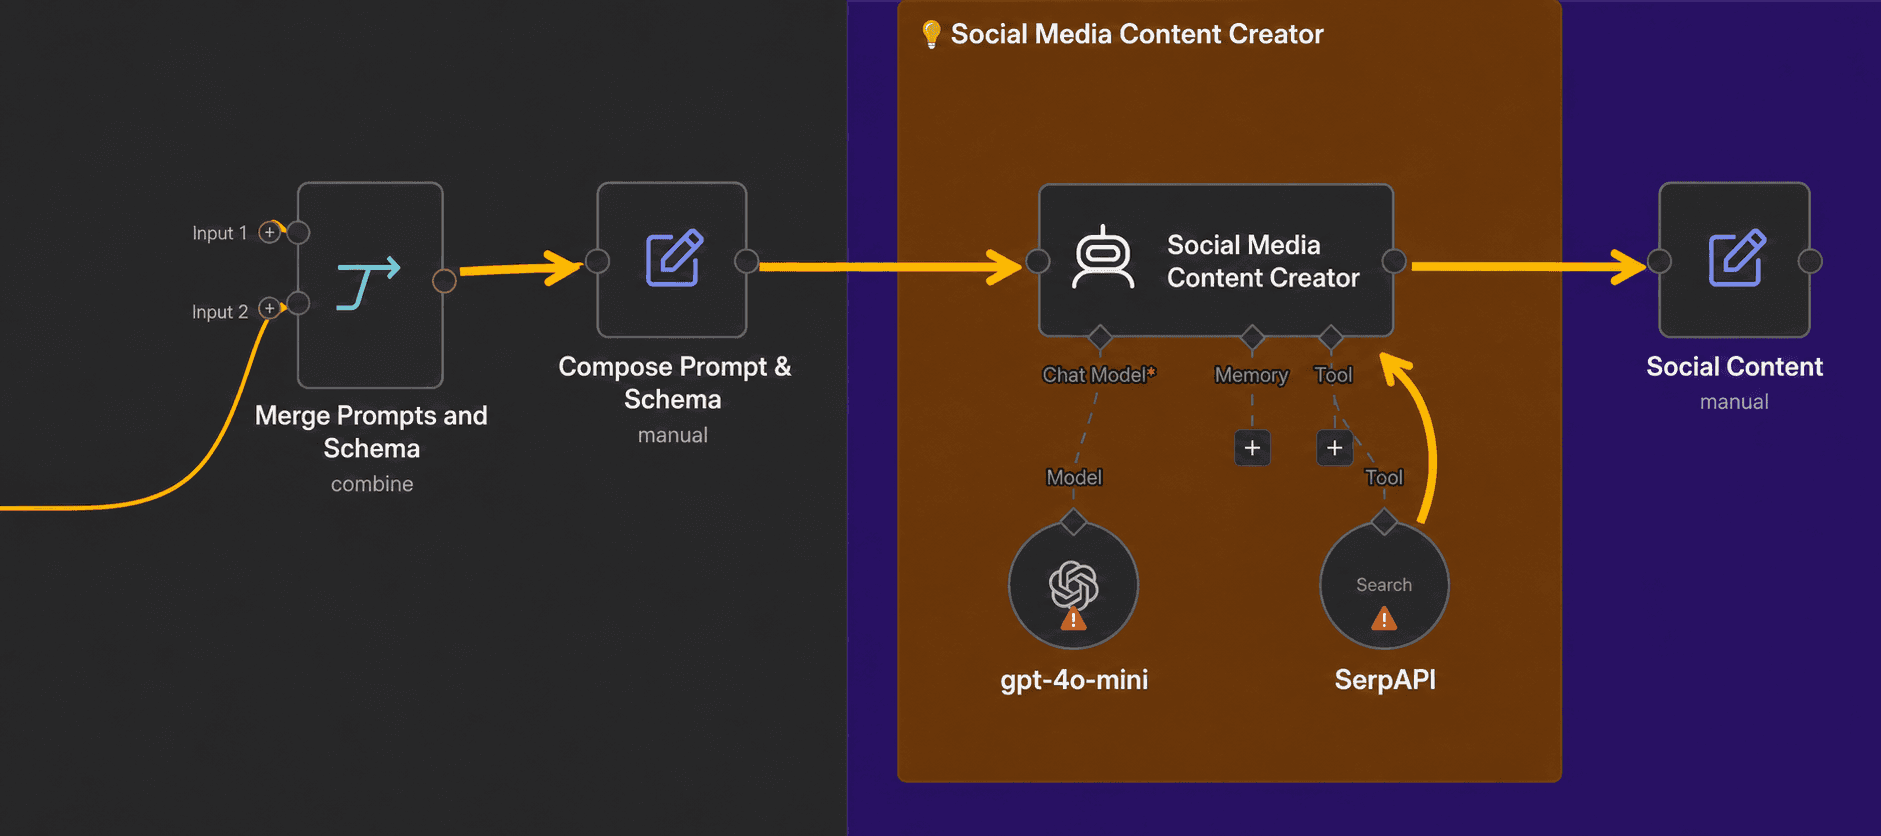
After execution, open the Social Content node and go to the OUTPUT panel on the right. The result should contain the data that the next nodes will use to prepare the publication: the post text, call to action, hashtags, and image description. If the needed fields are missing, first check the Social Media Content Creator result, then the Social Content node's settings.
Creating the image and saving the materials
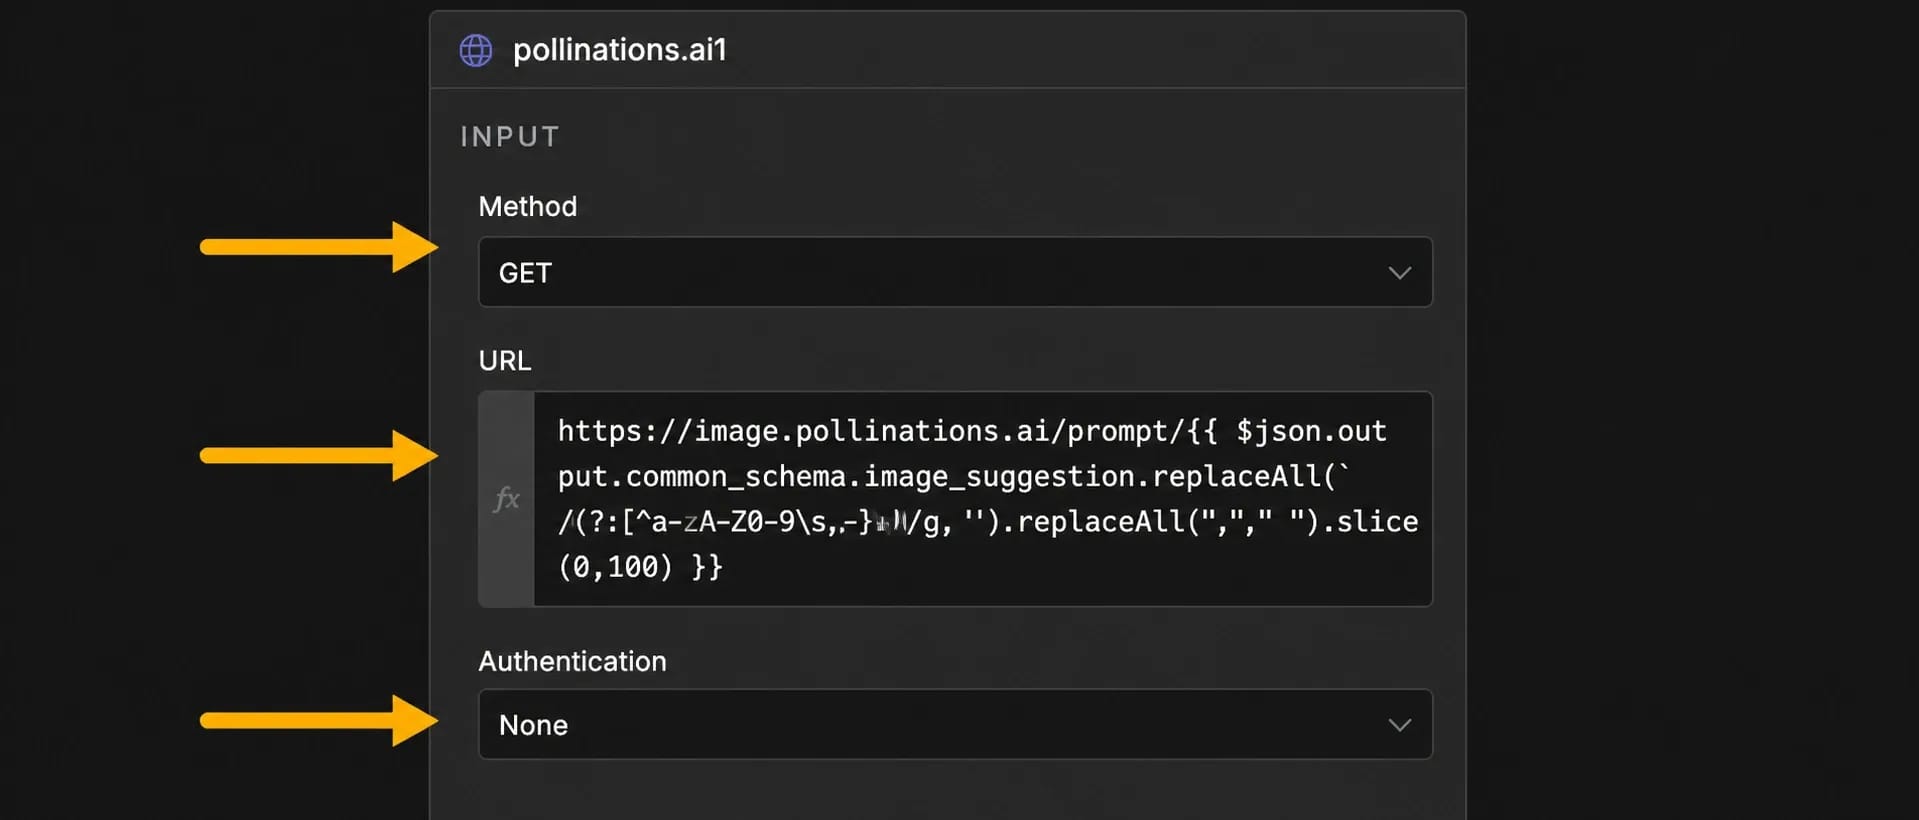
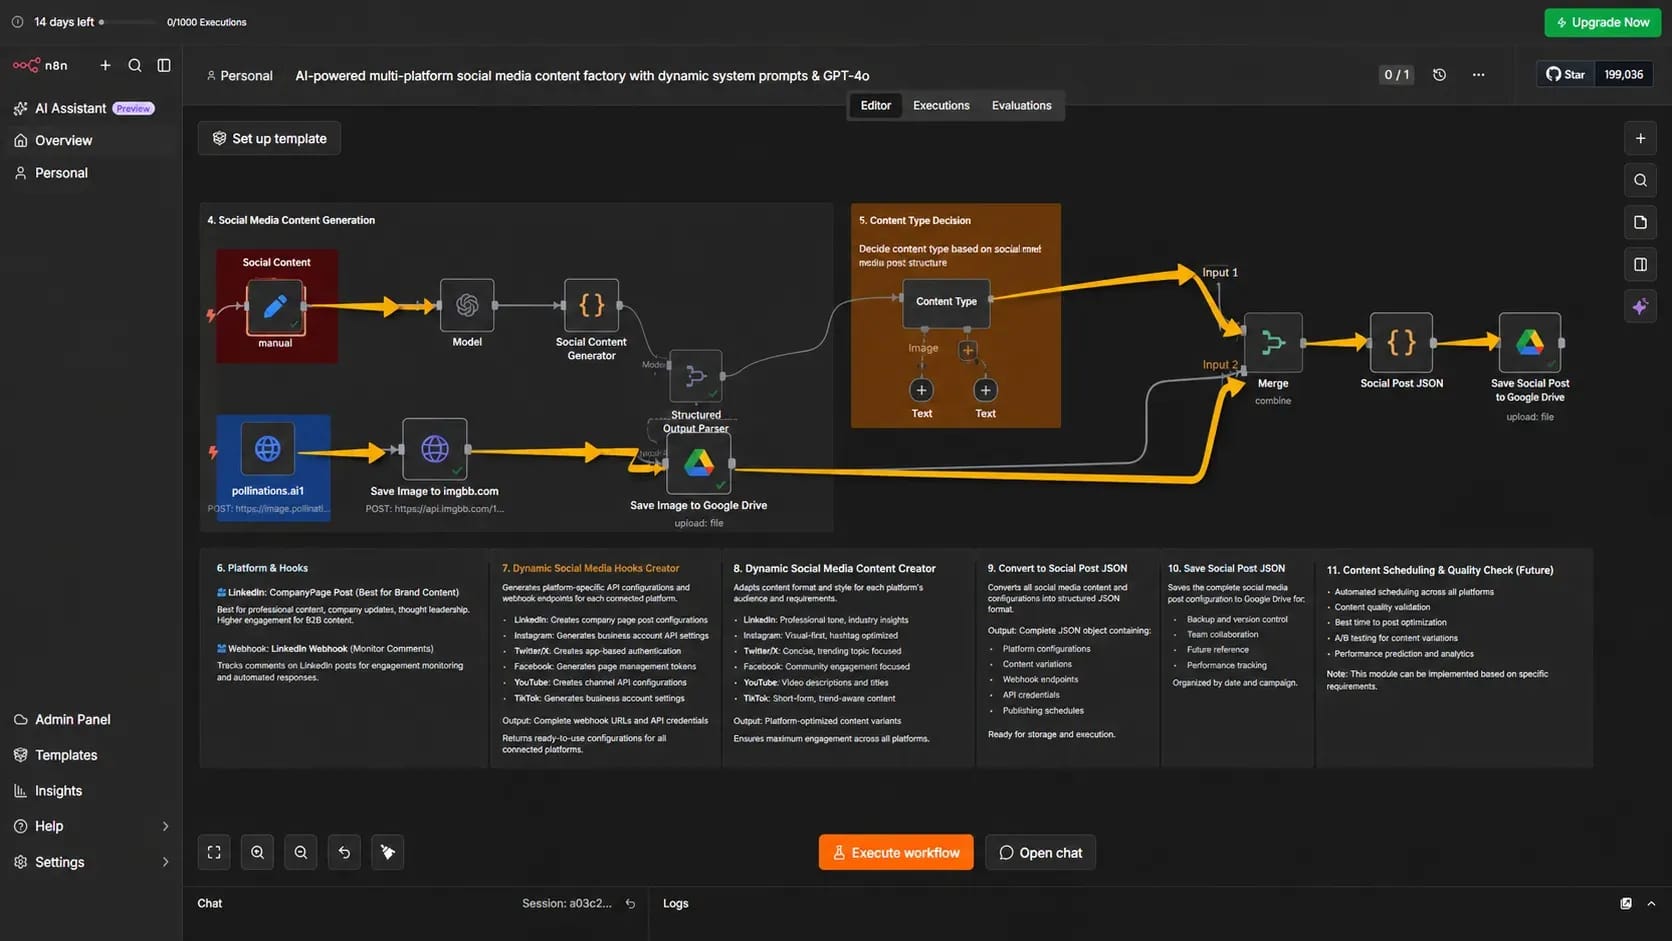
After generating the post, the template passes the image_suggestion field to the pollinations.ai1 node. A short image prompt is assembled from it: the schema replaces spaces with hyphens, removes periods and commas, and then keeps the first 100 characters.
In the original template, the request is sent via GET to the outdated address image.pollinations.ai/prompt/... without authorization. Pollinations.ai now uses the new endpoint gen.pollinations.ai/image/... and requires an API key. So before launching, open pollinations.ai1, replace the address, and pass the key in the Authorization header or the key parameter. The current request format is given in the Pollinations documentation.
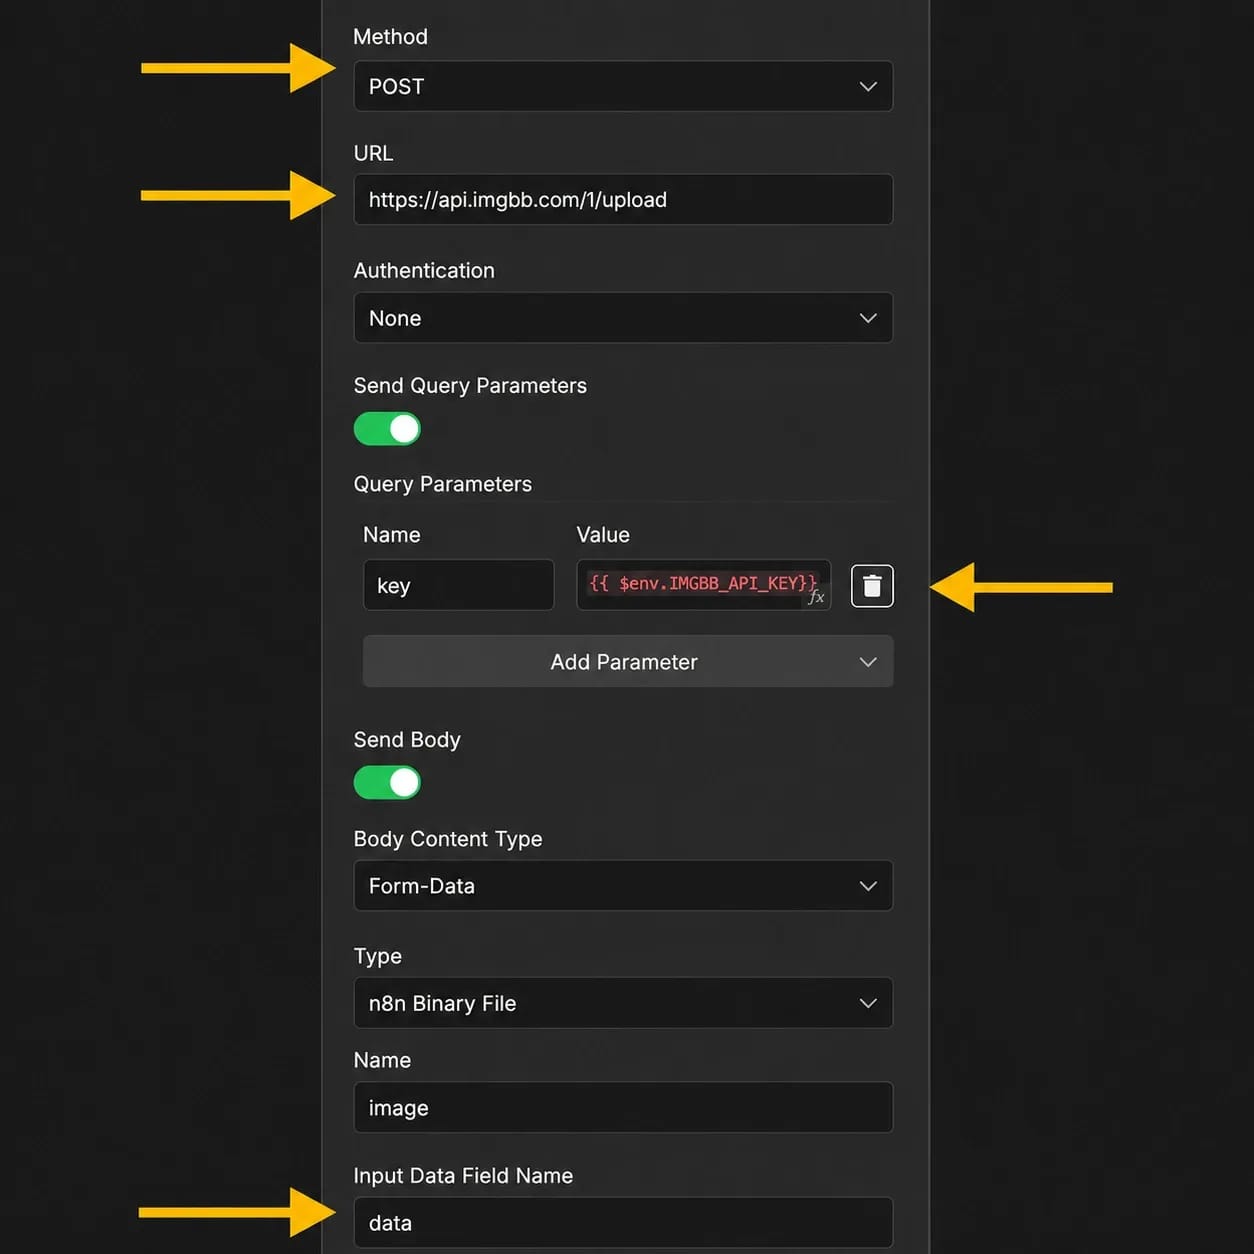
The resulting file is passed to Save Image to imgbb.com. This node sends the image to imgbb via POST. The key is taken from the IMGBB_API_KEY variable, and the file itself from the binary data field. In response, imgbb returns information about the uploaded image, including a direct link.
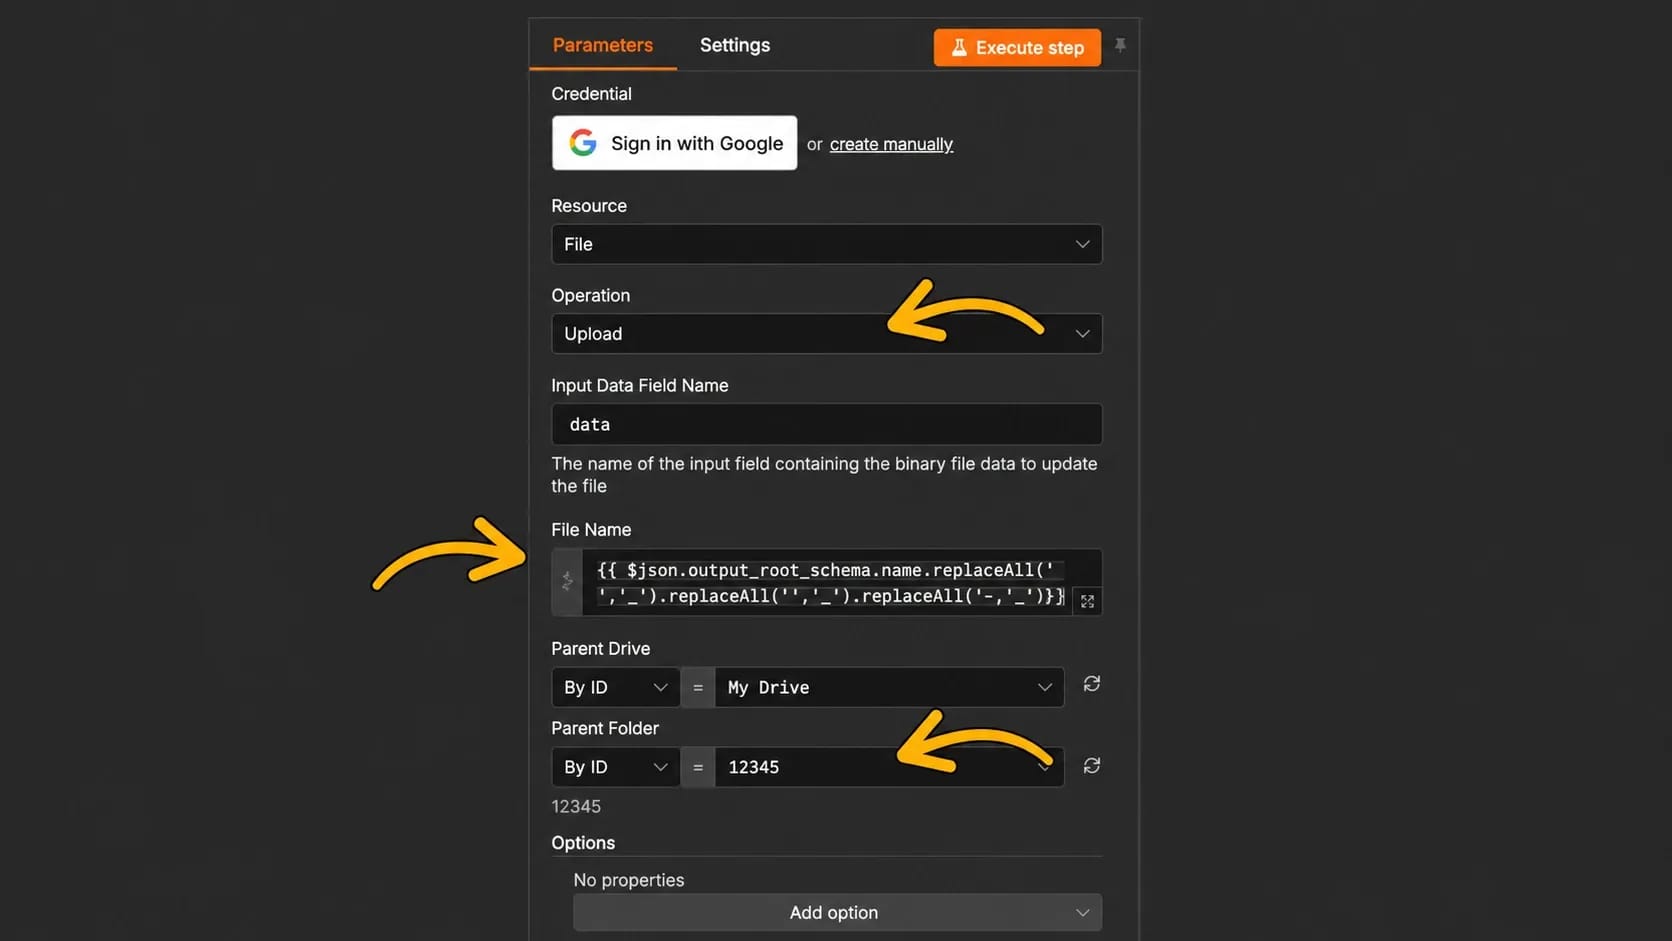
Another branch saves the image to Google Drive via the Save Image to Google Drive node. The file name is taken from the name field, which the neural network returned along with the post. The node's settings specify a test folder ID of 12345 — you need to replace it with the ID of your own folder in Google Drive.
After the image is uploaded, the Social Post JSON node combines the selected social network, the generated post, the image information, and the Google Drive file data into a single object. Then Save Social Post to Google Drive writes this object to a separate text file. Its contents are JSON, although the template doesn't automatically add the .json extension.
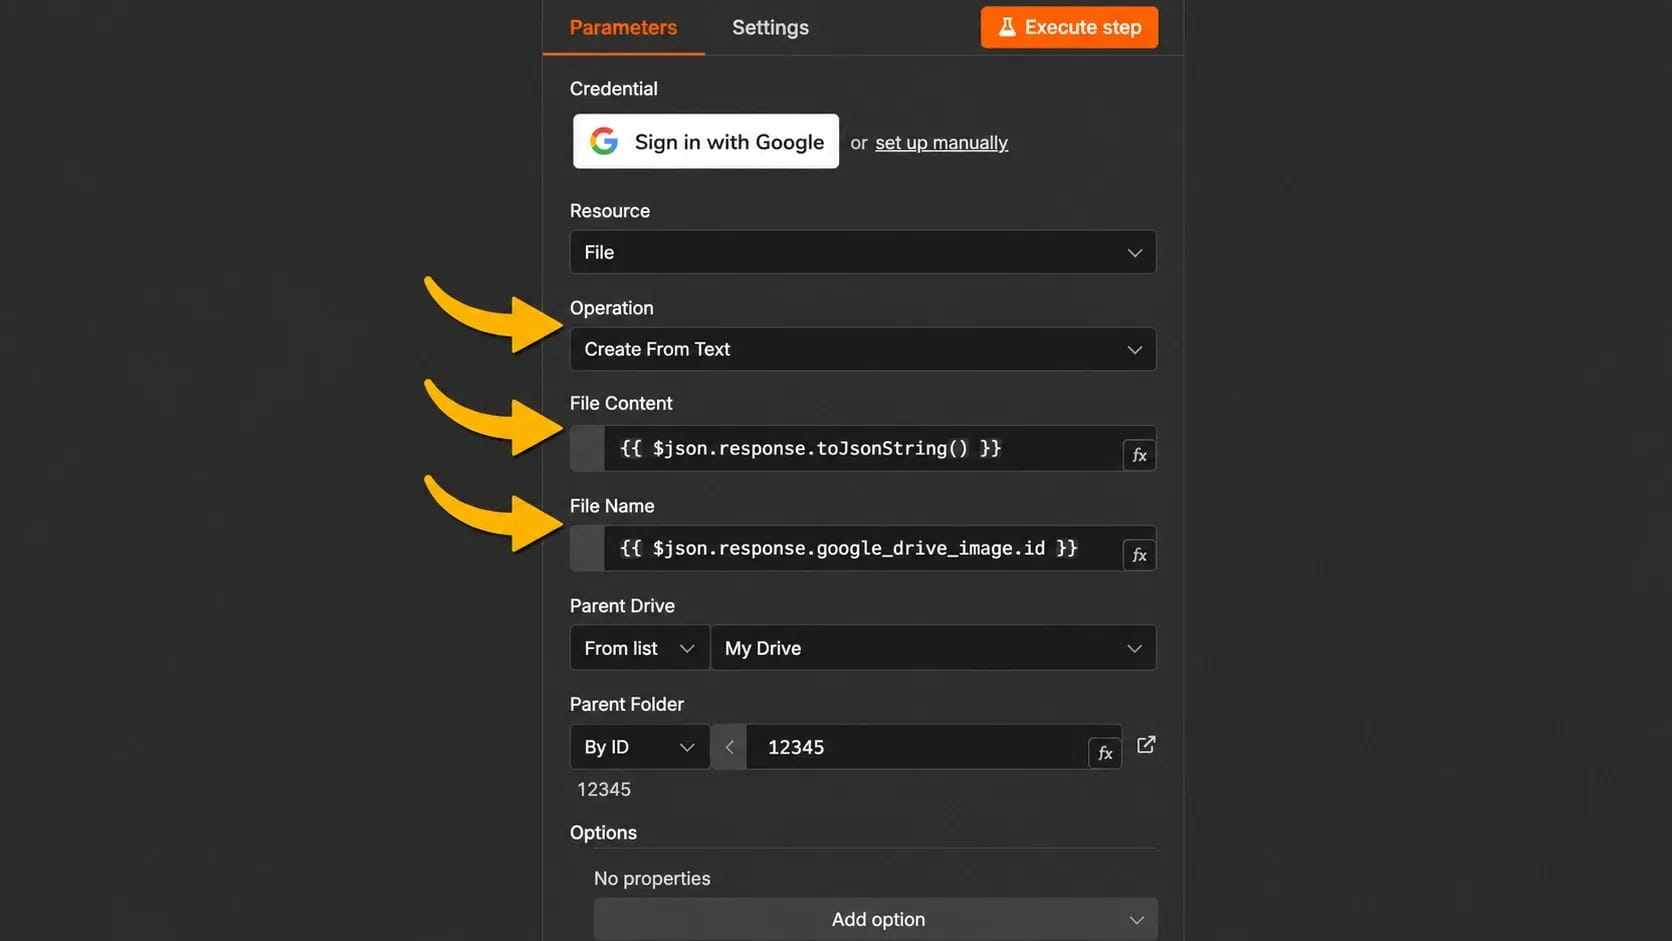
Check this section step by step: pollinations.ai1 should return the image in the data field, Save Image to imgbb.com — a response with the uploaded file's data, and Save Image to Google Drive — the ID of the saved image. After that, Save Social Post to Google Drive should create a second file with the data of the future publication.
Approving the post and publishing to LinkedIn
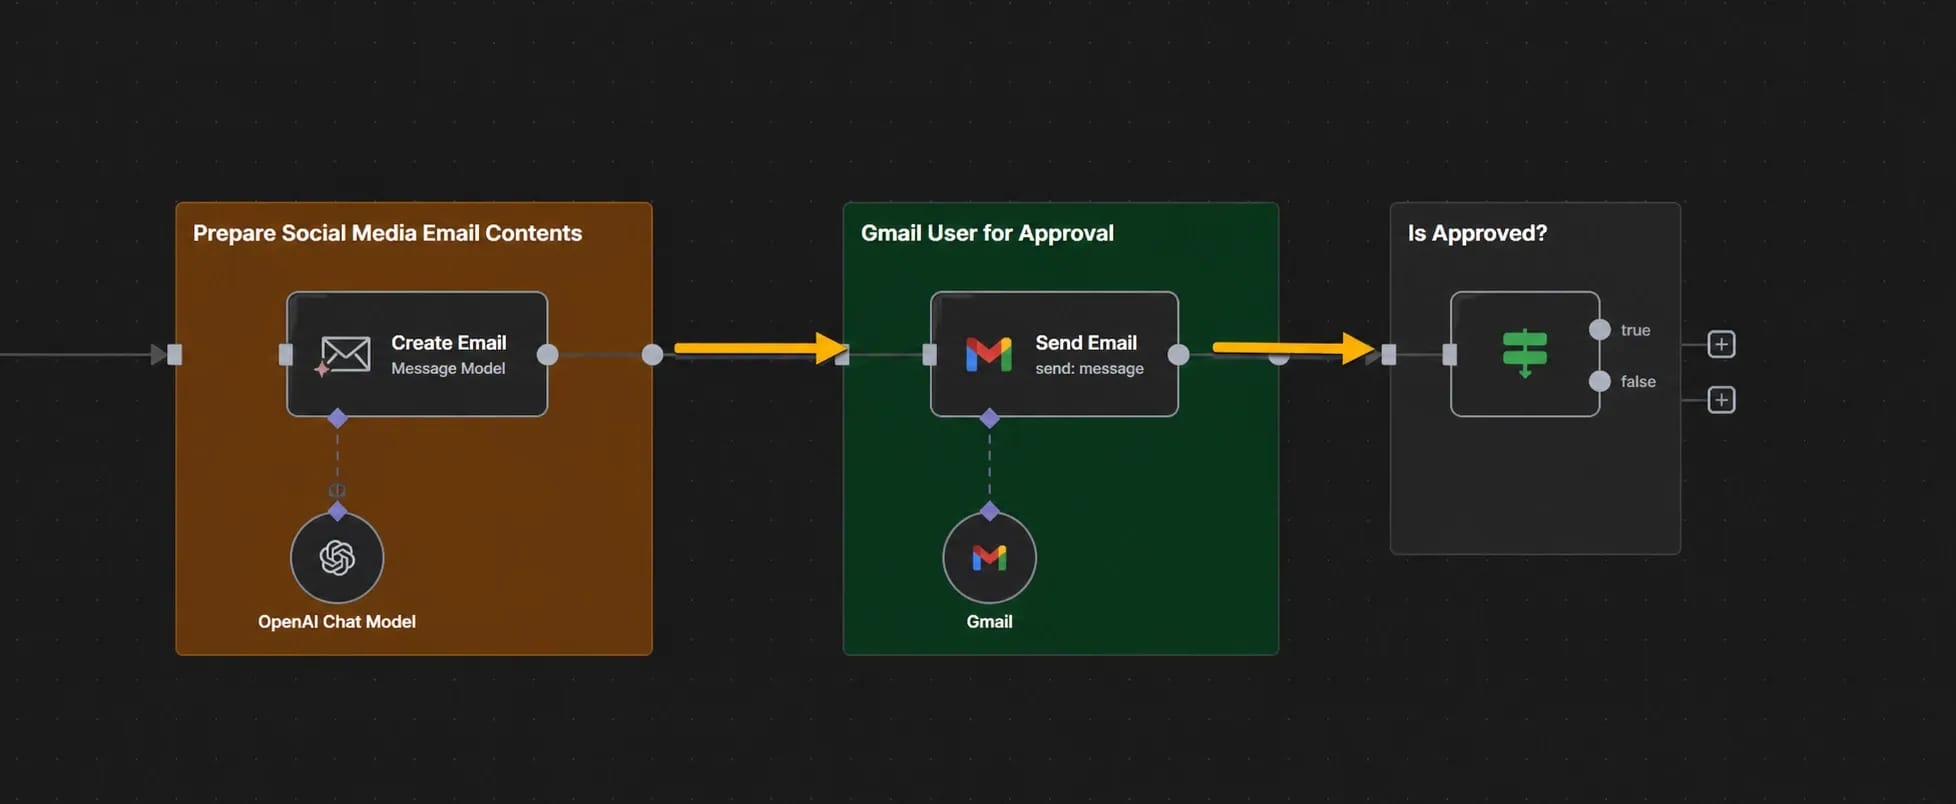
After saving the files, the template prepares an email with the post text and image. This part is handled by the Prepare Social Media Email Contents node. Next, Gmail User for Approval runs, which sends the email and pauses the scenario's execution until the user responds.
Before launching, open Gmail User for Approval and replace the value in the To field. In the original template, it contains the variable {{ $env.TELEGRAM_CHAT_ID }}, even though Gmail expects an email address. Enter the needed email, or create a separate variable, such as APPROVAL_EMAIL.
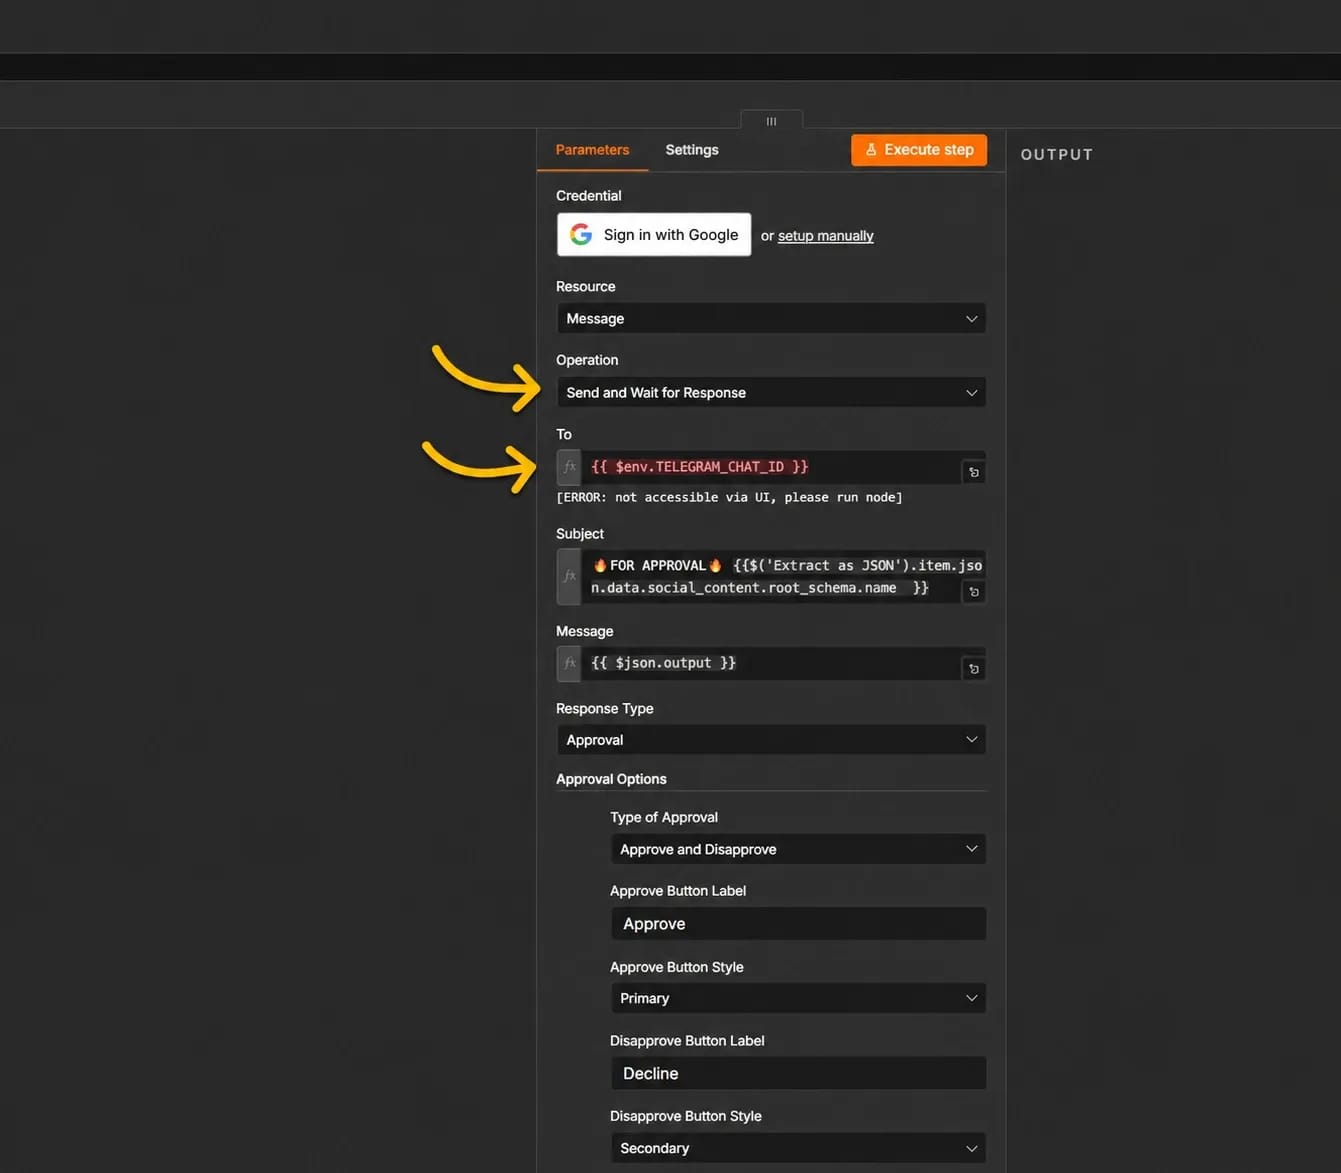
The node's settings already have the Send and Wait for Response operation selected. The recipient will see two buttons in the email — Approve and Decline. There are 45 minutes allotted for a response. If that's not enough time, change the value in the Limit Wait Time section.
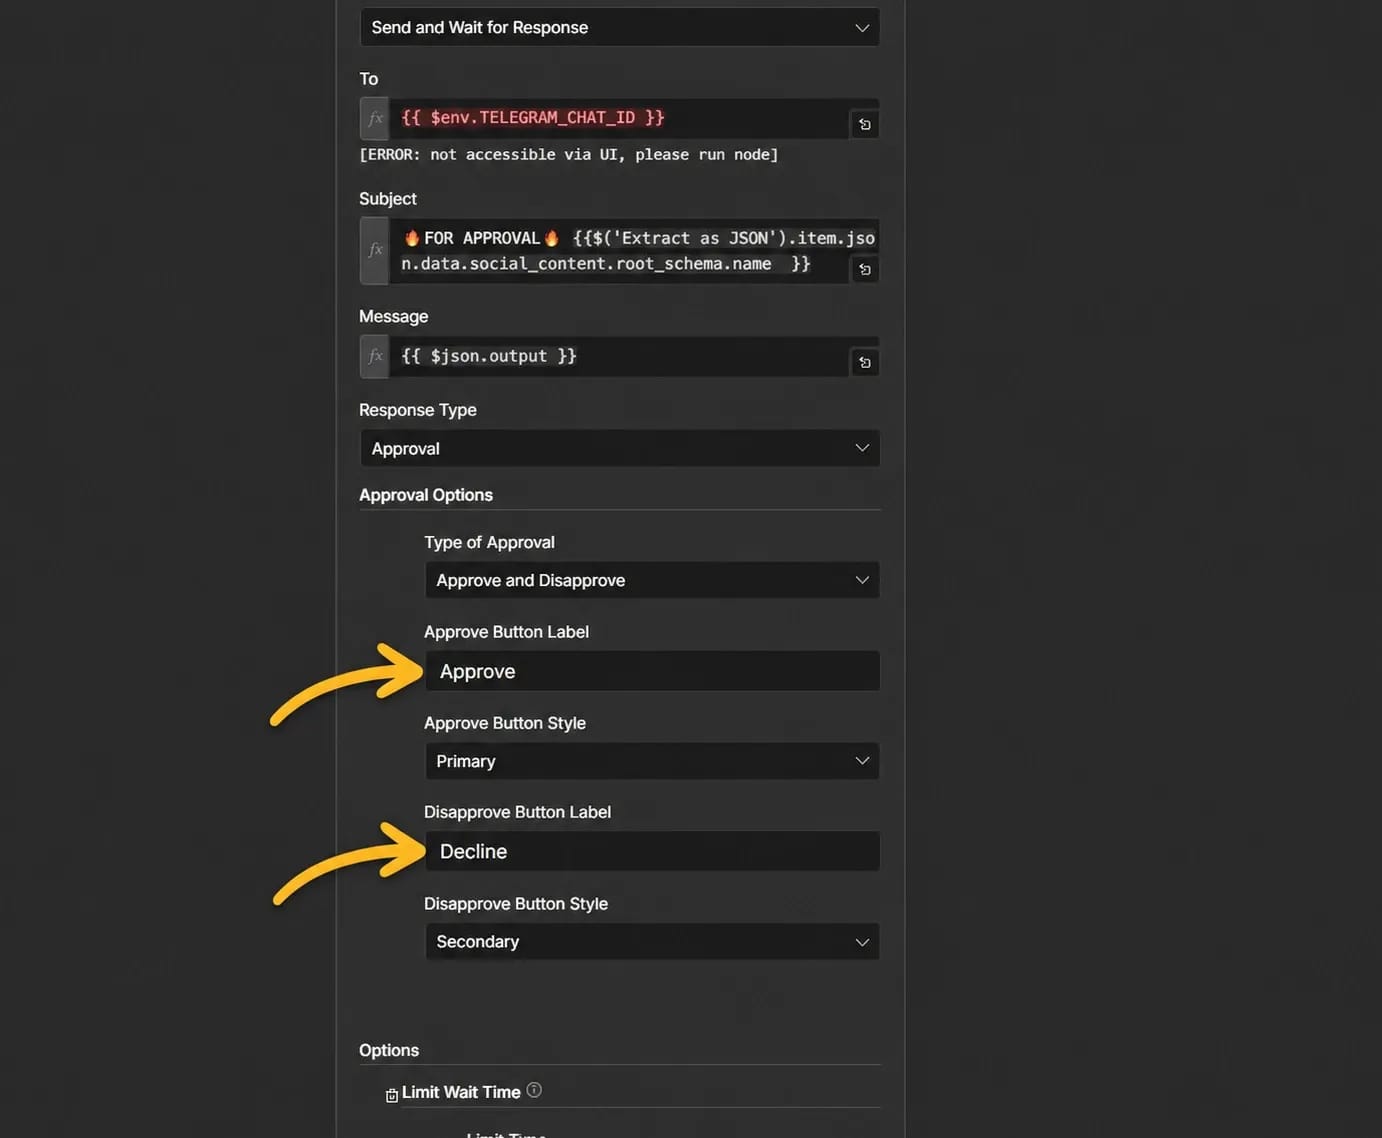
After clicking the button, the template continues from the Is Approved? node. An Approve response sends the material to the publishing branch. If Decline is chosen, execution stops before the LinkedIn Post node, so the rejected text won't appear on the profile.
Before publishing, the diagram retrieves the saved materials again. The File Id node extracts the text file's ID, and Get Social Post from Google Drive downloads it from Google Drive. Then Extract as JSON parses the contents and returns separate fields with the platform name, post text, and image information.
In parallel, Get Social Post Image retrieves the picture. The Merge Image and Post Contents node combines it with the publication data, after which the router sends the result to the branch of the selected social network. In our case, LinkedIn Post is triggered.
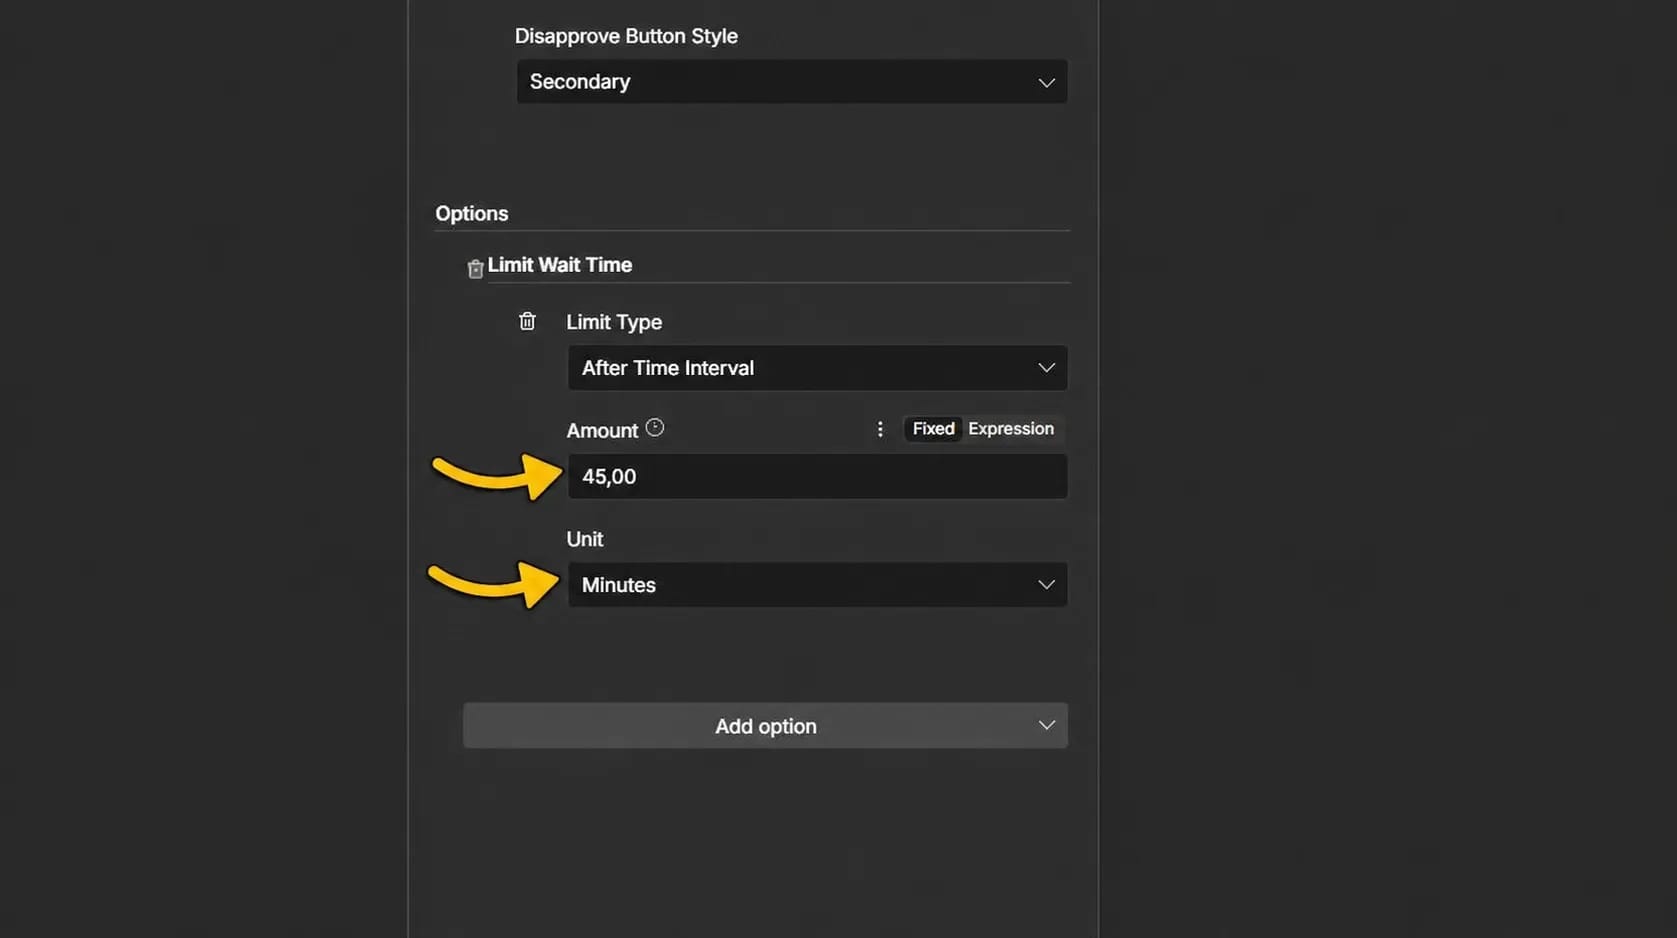
Open LinkedIn Post and check the connected account. If you need to publish on behalf of a company page, select that instead of a personal profile. The node gets the text itself from the object that was saved to Google Drive and restored after approval.
After successful execution, LinkedIn Post should return the data of the created publication. Open LinkedIn and make sure the text, hashtags, and image display correctly. If the node ran without an error but there's no publication, check the selected profile and the permissions granted to n8n.
Testing the entire workflow
Now you can run the whole chain via Open chat and send a test task for LinkedIn again. During execution, check step by step that:
- Social Content returned the text, hashtags, call to action, and image description;
- pollinations.ai1 created the image in the binary data field;
- Save Image to imgbb.com received a direct link to the uploaded file;
- Save Image to Google Drive saved the picture to the specified folder;
- Save Social Post to Google Drive created a separate file with the publication data;
- Gmail User for Approval sent the email with approval buttons;
- after clicking Approve, the LinkedIn Post node ran;
- the finished publication appeared on the selected LinkedIn profile or page.
If the chain stopped, open the last successfully executed node. Its right-hand panel will show what data it passed on. Usually the cause is found right at that point: a required field is missing, the wrong file ID is specified, the response wait time expired, or the connected account lacks the necessary permissions.
After a successful test, the template can be activated. From this point on, preparing a new post only requires sending a topic via chat and approving the finished material in the email. The diagram will handle the rest — generating the text and image, saving the files, and publishing — on its own.
That completes the simple version of the content factory.
How much an AI-based content factory costs
In our template, several services charge money: n8n charges for scenario runs, OpenAI for processed tokens, SerpAPI for search queries, and Pollinations.ai for created images.
n8n
The n8n Starter cloud plan costs 24 euros per month and includes 2,500 template runs. n8n counts the execution of the entire scenario, not each individual node within it. For a factory producing several dozen posts a month, this limit is more than enough.
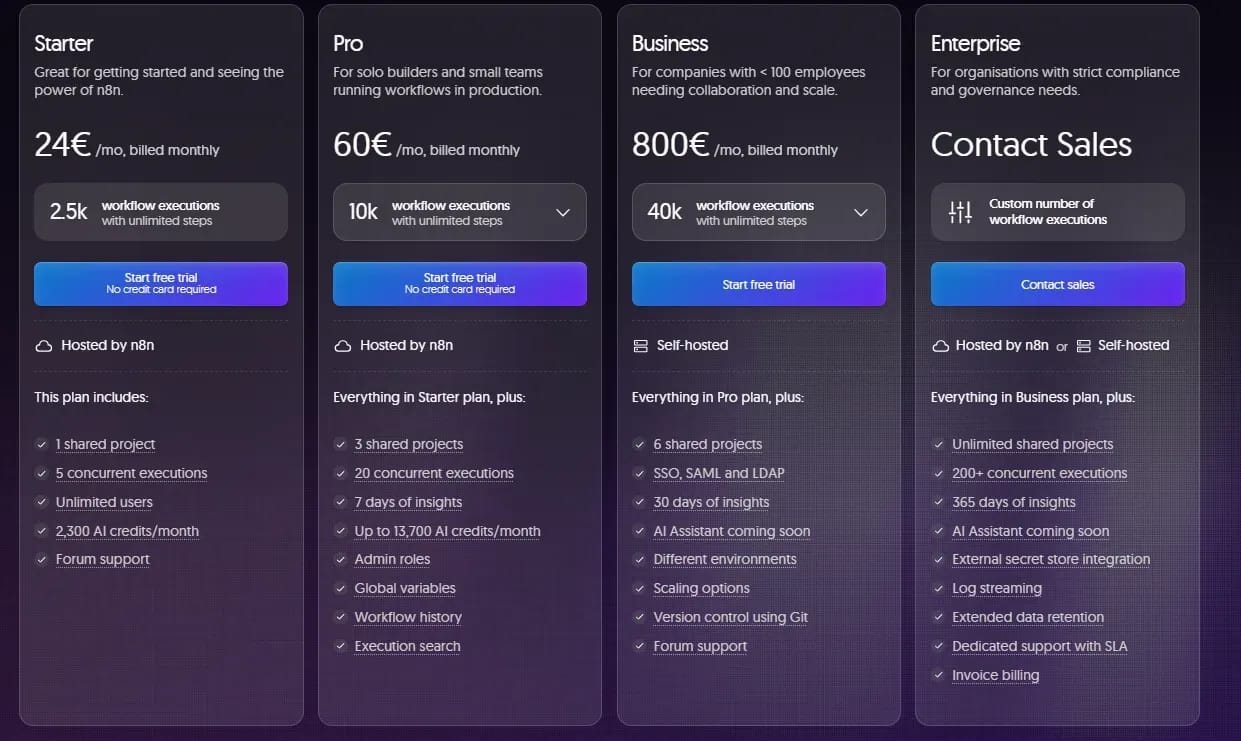
n8n itself can be installed on your own server. The Community Edition doesn't require a cloud subscription, but you'll need a VPS and someone to set up updates, backups, and system access. This option makes sense when several automations run on the same server at once. For the sake of a single content template, it's simpler to start with n8n Cloud.
OpenAI
A ChatGPT Plus subscription won't help here: requests from n8n go through the API and are billed separately. The cost depends on the chosen model and the amount of text passing through it.
The original template uses GPT-4o and the cheaper GPT-4o mini. Under OpenAI's pricing, GPT-4o costs $2.50 per million input tokens and $10 per million output tokens. For GPT-4o mini, the prices are $0.15 and $0.60 respectively.
Suppose that while preparing one post, the neural network received 10,000 input tokens and returned 2,000 output tokens. If we calculate the entire volume at GPT-4o pricing, generation would cost about 4.5 cents:
10,000 × $2.50 / 1,000,000 + 2,000 × $10 / 1,000,000 = $0.045
Thirty such publications would cost about $1.35. The actual expense may be higher if the agent calls SerpAPI several times, receives long search results, or regenerates unsuccessful text. You can check the exact amount in the Usage section of the OpenAI platform after a few test runs.
You don't have to cut costs by using the cheapest model in every node. GPT-4o can stay in Social Media Content Creator, where the main material is created, while parsing JSON, preparing the email, and other technical operations can be handed off to GPT-4o mini.
Search via SerpAPI
SerpAPI gives 250 free search queries per month. The paid Starter plan costs $25 and includes 1,000 queries.
One post doesn't always equal one search. The model decides on its own whether it needs SerpAPI, and for a complex topic it may query search several times. If the factory produces 30 pieces of content a month and makes one or two queries for each, the free limit is enough. The paid plan comes in handy for daily publication of several posts or active collection of news and fresh statistics.
You can also save money by running search only for topics where timeliness really matters. A post about a new law, study, or service update needs fresh sources. A piece about basic team management principles usually doesn't need a fresh search before every generation.
Images
Pollinations.ai uses internal Pollen credits: one credit roughly equals one dollar. The cost of an individual generation depends on the model, image size, and other settings. The service returns current prices via the model list, so it's not correct to assign every image a fixed ten or twenty cents in advance.
You can set a separate Pollen limit for the API key. This protects against a situation where a broken template starts repeatedly creating the same image and eats up the entire balance. After the first ten publications, check the spending history and multiply the average image cost by the planned number of posts.
The Imgbb service is used in this scheme only to get a direct link to the image. The public API documentation doesn't specify a separate charge for requests. For a working project, it's still worth following file storage rules and not using imgbb as the sole archive. The main copy of the image is already saved in Google Drive.
What it adds up to per month
For a factory producing 30 publications a month, the calculation looks roughly like this:
- n8n Cloud Starter — 20 euros;
- OpenAI — about $1–3;
- SerpAPI — $0, as long as the 250 free queries are enough;
- imgbb and LinkedIn — no separate charge;
- Pollinations.ai — based on the actual usage of the chosen model.
So a simple factory can be run for roughly 20–30 euros a month. At 300 publications a month, OpenAI would require about $13.5 by the same calculation. The free SerpAPI limit may no longer be enough, adding another $25 to the budget. The n8n Starter plan will be enough as long as the total number of runs doesn't exceed 2,500 per month.
Conclusion
The first version of a content factory can consist of a single short route. A topic comes in via chat, OpenAI prepares the post, Pollinations.ai creates the image, Google Drive saves the files, Gmail requests approval, and LinkedIn accepts the finished publication. This chain is already enough for daily work with one account. Later, you can add Telegram, a corporate blog, a newsletter, and statistics collection to it. New branches will use the already configured sources, prompts, and verification rules.
Why Google Blocks Accounts and What Your Antidetect Has to Do With It
Google has once again complicated the mechanisms of digital identification by deploying a new, more sophisticated layer of protection based on proprietary HTTP headers. This quiet change caught most of the market off guard, triggering a wave of rushed updates. While others hastily released superficial 'fixes', we realized that we were dealing not with a minor issue but with a fundamental shift that required deep and comprehensive analysis.
SOCKS vs HTTP Proxy: What’s the Real Difference and Which One to Choose?
There are times when you don’t want a website to link the request back to your device. That’s where a proxy comes in, it acts like a middle layer and sends the request for you. The site sees the proxy’s info instead of yours. It’s a go-to trick when you’re trying to see a page that’s not available in your region, pull content that’s restricted by location, or avoid hitting a wall when sending lots of requests.

The Best Alternative to OBS Studio
Working with a webcam on many online platforms can turn into a real challenge. A strict oval or rectangular frame appears on the screen, but your image doesn’t align perfectly with it. As a result, the system blocks further progress, demanding perfect alignment, and your workflow is disrupted before it even begins.