
Universal Tracker for Affiliate Marketing: An Overview of Binom
A tracker in affiliate marketing collects and analyzes data on clicks, traffic sources, campaigns, landing pages, offers, and conversions so that the media buyer understands which angles yield results and which only waste the budget. Without such analytics, an affiliate marketer is essentially working blind: data remains scattered across advertising cabinets, affiliate networks, and landing pages, making it difficult to assess the real profitability of campaigns.
The tracker solves one of the key tasks in affiliate marketing — it helps control the entire user journey from a click to the target action. With its help, you can quickly find effective ads, turn off unprofitable paths, test different funnels, distribute traffic between offers, and make decisions based on figures rather than intuition.
Let's explore the capabilities of a modern tracker using Binom, one of the market leaders, as an example.
Review of the Binom Tracker: Functionality and Capabilities
Binom is a universal tracker for affiliate marketing and performance marketing that allows you to track the entire user journey: from clicking on an ad to landing page redirection, offer redirection, and the final conversion.
While the service initially offered placement exclusively on users' servers, today both a self-hosted server license and a Cloud option are available. Features for improved bot protection have also been added.
The service has been active in the market since 2015 and has always stood out for its high performance when handling large volumes of data. At the end of 2024, the developers announced a major update — the transition to Binom 2.0, which involved redesigning the database architecture: ClickHouse is now used instead of MySQL.
This transition allowed for a significant increase in performance:
- Binom 2.0 can process up to 3000 clicks per second;
- the maximum daily volume of clicks has been increased to 260 million;
- reports are built significantly faster;
- the maximum volume of the click database has increased to 3 billion;
- data storage has become more economical: 1 million clicks occupy less disk space than before.
What is Needed to Get Started with Binom
To start using Binom, you need to register on the official website of the service. After that, you can choose a suitable working format: self-hosted or Cloud.
In the case of the self-hosted version, the tracker is installed on your server. To do this, you need to rent a server with suitable specifications, and then either install Binom yourself according to the instructions or contact technical support for assistance.
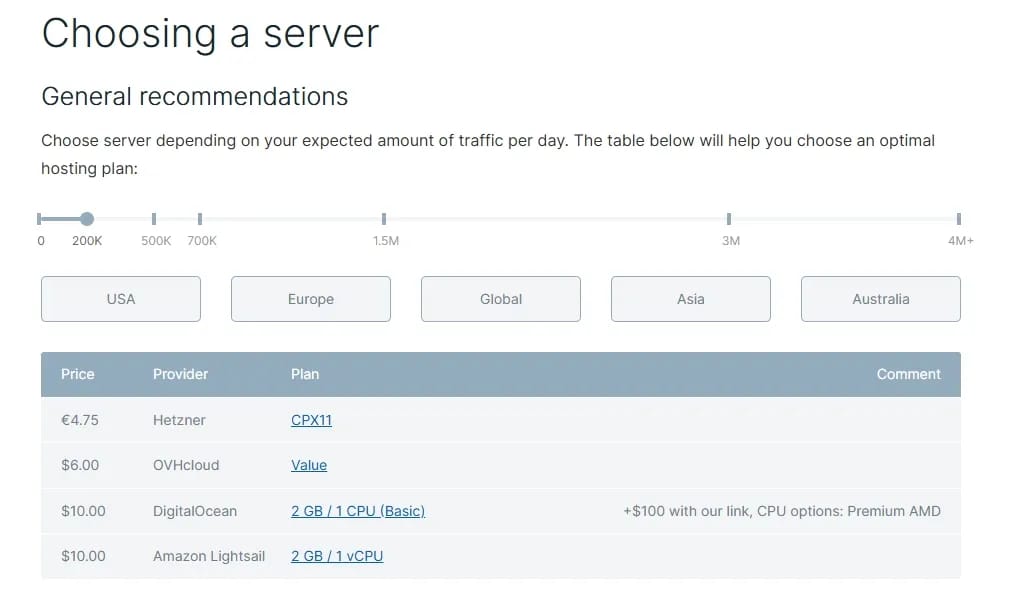
The Cloud version is simpler for getting started: the user does not need to handle server and installation issues, as the tracker is ready for use. This option is suitable for those who want to jump straight into configuring campaigns without spending time on the technical side.
The cloud version also allows working with optimal website loading speeds in any region without connecting additional servers. The self-hosted server version is tailored for large volumes of traffic — up to 260 million visitors per day.
Updated Design of Binom 2.0
The interface of Binom 2.0 has become more modern while preserving the recognizable logic of the previous version. This is convenient for users who have already worked with Binom: they do not need to re-learn the location of the main sections and the setup principles.
New users will also find the interface easy to understand. The main tabs are located in the menu, and key actions like creating campaigns, adding affiliate networks, offers, and traffic sources are performed using intuitive Create buttons.
For those who prefer a dark interface, a dark theme is available in Binom 2.0. It can be toggled via a switch at the top of the screen. You can also customize the appearance under the Settings → Appearance tab, where you can modify the font and the color scheme.
Campaigns Tab
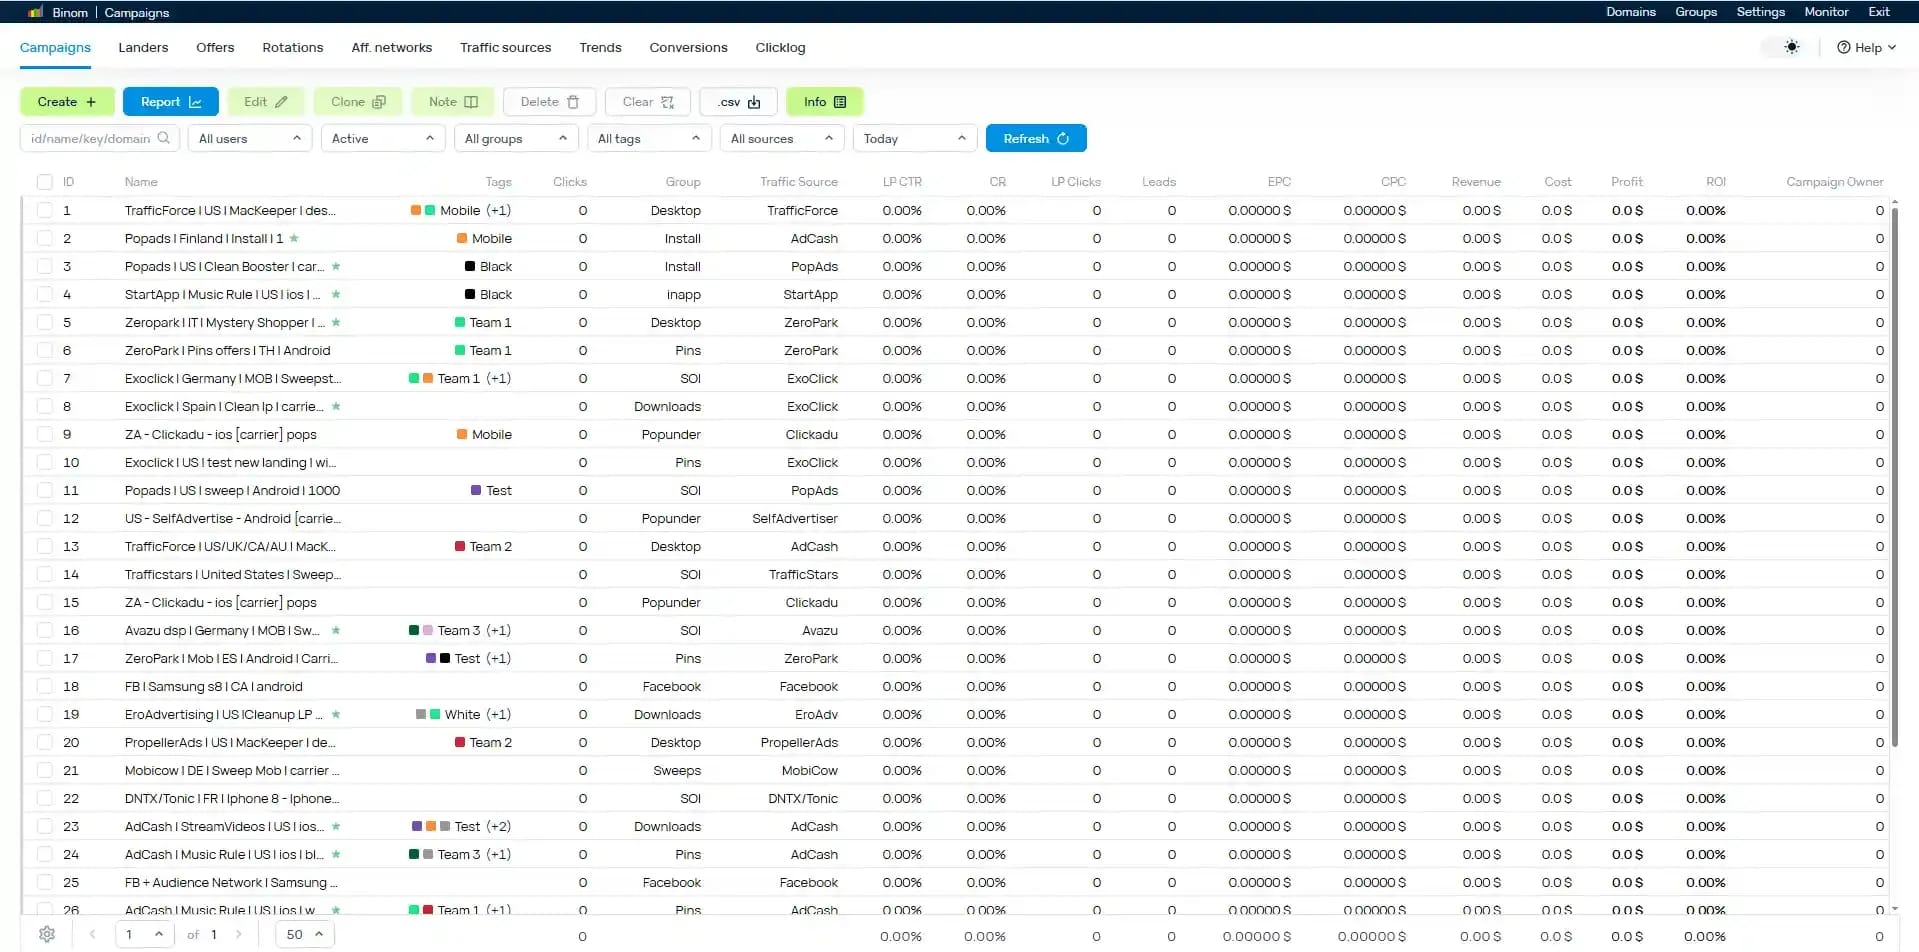
After logging into the tracker, the user lands on the campaigns page. This is one of the main working sections where stats for active campaigns are displayed.
The table displays key metrics:
- Campaign ID;
- name;
- group;
- traffic source;
- number of clicks;
- landing CTR;
- conversions;
- conversion rate;
- bot percentage;
- EPC;
- CPC;
- spend;
- profit;
- ROI;
- campaign owner.
The addition of the campaign owner field is particularly useful for team collaboration. If multiple media buyers are working inside the tracker, it is much easier to understand who is responsible for a specific campaign and its results.
Basic Steps for Launching a Campaign
To start running traffic through Binom 2.0, you usually need to follow several steps:
- Add an affiliate network.
- Add an offer or several offers.
- Configure a postback.
- Add a traffic source.
- Add a landing page if it is used in the funnel.
- Create a campaign.
- Copy the campaign link and add it to the traffic source.
After that, you can launch traffic, pass moderation in the source, and track statistics inside Binom.
The entire process is described in detail in the service documentation and is also available as training materials on YouTube. If you have any questions, support is always online and ready to help.
Adding an Affiliate Network
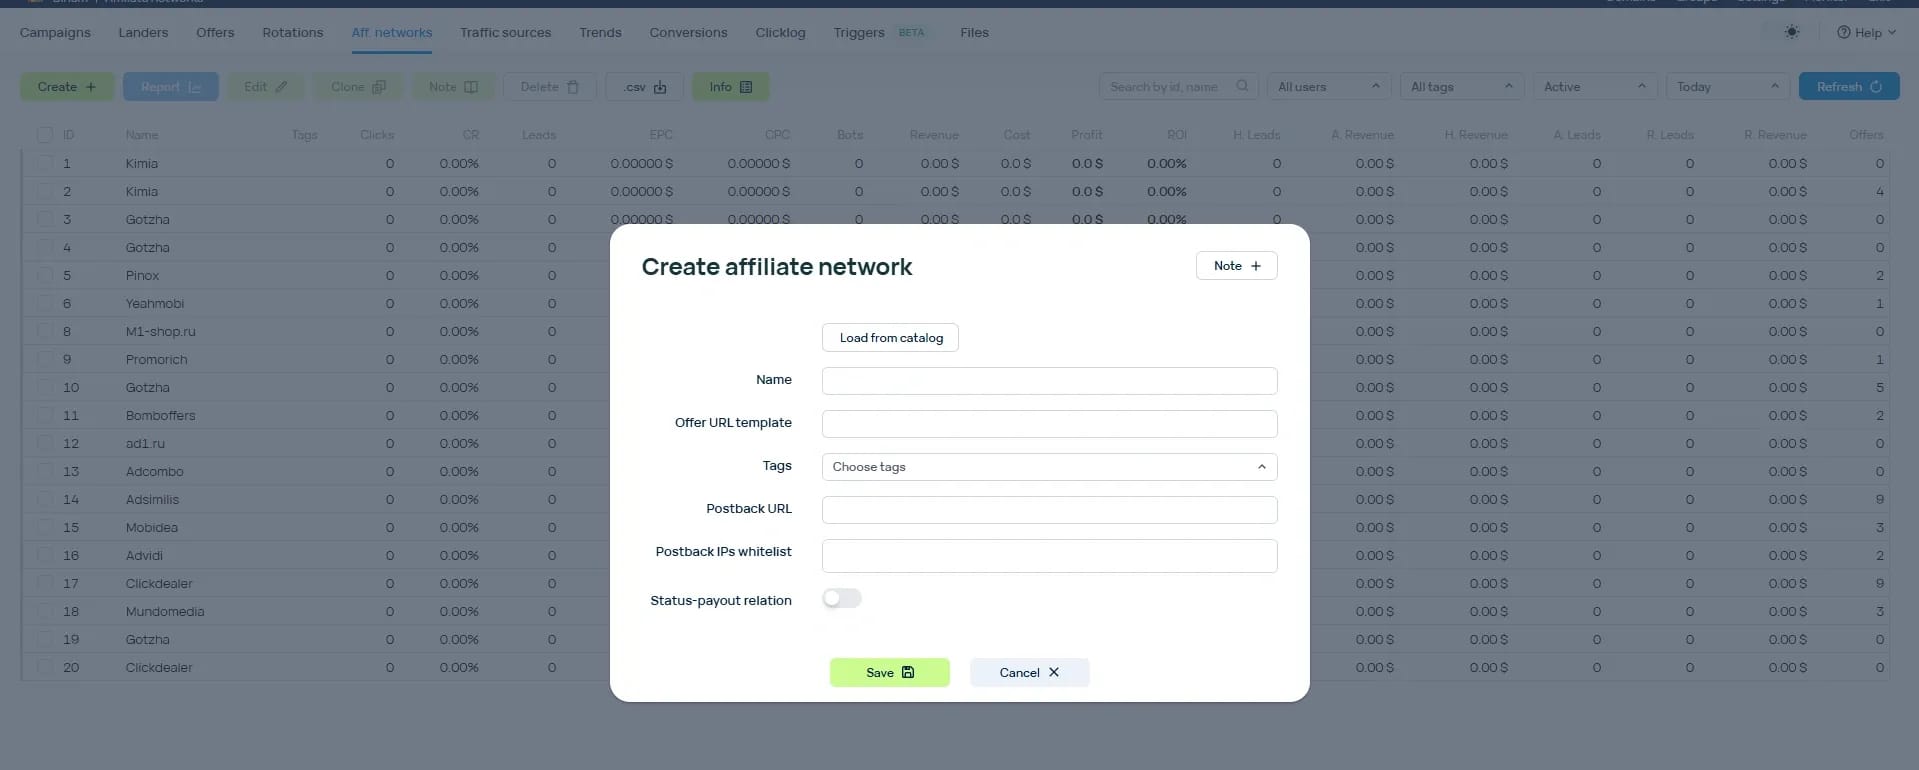
To add an affiliate network, navigate to the Affnetworks tab and click Create. This will open the affiliate network configuration window.
Data can be entered manually, or you can select an affiliate program from a list of pre-configured integrations. If the required network is already in the templates, Binom will automatically populate the necessary parameters, which speeds up the setup and reduces the risk of errors.
In Binom 2.0, you can add not only notes but also tags. This is convenient for subsequent analytics. For example, you can tag affiliate networks by verticals: nutra, finance, gambling, dating, crypto, and so on.
Additionally, in the settings, you can define a link between the conversion status and the payout. For example, if the affiliate network transmits a dep status, you can specify that payouts should be calculated only for this status. For other statuses, you can set individual rules: for example, specify a zero payout for registrations if revenue is only generated for deposits.
It is important to remember to add the postback within the settings of the affiliate network itself. Without this, the tracker will not be able to correctly receive conversion data and display revenue statistics.
Adding an Offer
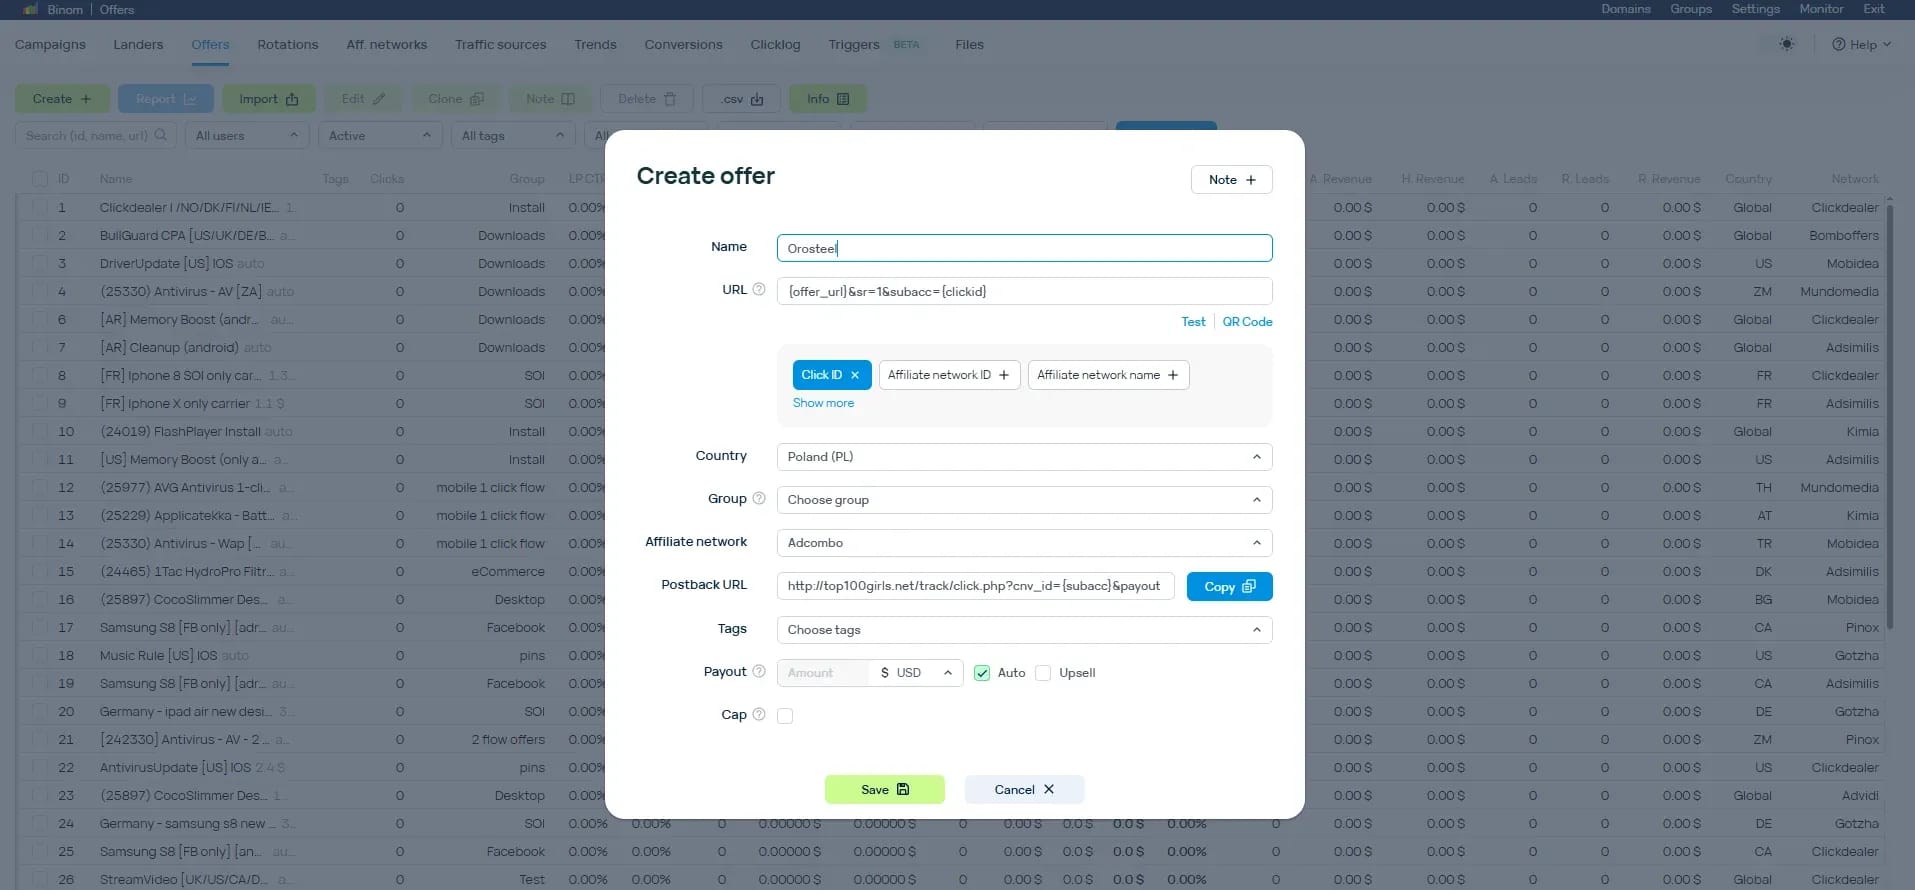
The next step is adding an offer. To do this, go to the Offers tab and click Create.
In the addition form, specify the offer link, name, geo, and the affiliate network to which it belongs. If the affiliate network is already added in Binom, the necessary macros will be pulled automatically.
You can also add extra macros to pass more click parameters to the affiliate network. This is useful for deeper analysis: for example, you can pass the campaign ID, source, publisher ID, creative, keyword, or other data that helps optimize traffic.
Offers can be grouped. This is useful if you work with several verticals, geos, or affiliate networks at once.
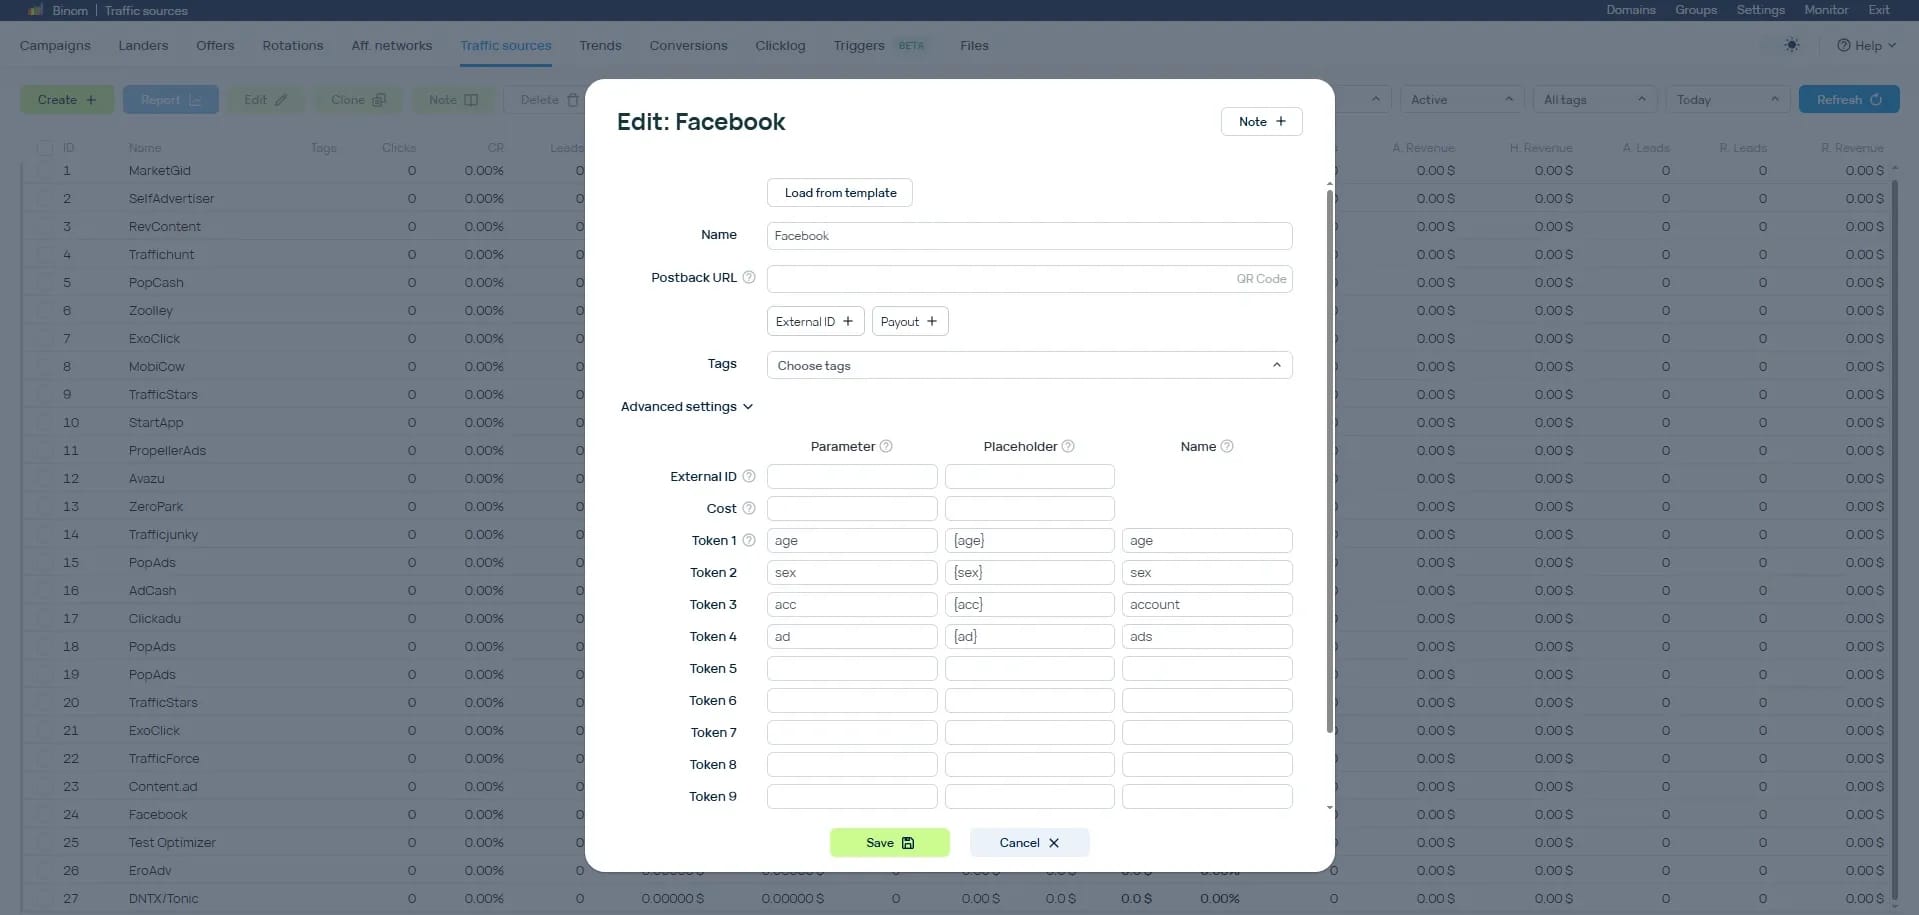
Adding a Traffic Source
After the affiliate network and offer, you need to add a traffic source. The Traffic sources tab is used for this purpose.
If the source is already available in the Binom templates, the system will automatically fill in the basic parameters. If there is no template, the settings can be added manually.
In Binom 2.0, the number of tokens has been increased to 30. This provides more opportunities for passing click details. For example, you can pass data about the publisher site, creative, campaign, device, browser, placement, keyword, and other parameters.
The more useful data passed from the traffic source to the tracker, the more precisely you can analyze results and make optimization decisions.
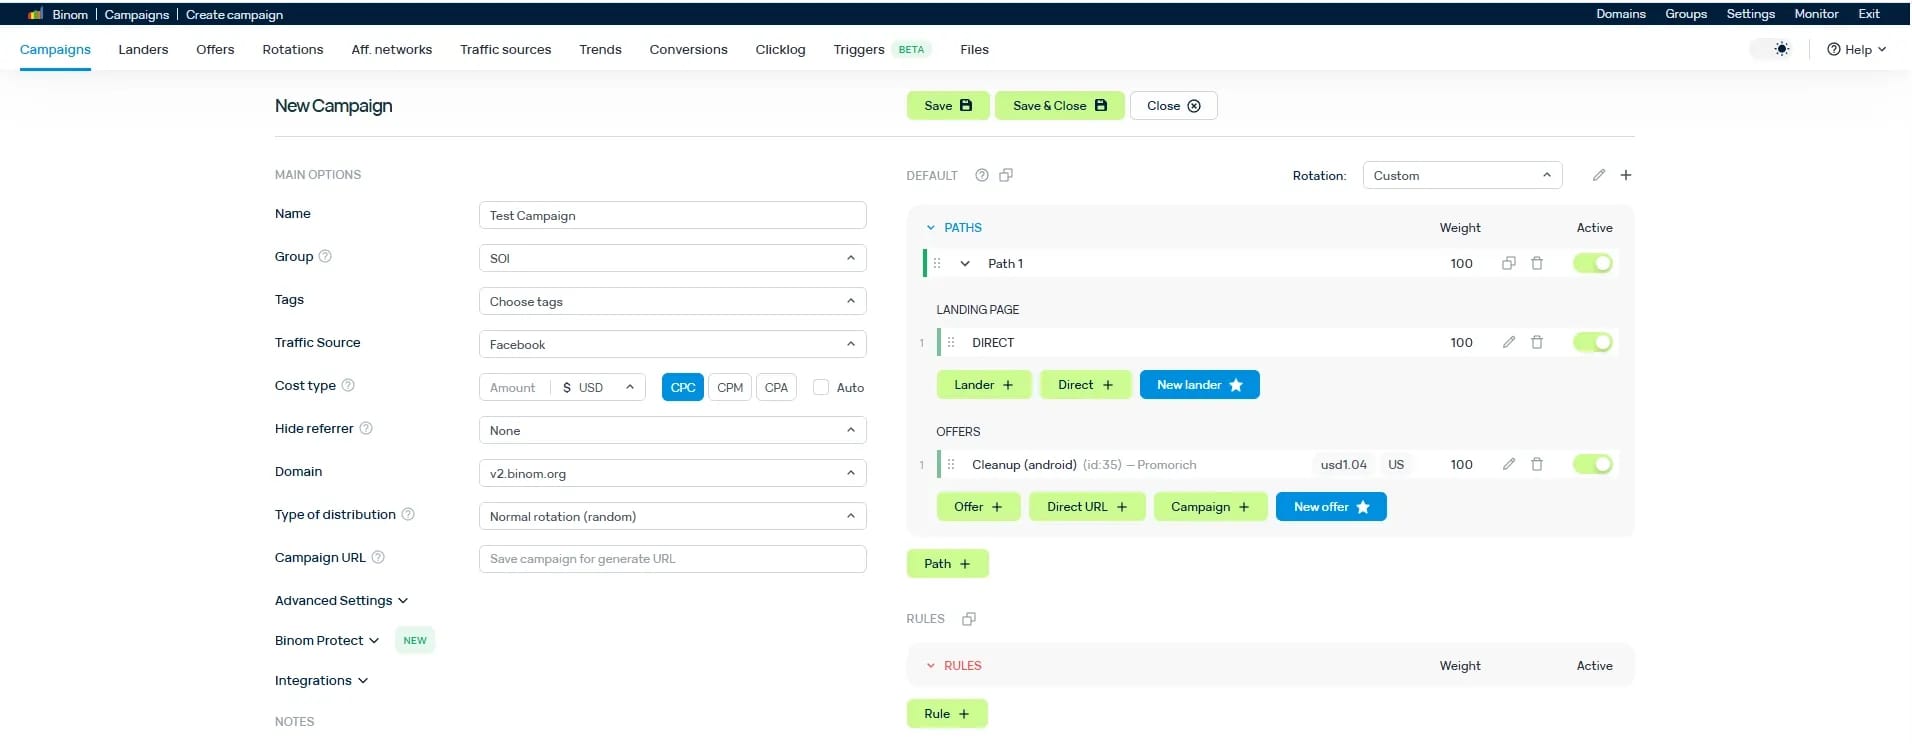
Creating a Campaign
Once the affiliate network, offer, and traffic source are added, you can proceed to create a campaign. To do this, return to the Campaigns tab and click Create.
On the left side of the form, you define the campaign name, select the traffic source, and choose the payment model. Binom supports different models, including CPC, CPM, and CPA.
If CPC is used, you must specify the click cost. This is crucial for correct calculations of spend, profit, and ROI.
A Hide referrer parameter is also available in the campaign settings. It is responsible for hiding the referrer. In Binom 2.0, this function has become more flexible: you can now hide the referrer not only when redirecting to a landing page, but also when redirecting from a landing page to an offer.
If multiple domains are added to the tracker, you can select the required domain for a specific campaign.
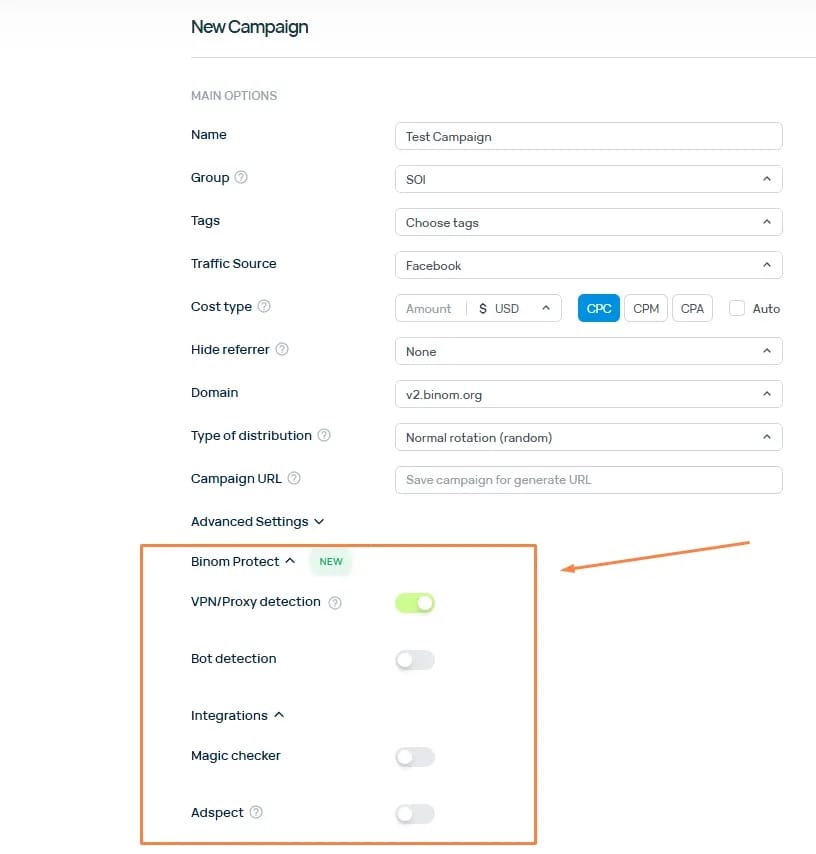
Binom Protect Module
One of the important updates in Binom 2.0 is the Binom Protect module. It is designed to protect campaigns from unwanted and suspicious traffic.
The module features integrations with external solutions such as Magichecker and Adspect, as well as its own filtering tools within Binom.
Using Binom Protect, you can:
- block VPN/proxy traffic;
- filter suspicious users;
- use ready-made protection presets;
- manually configure filtering methods;
- create separate rules for bots.
The interface offers Light, Medium, and Paranoid presets. They differ in their level of filtering strictness. Light is suitable for milder checks, Medium provides balanced protection, and Paranoid offers more aggressive filtering of suspicious traffic.
Manual settings are useful for advanced users who need precise control over which traffic to allow and which to redirect down a separate route.
Setting Up Routes and Traffic Distribution Rules
On the right side of the campaign creation window, the main user path is set. For example, you can configure it so that all traffic is sent directly to the offer without using a pre-lander.
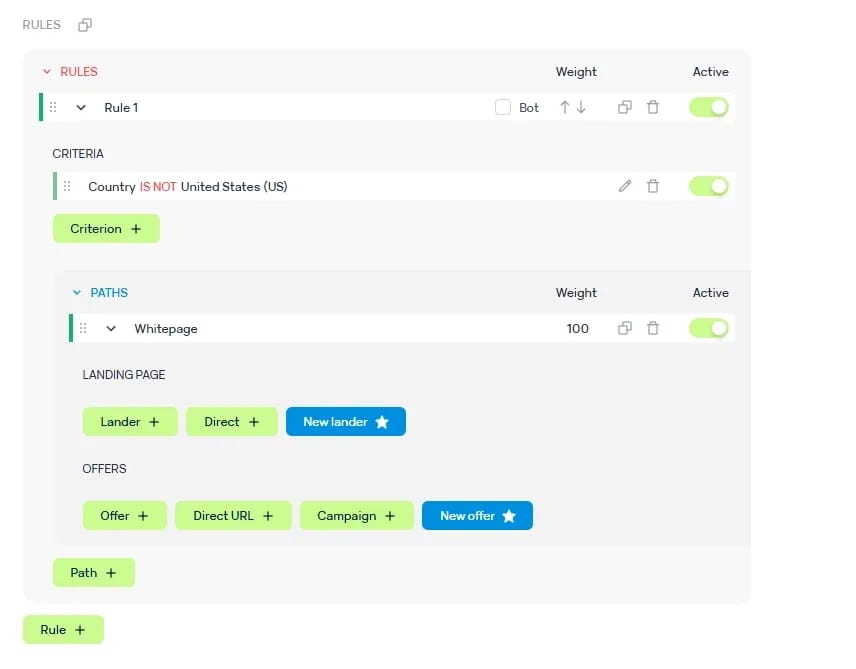
Below are the traffic distribution rules. This is one of the tracker's key features because it is where you can flexibly manage user flows.
Traffic can be routed to:
- an offer;
- a landing page;
- a URL;
- another campaign;
- a separate route for bots;
- different pages depending on geo, device, token, or other conditions.
For example, you can set a rule where users from a target geo go to the main offer, while everyone else goes to a back-up page or a neutral URL.
There are many criteria for distribution: conversion status, token values, country, device, browser, operating system, and other parameters. This allows you to construct complex routing schemes and control traffic quality more precisely.
After completing the configuration, click Save. The campaign will be created, and the link for launching can be copied right next to the campaign name.
Launching the Campaign
After saving the campaign, all that is left is to copy the link and add it to the traffic source. Next, the campaign undergoes moderation on the side of the ad network or other source, after which you can launch the traffic acquisition.
Binom will gather data on clicks, spend, conversions, revenue, ROI, and other metrics. Based on these statistics, you can make decisions: disable unprofitable publishers, scale winning combinations, and test new landing pages and offers.
Additional Features of Binom 2.0
The review above outlines the basic steps required to launch your first campaign. However, Binom 2.0 offers more features for a media buyer's day-to-day operations.
Among the helpful features are:
- quick copying of landing pages via the Grab button in the Landers section;
- tracking traffic without redirects;
- custom postback dispatch rules;
- unlimited tracker users;
- tools for team collaboration;
- ability to create folders;
- uploading and editing files on the server directly from the Binom interface;
- custom interface alignment settings;
- expanded work with tokens;
- flexible traffic routing rules.
Such features are especially valuable for teams running multiple campaigns simultaneously who want to centrally manage traffic, analytics, and permissions.
How Much Does Binom Cost
Binom has two main usage models:
- Binom 2.0 self-hosted — from $149 per month;
- Binom v2 Cloud — from $299 per month.
For the self-hosted version, a discount is provided when paying annually. The Cloud version is priced higher but eliminates the need to manage server infrastructure yourself.
Before choosing a format, it is worth considering not only the price but also technical objectives. If the team has experience working with servers and complete control over the infrastructure is vital, self-hosted might be the more suitable option. If a fast start without technical setup is preferred, it is more convenient to consider Cloud.
Who is Binom Best For
Binom 2.0 is suitable for affiliate marketers, media buyers, and teams working with paid traffic who want to control the entire funnel: from a click to conversion and ROI calculation.
The tracker is especially useful if you need to:
- analyze large volumes of traffic;
- construct reports quickly;
- distribute users between different offers and landing pages;
- track costs and revenues;
- set up postbacks;
- filter suspicious traffic;
- work as a team;
- test multiple angles simultaneously.
For beginners, Binom might not seem like the simplest tool to get started with, especially if they have no prior experience with trackers. However, once the basic structure — network, offer, source, campaign — is configured, the logic becomes clear.
Summary
Binom 2.0 is an updated version of the tracker focused on speed, scalability, and comfortable handling of large volumes of data. The transition to ClickHouse has noticeably strengthened the technical side: the tracker processes clicks faster, builds reports speedier, and is better suited for intensive traffic operation.
Among the key advantages of Binom 2.0 are:
- high click processing speed;
- a refreshed yet familiar interface;
- flexible campaign configuration;
- extended work with tokens;
- convenient addition of affiliate networks, offers, and sources;
- Binom Protect module;
- traffic distribution rules;
- team collaboration features;
- availability of self-hosted and Cloud versions.
Binom can be considered a solid working tool for media buyers and affiliate teams who do not just need click statistics, but an entire system for analytics, routing, and traffic optimization.

Why Google Blocks Accounts and What Your Antidetect Has to Do With It
Google has once again complicated the mechanisms of digital identification by deploying a new, more sophisticated layer of protection based on proprietary HTTP headers. This quiet change caught most of the market off guard, triggering a wave of rushed updates. While others hastily released superficial 'fixes', we realized that we were dealing not with a minor issue but with a fundamental shift that required deep and comprehensive analysis.

SOCKS vs HTTP Proxy: What’s the Real Difference and Which One to Choose?
There are times when you don’t want a website to link the request back to your device. That’s where a proxy comes in, it acts like a middle layer and sends the request for you. The site sees the proxy’s info instead of yours. It’s a go-to trick when you’re trying to see a page that’s not available in your region, pull content that’s restricted by location, or avoid hitting a wall when sending lots of requests.

The Best Alternative to OBS Studio
Working with a webcam on many online platforms can turn into a real challenge. A strict oval or rectangular frame appears on the screen, but your image doesn’t align perfectly with it. As a result, the system blocks further progress, demanding perfect alignment, and your workflow is disrupted before it even begins.