How to Use an Antidetect Browser: A Guide for Beginners
We will break down step-by-step how a beginner can start working with an antidetect browser using Linken Sphere as an example: from quickly creating a ready-to-use profile to building a fully-fledged account management system.
What you need to prepare before starting work
An account in Linken Sphere
First, you need to register in Linken Sphere and install the browser on your device. After logging into your account, you will enter the workspace where you can create and launch profiles.
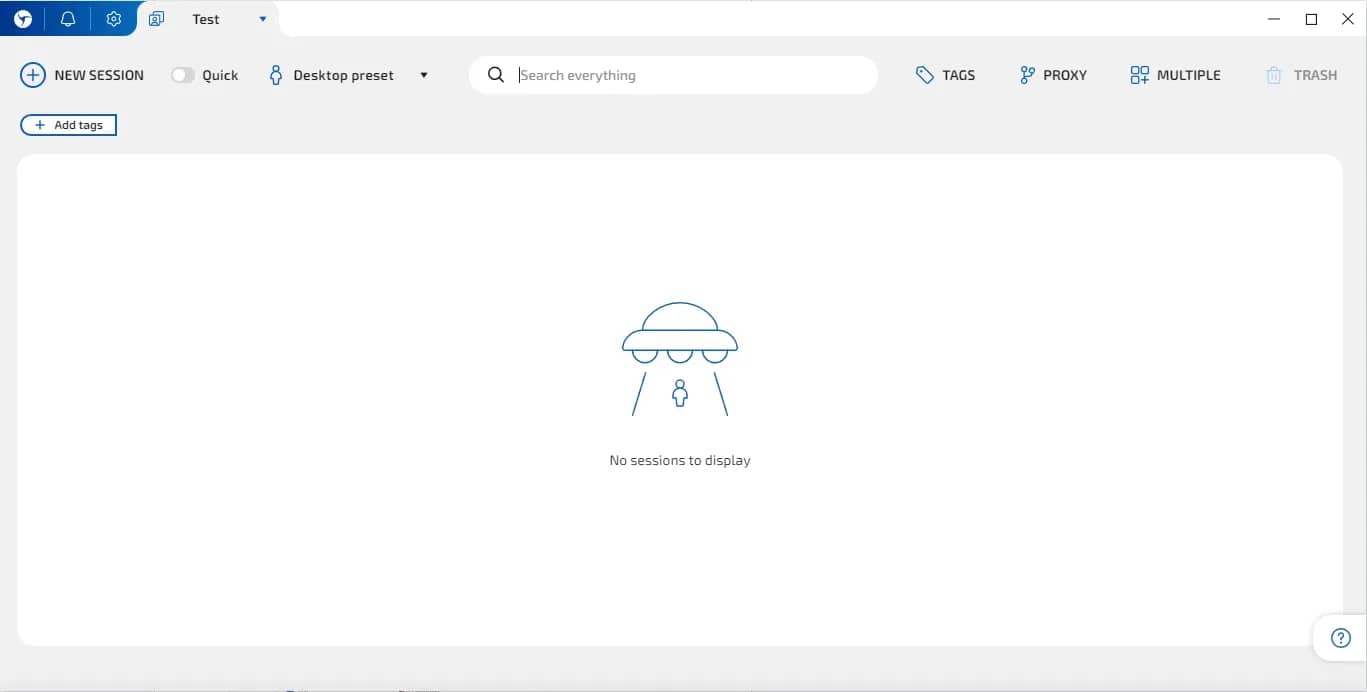
Choose your preferred language and interface color theme.
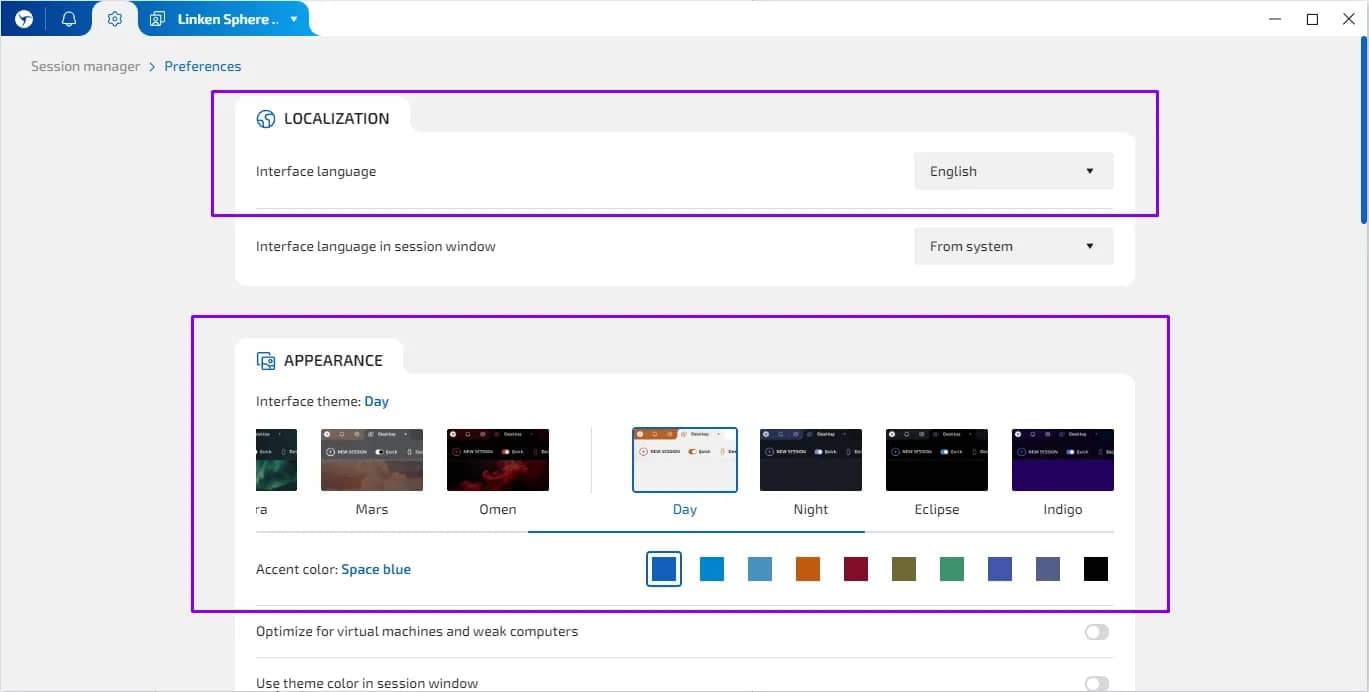
Each profile in an antidetect browser is a separate browser environment. Within it, cookies, history, sessions, settings, and other data are saved. That is, a profile can be thought of as a separate browser for a specific account or task.
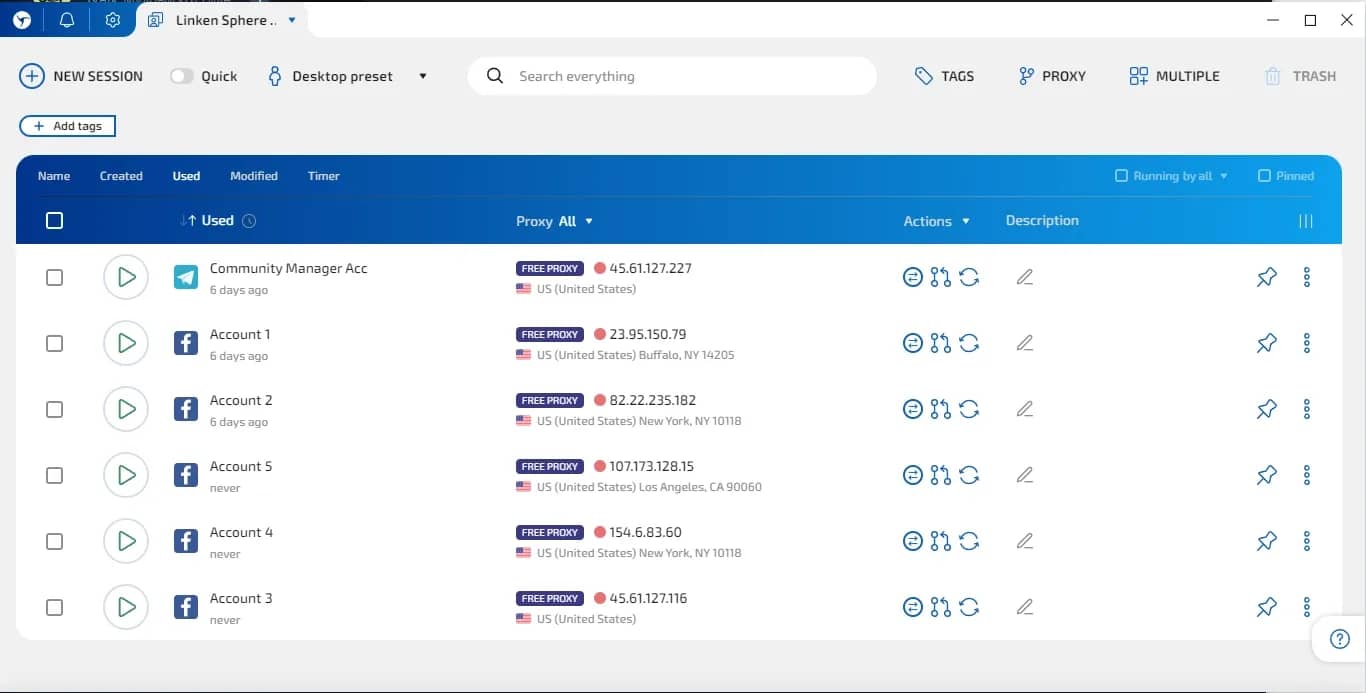
Proxies
The proxy is responsible for the IP address from which the profile will operate. Ideally, use a separate proxy for each profile to avoid any possibility of accounts overlapping with each other.
You need to understand that you can choose any service, as well as any type of proxy: mobile, datacenter, residential — and this choice directly affects the quality of work. The proxy type is often chosen for a specific task, balancing price and quality. If we are talking about multi-accounting, residential or mobile proxies are most often chosen as the most reliable.
Even the most perfect browser fingerprint will not save you from blocking if the IP address is blacklisted by anti-bot systems.
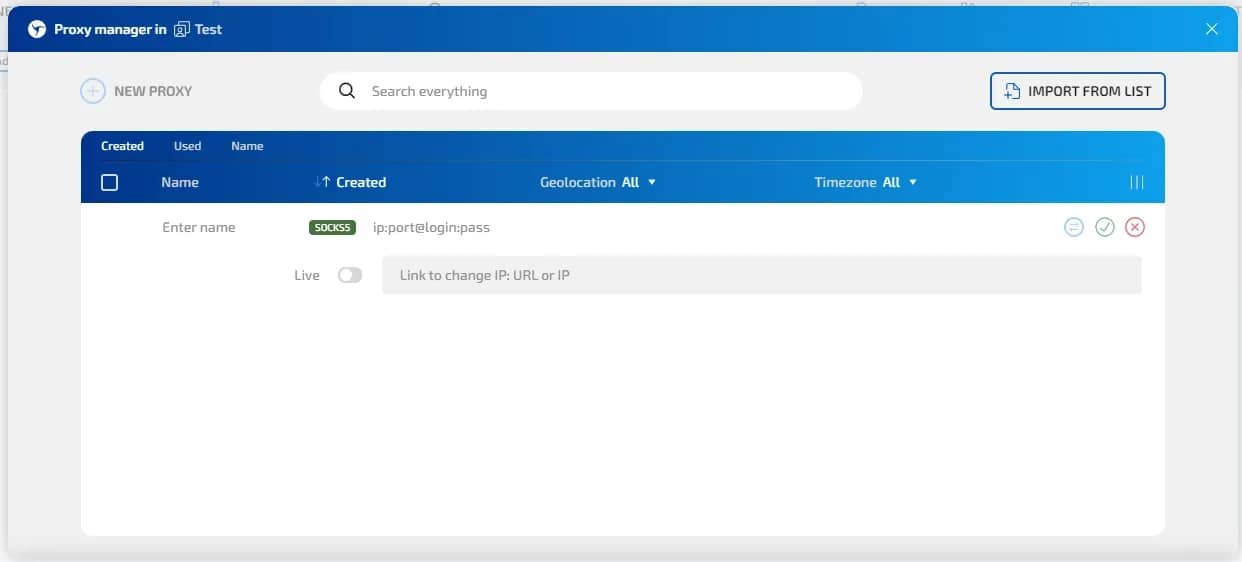
To add a proxy to the antidetect browser, simply copy the data and paste it into the proxy manager, or into the "Proxy" section when creating a profile.
For work we need:
- host or IP;
- port;
- login;
- password;
- connection type — HTTP, HTTPS, or SOCKS5.
All available formats are supported in Linken Sphere; just paste the data into the proxy manager and the browser will automatically recognize it.
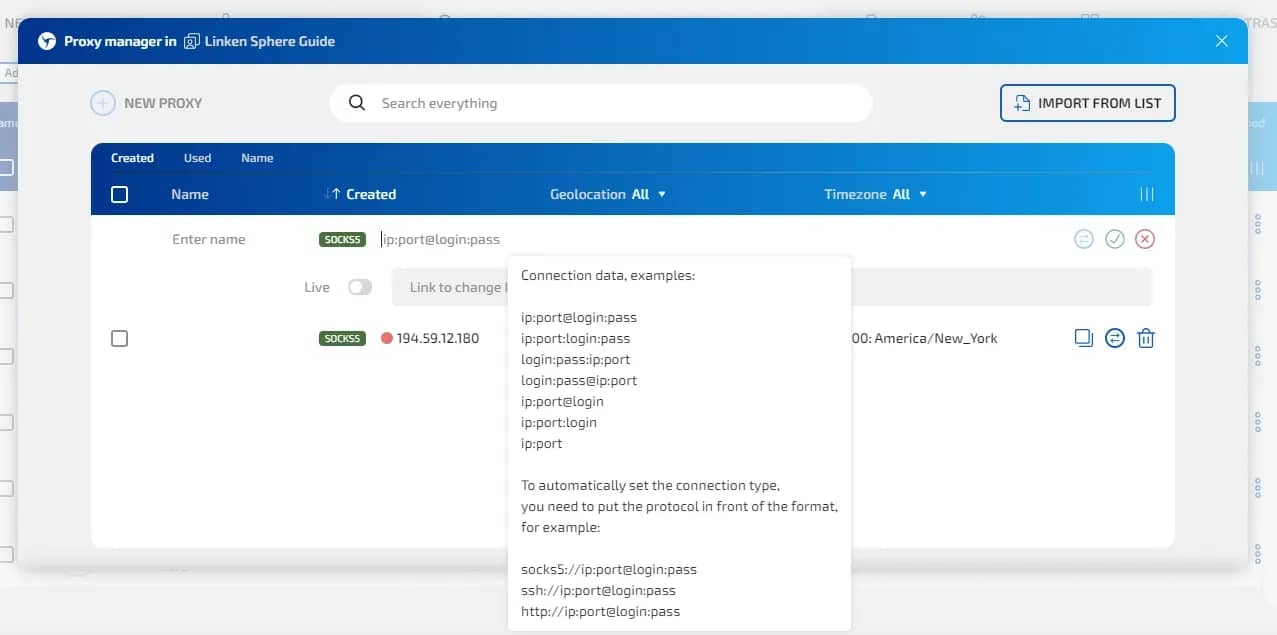
Accounts you will be working with
If you are working with already existing accounts, it is advisable to import the cookies that go with them when creating profiles. You can also use the user agent that was used with this account when creating the browser profile in the antidetect browser.
To save time, use the mass data import function: simply paste the account data, and the browser will automatically recognize it and create the required number of profiles, importing the necessary data. You will only have to specify a proxy for each profile.
A table for keeping records
If you only have a couple of profiles, you can get by without a table. But as soon as there are more, confusion will begin: which account is where, which proxy, which GEO, which status. It is better to start a simple table right away.
It is worth noting that Linken Sphere has everything you need to structure your work and maintain a convenient system, but for beginners, the main thing is not to lose the most important details, and over time transition to a fully-fledged system.
You need to understand that there is no perfect system: sometimes large tables containing all possible information are simply not needed, and basic account data is sufficient for workflows. In other cases, it is important to understand the current state of the account, as well as to have login data and data for passing various checks close at hand.
When we talk about a profile tracking system, it is more a matter of specific processes, volume of work, and personal discipline. When it comes to team work and dozens, or even hundreds of profiles, you cannot do without a system. There is no right or wrong system — it just needs to be convenient for work.
In Linken Sphere, you can organize profiles by desktops. In each desktop, you can create the necessary tags, choose the profile status, add descriptions — notes, the logo of the platform for which the profile is used, as well as the name itself can help in structuring. Additionally, there is a status system that helps to quickly change information about the state of the account in the profile.
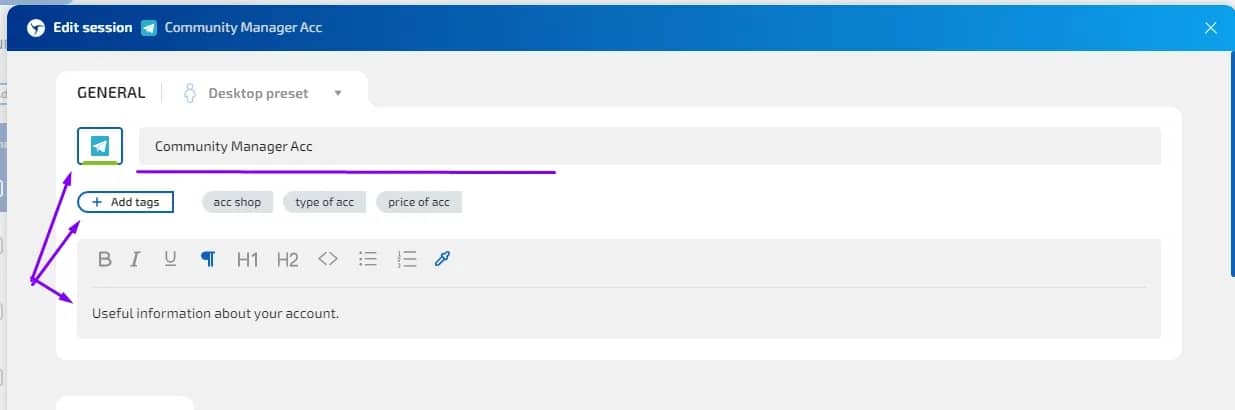
How to use an antidetect browser
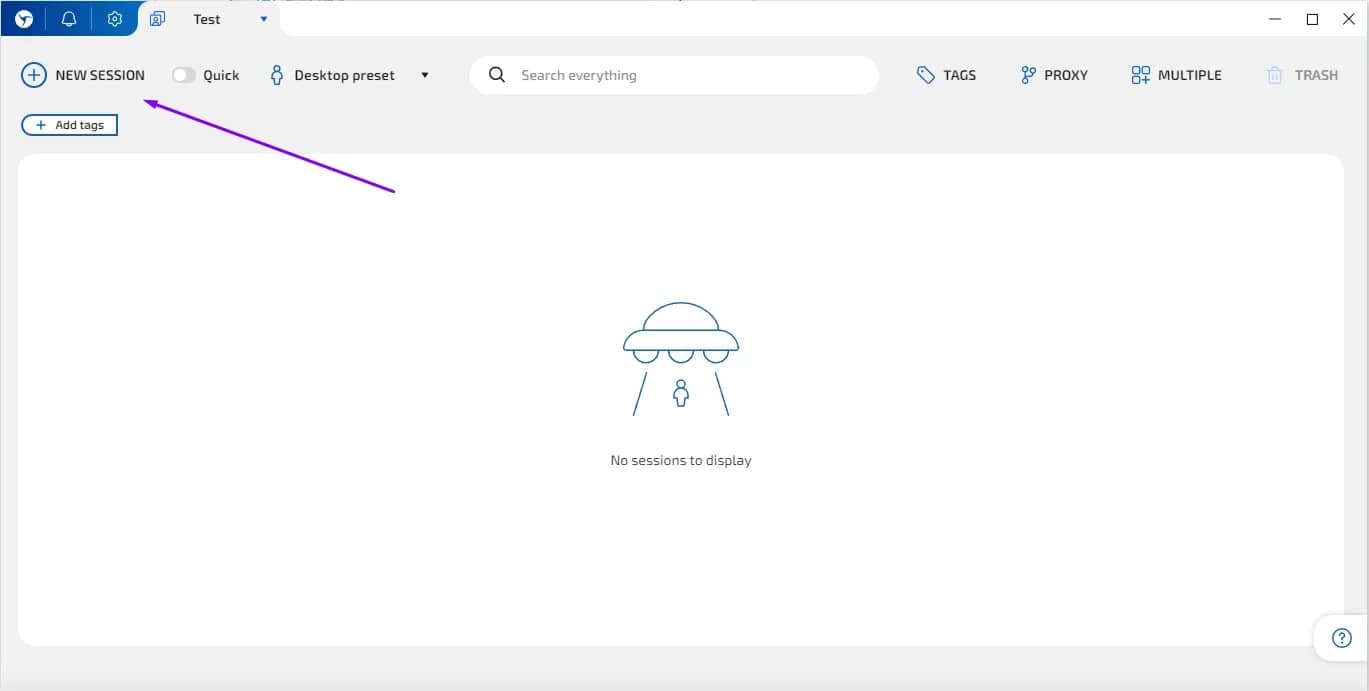
Step 1. Create a new profile
After logging into Linken Sphere, open the section with profiles and click the button to create a new profile.
At this stage, it is important to immediately give the profile a clear name. Do not name profiles simply "1", "2", "test", or "new". After a few days, it will be difficult to remember which account is where and what it was created for.
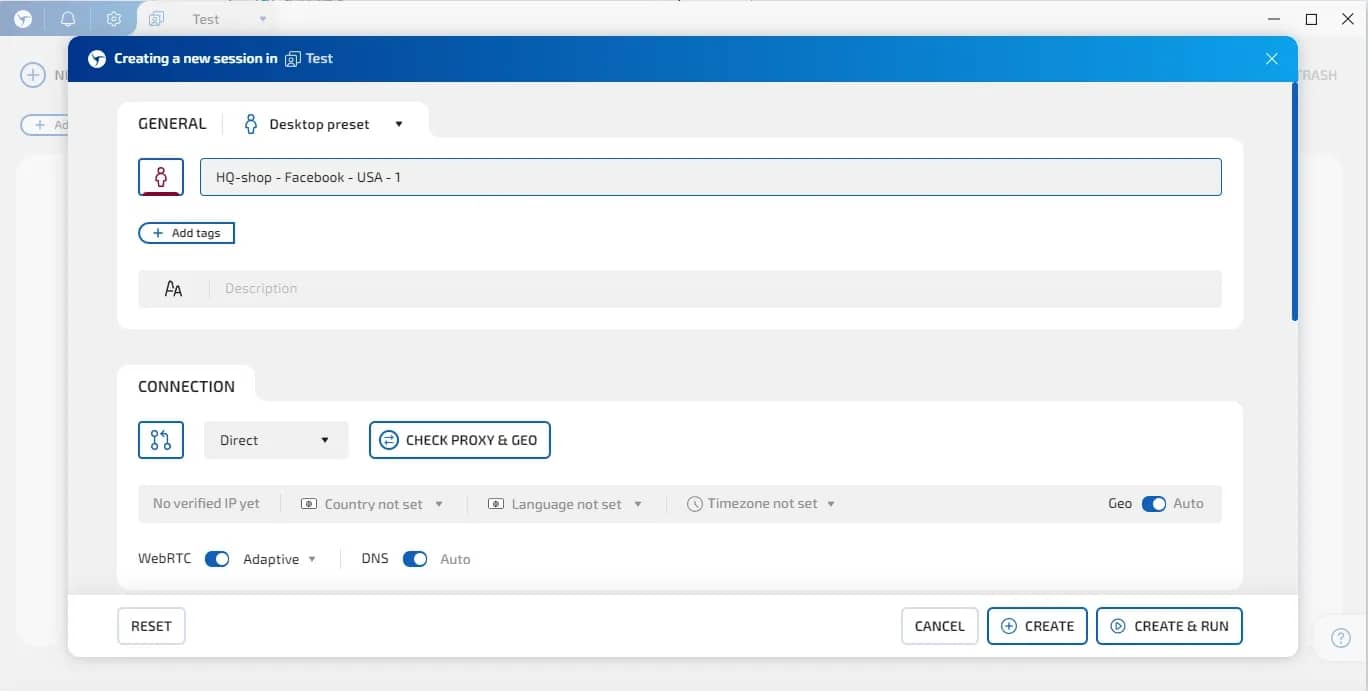
It is better to use a clear naming structure.
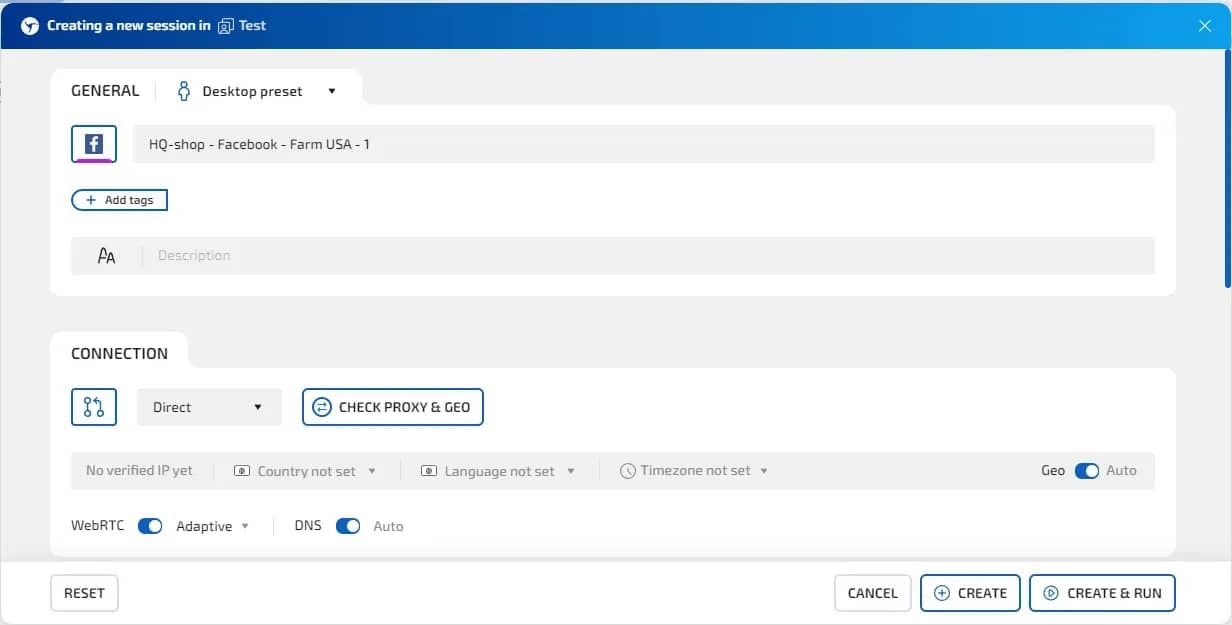
Examples:
- FB Ads / US / Account 01
- Google Ads / DE / Test
- TikTok / UA / Client 1
- Crypto / Wallet 01
- Marketplace / UK / Seller 2
A good name helps you quickly understand three things:
- which service the profile was created for;
- which GEO it is used for;
- which account or client it belongs to.
If you work in a team, clear profile names become even more important. Another person should be able to open the list and immediately understand what can be launched and what is best left untouched.
Step 2. Connect a proxy
To connect a proxy in a profile, go to the connection settings and specify the data you received from the provider. Usually you need to fill in:
- proxy type;
- host or IP;
- port;
- login;
- password.
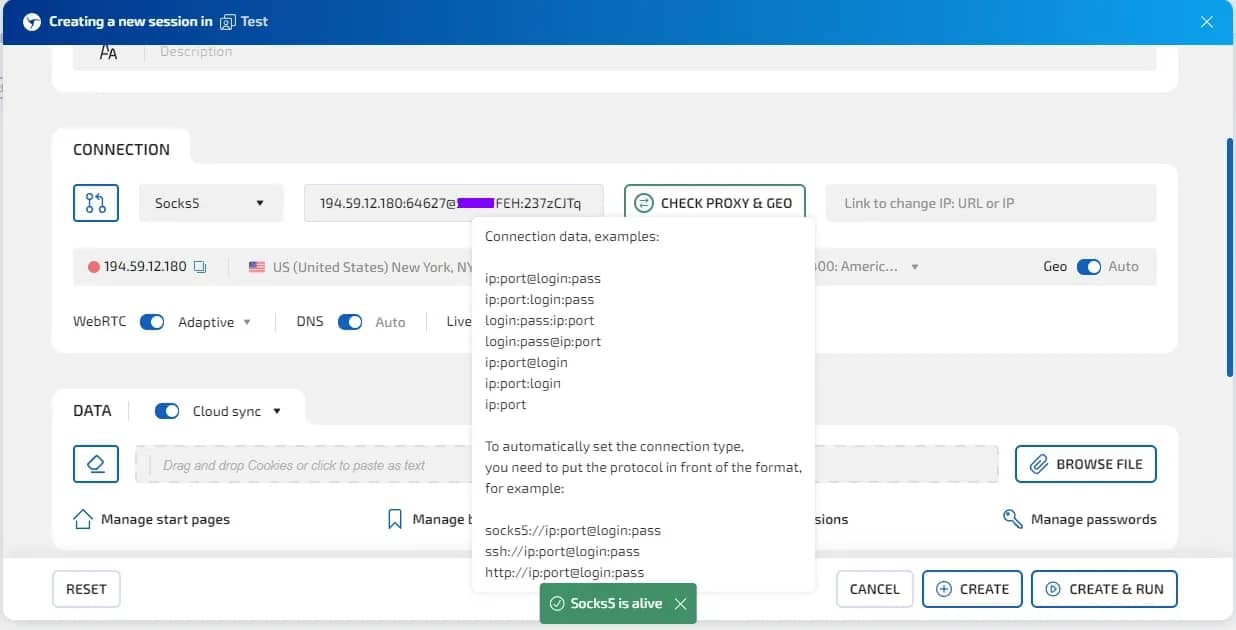
After adding, be sure to check the connection. If the proxy is connected correctly, the browser should show that the connection is working.
What needs to be checked:
- the proxy is active;
- there is no authorization error;
- the IP country matches your task;
- the connection speed is normal;
- the proxy does not drop when launching the profile and in subsequent work.
If the check fails, first make sure that you have correctly specified the connection type, IP, port, login, and password. Often an error occurs due to an incorrect data format or an incorrectly selected proxy type. For example, if the proxy is issued as SOCKS5, but HTTP is selected in the profile, the connection may not work.
Linken Sphere supports all current connection protocols and operates natively with providers that offer SOCKS5 with UDP+QUIC connection support.
You can also add proxies in bulk in the proxy manager to connect them to the required profiles in the main browser workspace later.
Step 3. Import profile data
If you work with ready-made accounts, you need to log into them. It is recommended to import the account's browser profile data into the antidetect browser profile, i.e., transfer the browser "history" to the new profile. If the data import was successful, you will be automatically logged into all services for which cookies contained data.
For importing, it is sufficient to copy the cookies that come with the account and paste them in the profile settings, or upload the file with this data.
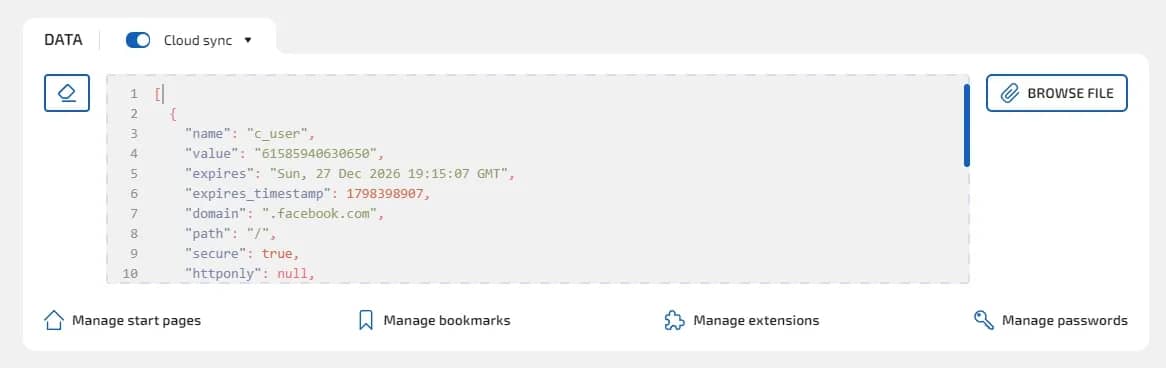
At this stage, you can select the necessary extensions, profile bookmarks, and also import passwords. If there are necessary extensions and bookmarks for work, we recommend adding them to the settings template so that each profile is created with them.
If you are creating a profile from scratch and there is no need to transfer data, simply skip this step and proceed to the next one.
Step 4. Choose basic profile parameters
When creating a profile, it is important that its parameters look logical and do not contradict each other. In an antidetect browser, they form a digital fingerprint: operating system, browser engine, language, time zone, geolocation, screen resolution, and device characteristics.
A beginner does not need to manually change dozens of values; modern antidetect browsers generate fingerprints without major errors. It is safer to create a profile, automatically generate a fingerprint, and check the overall consistency of the parameters.
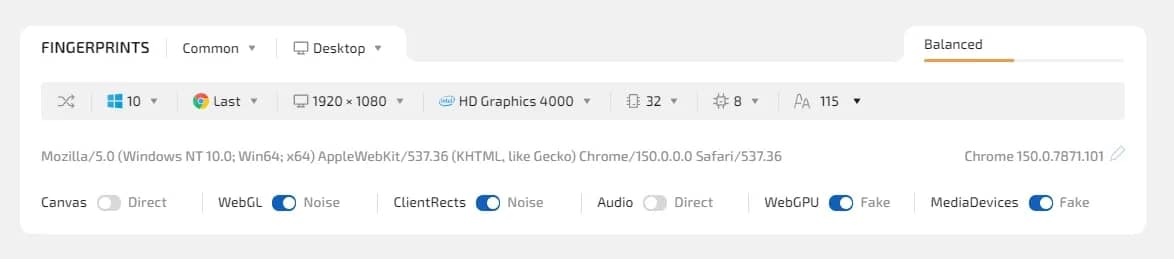
For example, for a profile with a connection from Germany, it is logical to choose:
- IP — Germany;
- time zone — Germany;
- browser language — German or English;
- geolocation — Germany;
- a realistic device and browser configuration.
For the USA, the principle is the same: IP, geolocation, and time zone must correspond to the selected region, and the browser language must be English.
The main rule: parameters must not conflict with each other. For example, a combination of an IP from Germany, a Ukrainian time zone, Russian browser language, and USA geolocation looks unnatural.
In Linken Sphere, the configurator automatically selects the optimal set of device parameters. When using Hybrid 2.0 mode, the browser forms a digital fingerprint based on your real device, practically reducing the possibility of creating a non-existent parameter configuration to zero.
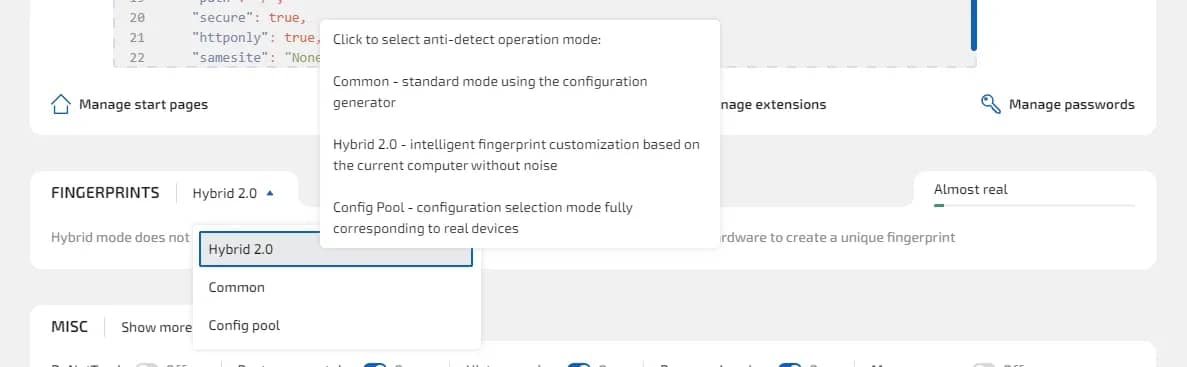
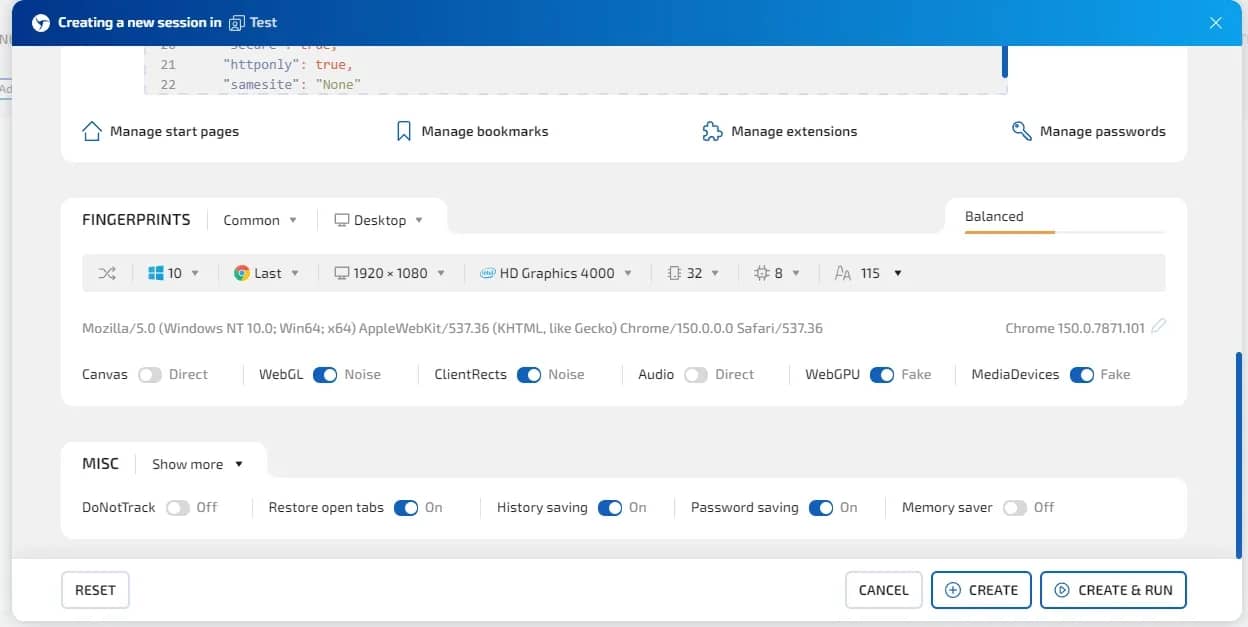
For the first launch, it is enough to:
- Create a profile.
- Enter the necessary details for ease of future work (name, description, tags).
- Connect a proxy — the GEO and timezone will be selected based on your IP data.
- Generate a digital fingerprint.
- Save and launch the profile.
Do not manually change Canvas, WebGL, audio, screen resolution, font list, User-Agent, language, or time zone without a reason: random settings can make the profile look less natural.
Step 5. Check the profile before logging into the account
This is one of the most important steps. Do not immediately open Facebook, Google, TikTok, a marketplace, or a crypto exchange and log into your account. First, you need to make sure that the profile looks correct.
Launch the profile and open a service to check the IP and browser environment.
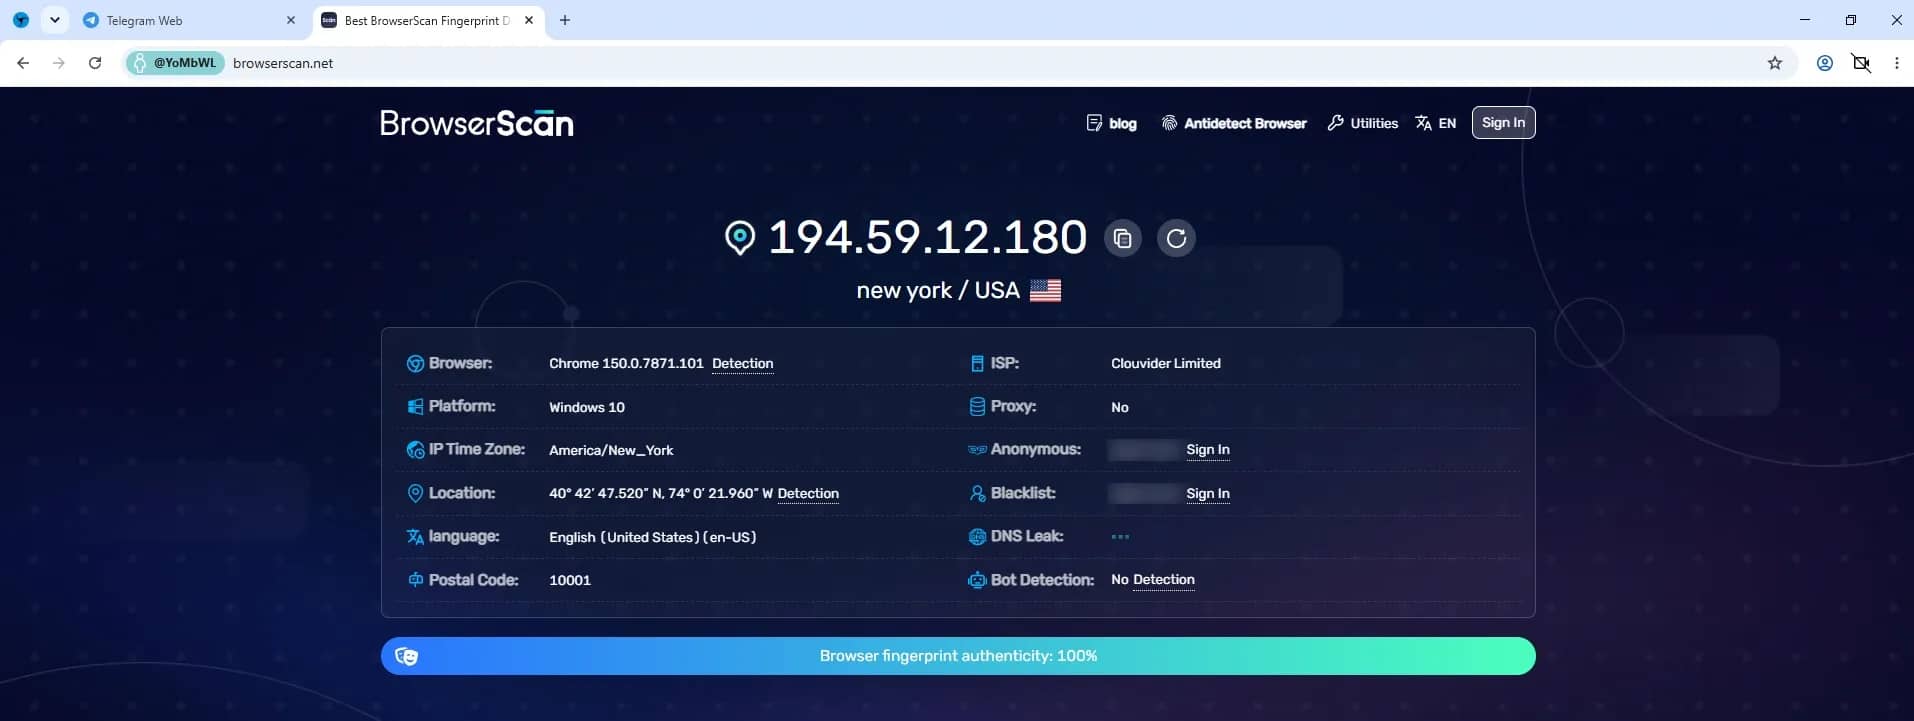
Check the main parameters:
- which IP is displayed;
- GEO of the IP;
- whether the real IP is visible through WebRTC;
- whether the time zone matches the GEO;
- whether the browser language matches the region;
- whether there are DNS leaks;
- whether there are obvious conflicts in the parameters.
A good result looks like this:
- IP from the target country;
- time zone corresponds to the country or region;
- browser language looks logical;
- WebRTC does not show the real IP;
- DNS does not conflict with the GEO;
- the fingerprint looks stable and realistic.
If you see a conflict, it is better to fix it before logging into the target platform. Especially when dealing with a valuable account: an advertising account, a client profile, marketplace accounts, or a crypto exchange.
When using high-quality proxies, standard settings in Linken Sphere pass all well-known modern anonymity check services.
Step 6. Log into your account
When the profile is created, the proxy is connected, and the check shows no problems, you can log into your account.
If you did not import cookies, then log in using your username and password.
After logging in, cookies and the session will be saved inside this profile. Next time, you will be able to open the same profile and continue working without authorization, unless the site resets the session.
An important point: do not open this same account in another profile unless necessary. For the website, this may look like logging in from a new device. Sometimes this is fine, but if such actions occur frequently, the account may trigger additional verification.
If the account is already old and was previously used from another device or country, be especially careful. Do not suddenly change region, device, language, and behavior. It is better to maintain a highly similar and stable environment.
Step 7. Update profile details in your tracking system
After the first login, immediately record the data in the table or make changes to the profile description — update the information about it. Do not put this off until later: when there are more profiles, remembering details will be difficult.
Profile tracking helps to avoid basic mistakes:
- accidentally logging into an account from the wrong profile;
- connecting one proxy to several unrelated accounts;
- forgetting which profile is responsible for what;
- confusing a working account with a test one.
If you work in a team, the table becomes a part of general discipline. Even simple tracking reduces the number of accidental errors.
How to work with profiles in a team
A large number of profiles and multiple people in one workspace significantly increase the possibility of an error. To avoid this, you need to agree on working principles among yourselves, as well as divide work among desktops.
The functionality of Linken Sphere allows you to create a team, add users to it, and assign them the necessary access rights.
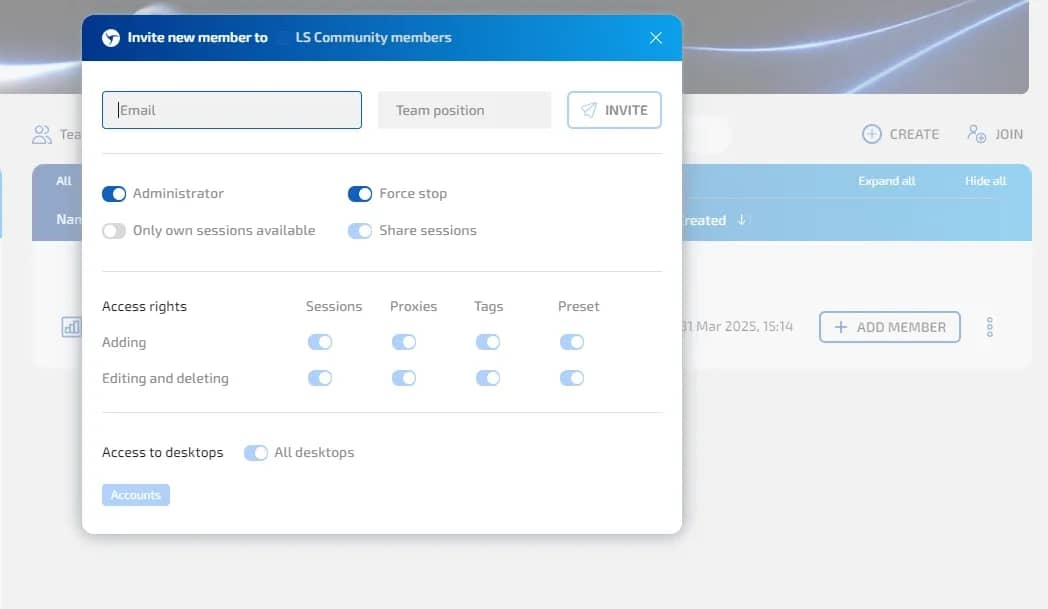
In the history of each profile, you can check who used it if you need to investigate workflows.
For team work, it is enough to create the team itself in the account settings, as well as add team members with the required role and access rights by sending them an invitation by email.
How to work with a profile after setup
Creating a profile is only the first step. Next, it is important not to ruin it with incorrect actions.
Do not change proxies without a reason
If an account has already started working from a specific IP or region, do not suddenly change the proxy. Especially if the country changes.
For example, if an account has been logging in from Germany for several weeks and then suddenly opens from Brazil, the site may request login confirmation. For some platforms, this is a normal security measure.
If a proxy needs to be replaced, it is better to select a new IP from the same region and not change all profile parameters at once.
Do not regenerate the fingerprint every day
For a single account, the profile must be stable. If the site sees a new set of parameters every day, it might look as if the account is constantly logging in from different devices.
Correct logic: created profile — generated fingerprint — connected proxy — logged into account — continue working in the same environment.
No need to regenerate the fingerprint every time before launching.
Do not use one profile for different accounts
If accounts should not be linked, do not open them in the same profile.
It is better to use one profile for one account or for one linked group of accounts, if such a link is acceptable according to your working logic.
For beginners, the safest rule is: one profile = one account.
Yes, this requires more profiles, but it reduces the risk of confusion.
Do not log into one account from different profiles
The reverse mistake is to create several profiles and log into the same account from each. For the site, this may look like constant logins from different devices.
If an account is already tied to one profile, continue working with it right there.
Do not mix supplies
Supplies are emails, phone numbers, payment details, cookies, proxies, backup emails, and other elements used when working with accounts.
If accounts are meant to be independent, do not use the same data in different profiles.
It is bad practice to use:
- one phone number for several accounts;
- one backup email for different profiles;
- one proxy for a large number of accounts;
- the same payment details where accounts should not overlap.
An antidetect browser helps to isolate the browser environment, but it will not fix errors in the overall logic of your work.
Checklist before launching a working account
Before logging into an important account, run through a short checklist.
A profile is ready for work if:
- a separate profile has been created for the specific task;
- the fingerprint has been generated and does not contain contradictory parameters;
- the proxy is connected and has the correct country of connection and time zone, and WebRTC does not show the real IP;
- cookies have been imported correctly;
- the browser language looks logical.
If there are doubts about even one point, it is better to fix the problem before logging into the account.
Conclusion
To use an antidetect browser, a beginner does not need technical knowledge. It is enough to follow basic working logic and not interfere with the browser's algorithms by changing settings yourself.
Linken Sphere minimizes user involvement in profile settings by creating optimal characteristics automatically. You can get a profile in literally two clicks, specifying only the name and choosing a proxy.
You can start working with the browser without linking a card — sign up, Linken Sphere has a plan for 5 free profiles.
Frequently asked questions
- For a test introduction to the interface, a proxy is not always mandatory, but for real work, it is better to use separate proxies right away. If several profiles operate from the same IP, the accounts can be linked to each other.
- A VPN may be suitable for simple tasks, but for working with a large number of profiles, proxies are usually more convenient: they are easier to bind, scale, and control. In addition, most free VPN services are blacklisted by anti-bot systems.
- No. For a single account, it is better to keep a stable fingerprint. If you constantly change parameters, the site may perceive each login as a new device. The correct logic is to create a profile once and then work in it without unnecessary changes.
- Do not immediately change all profile settings. First check: if the IP has changed; if the GEO matches; if the proxy has disconnected; if the fingerprint has changed; if there was a login to the account from another profile or device. A request for login confirmation does not always mean a ban. Often, it is a standard security check, especially if the account accessed from a new environment.
Why Google Blocks Accounts and What Your Antidetect Has to Do With It
Google has once again complicated the mechanisms of digital identification by deploying a new, more sophisticated layer of protection based on proprietary HTTP headers. This quiet change caught most of the market off guard, triggering a wave of rushed updates. While others hastily released superficial 'fixes', we realized that we were dealing not with a minor issue but with a fundamental shift that required deep and comprehensive analysis.
SOCKS vs HTTP Proxy: What’s the Real Difference and Which One to Choose?
There are times when you don’t want a website to link the request back to your device. That’s where a proxy comes in, it acts like a middle layer and sends the request for you. The site sees the proxy’s info instead of yours. It’s a go-to trick when you’re trying to see a page that’s not available in your region, pull content that’s restricted by location, or avoid hitting a wall when sending lots of requests.

The Best Alternative to OBS Studio
Working with a webcam on many online platforms can turn into a real challenge. A strict oval or rectangular frame appears on the screen, but your image doesn’t align perfectly with it. As a result, the system blocks further progress, demanding perfect alignment, and your workflow is disrupted before it even begins.