How to Set Up a Proxy in Linken Sphere: Step-by-Step Guide
Key takeaways:
- Linken Sphere handles local browser parameters while anyIP masks your physical network location.
- SOCKS5 is the recommended protocol for Linken Sphere because of its lower-level data handling and fewer leaks.
- Linken Sphere’s built-in Proxy Manager allows fast, bulk uploads to easily manage hundreds of accounts simultaneously.
Linken Sphere is an elite, Chromium-based anti-detect browser that's mostly used for multi-account management, web scraping, and automation. This browser is favored by professionals and small to large teams specifically for Linken Sphere's advanced spoofing and digital fingerprint control features. Plus, Linken has a free plan for everyone, offering up to 5 profiles.
However, what really makes Linken Sphere so appealing is the browser's proxy integrations to increase global reach and keep connections private from prying eyes. In this walkthrough, we'll show you how to easily integrate anyIP proxies with your Linken Sphere browser.
How to Add an anyIP Proxy in Linken Sphere
The setup process is straightforward and only takes a few minutes. To get started, you only need to have an anyIP account, an active proxy account, and a working proxy profile. After that, simply follow these 7 steps to complete the integration.
Step 1: Create a new session
Go ahead and open your Linken Sphere browser, or download the appropriate application for your device's operating system and create an account. Note that while this browser has a free version, it's limited to 5 sessions only. Annual paid plans with more sessions and other features start from $24/month.
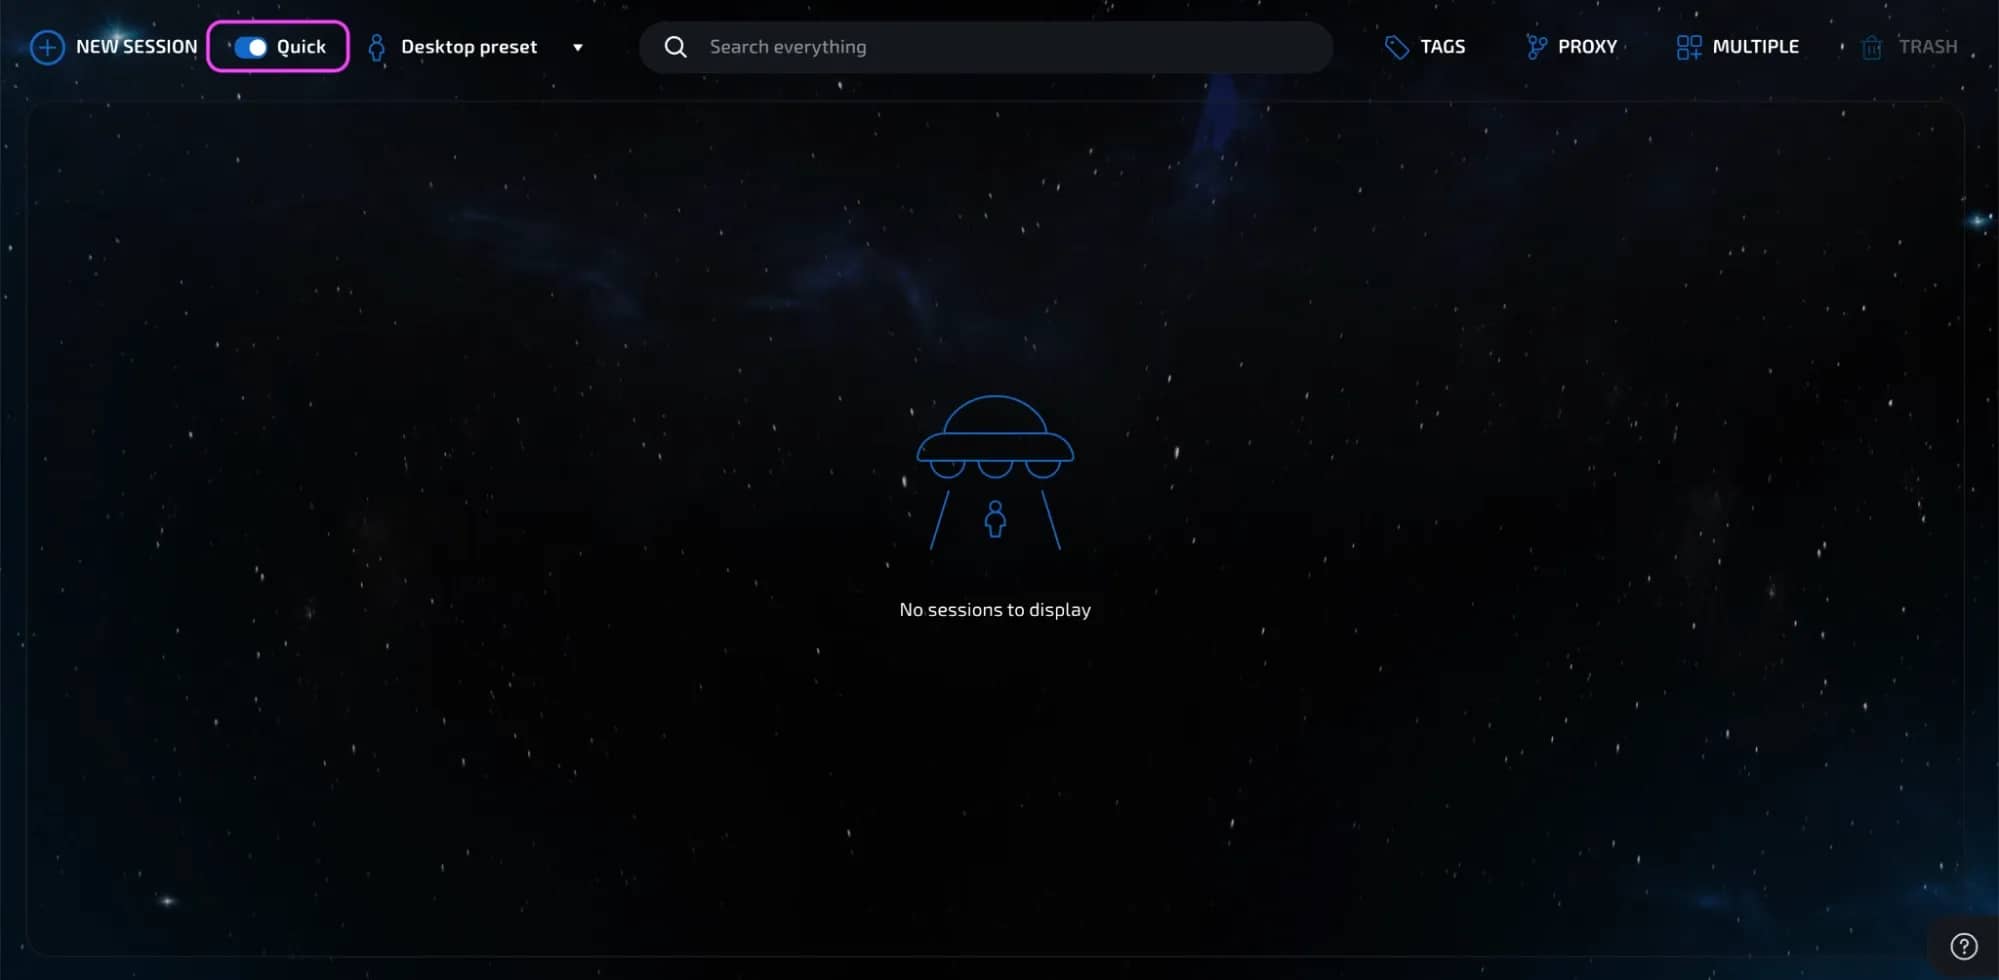
Once your application is running, you should see the main control dashboard. Go to the top-left corner and click on New Session. Here, you have 2 options: create every profile manually or choose Quick setup.
Option 1: Manual Session Setup
Start by clicking the Quick toggle, then click New Session.
Then a new window will open where you can create a new profile with 5 blocks: General, Connection, Data, Fingerprints, and Miscellaneous.
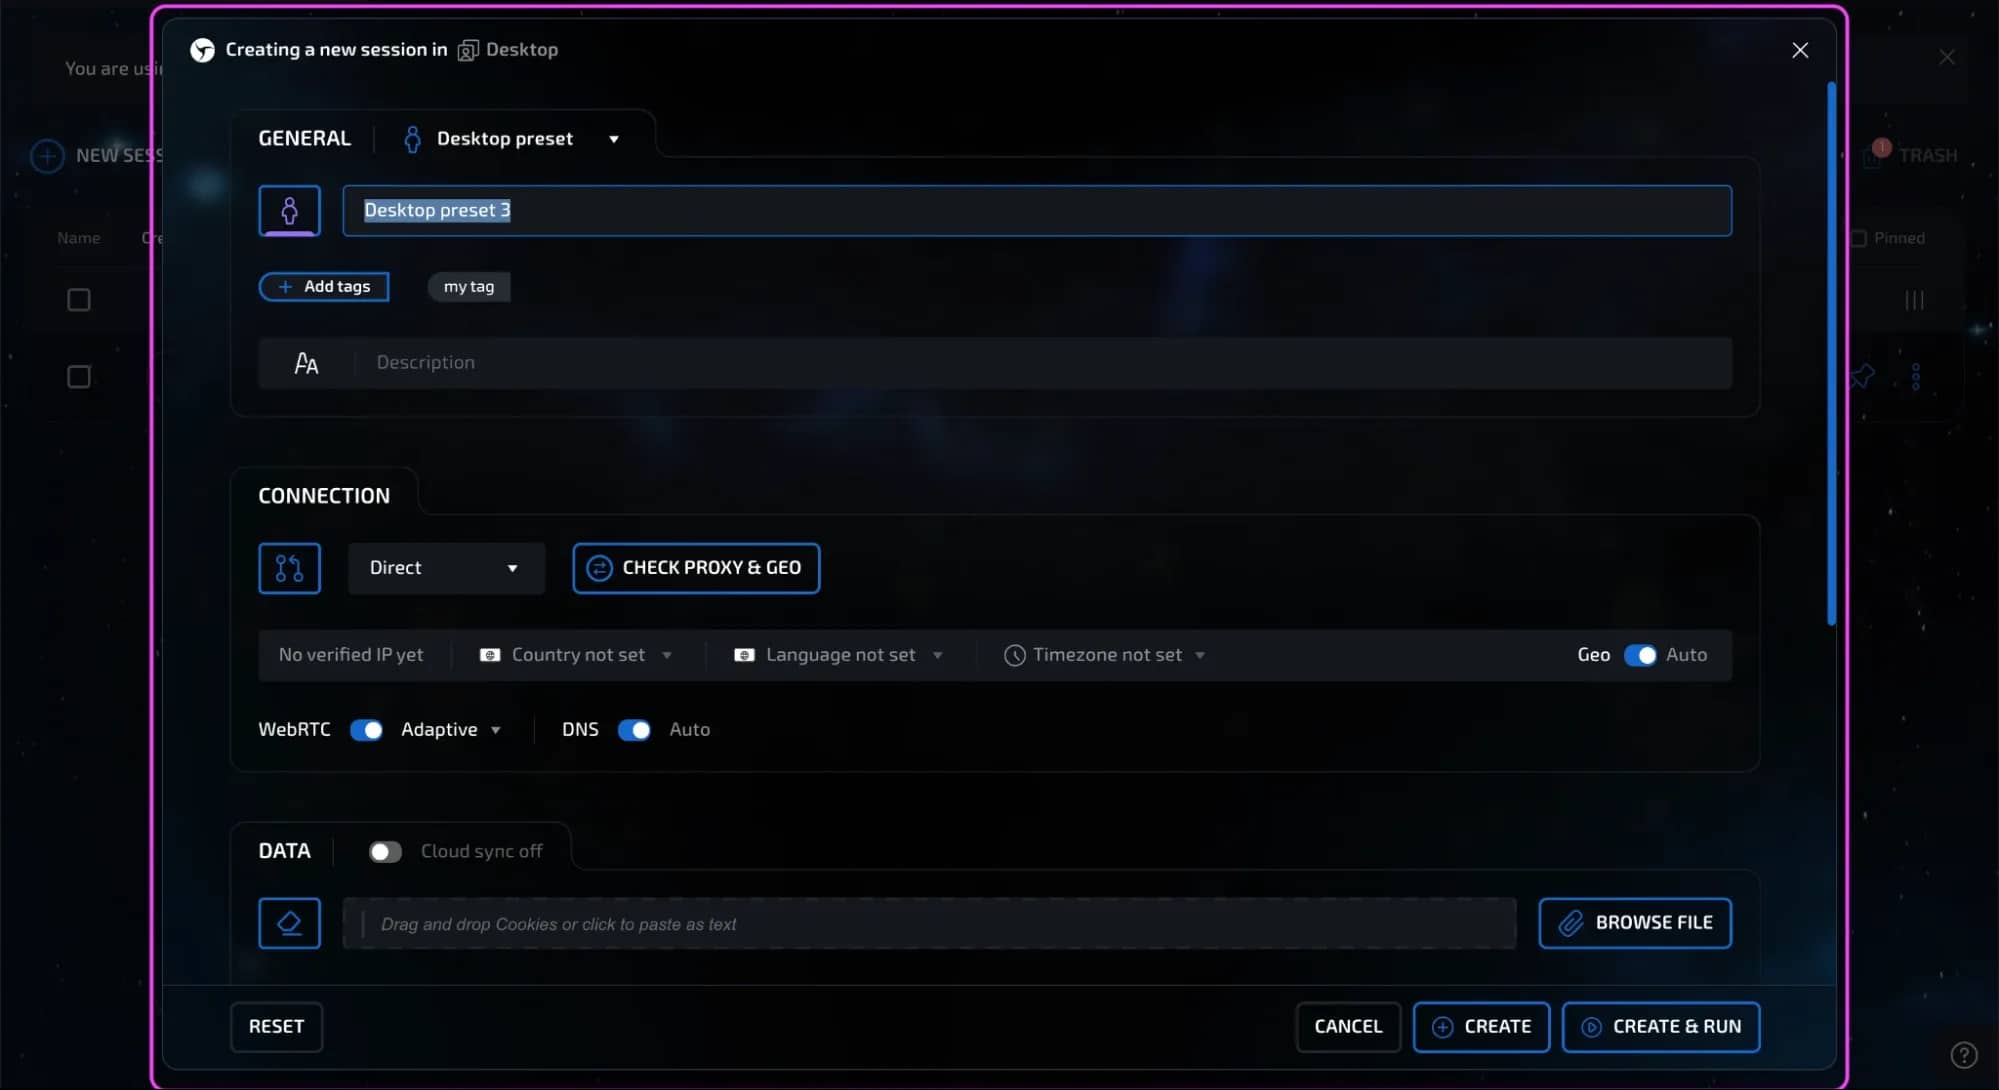
This option is great for someone who wants more control over their profile’s configuration:
- General: Choose a proxy/connection type.
- Connection: Detail WebRTC and DNS behavior.
- Data: Manage cookies, bookmarks, extensions, and cloud sync.
- Fingerprints: Select an anti-detection mode (Hybrid, Normal, or Configuration Pool).
- Miscellaneous: Adjust browser behavior toggles.
Once configured, click on Create and your session is ready to go.
Option 2: Quick Setup
If you prefer a simpler setup, keep the Quick toggle on and click New Session. This will prompt Linken Sphere to immediately create a new profile for you with pre-determined presets.
When creating the new session, make sure to give it a distinct name, like anyIP_US_Facebook_01, to stay organized. This will also help you find individual sessions when your profile list grows.
Step 2: Open the proxy settings
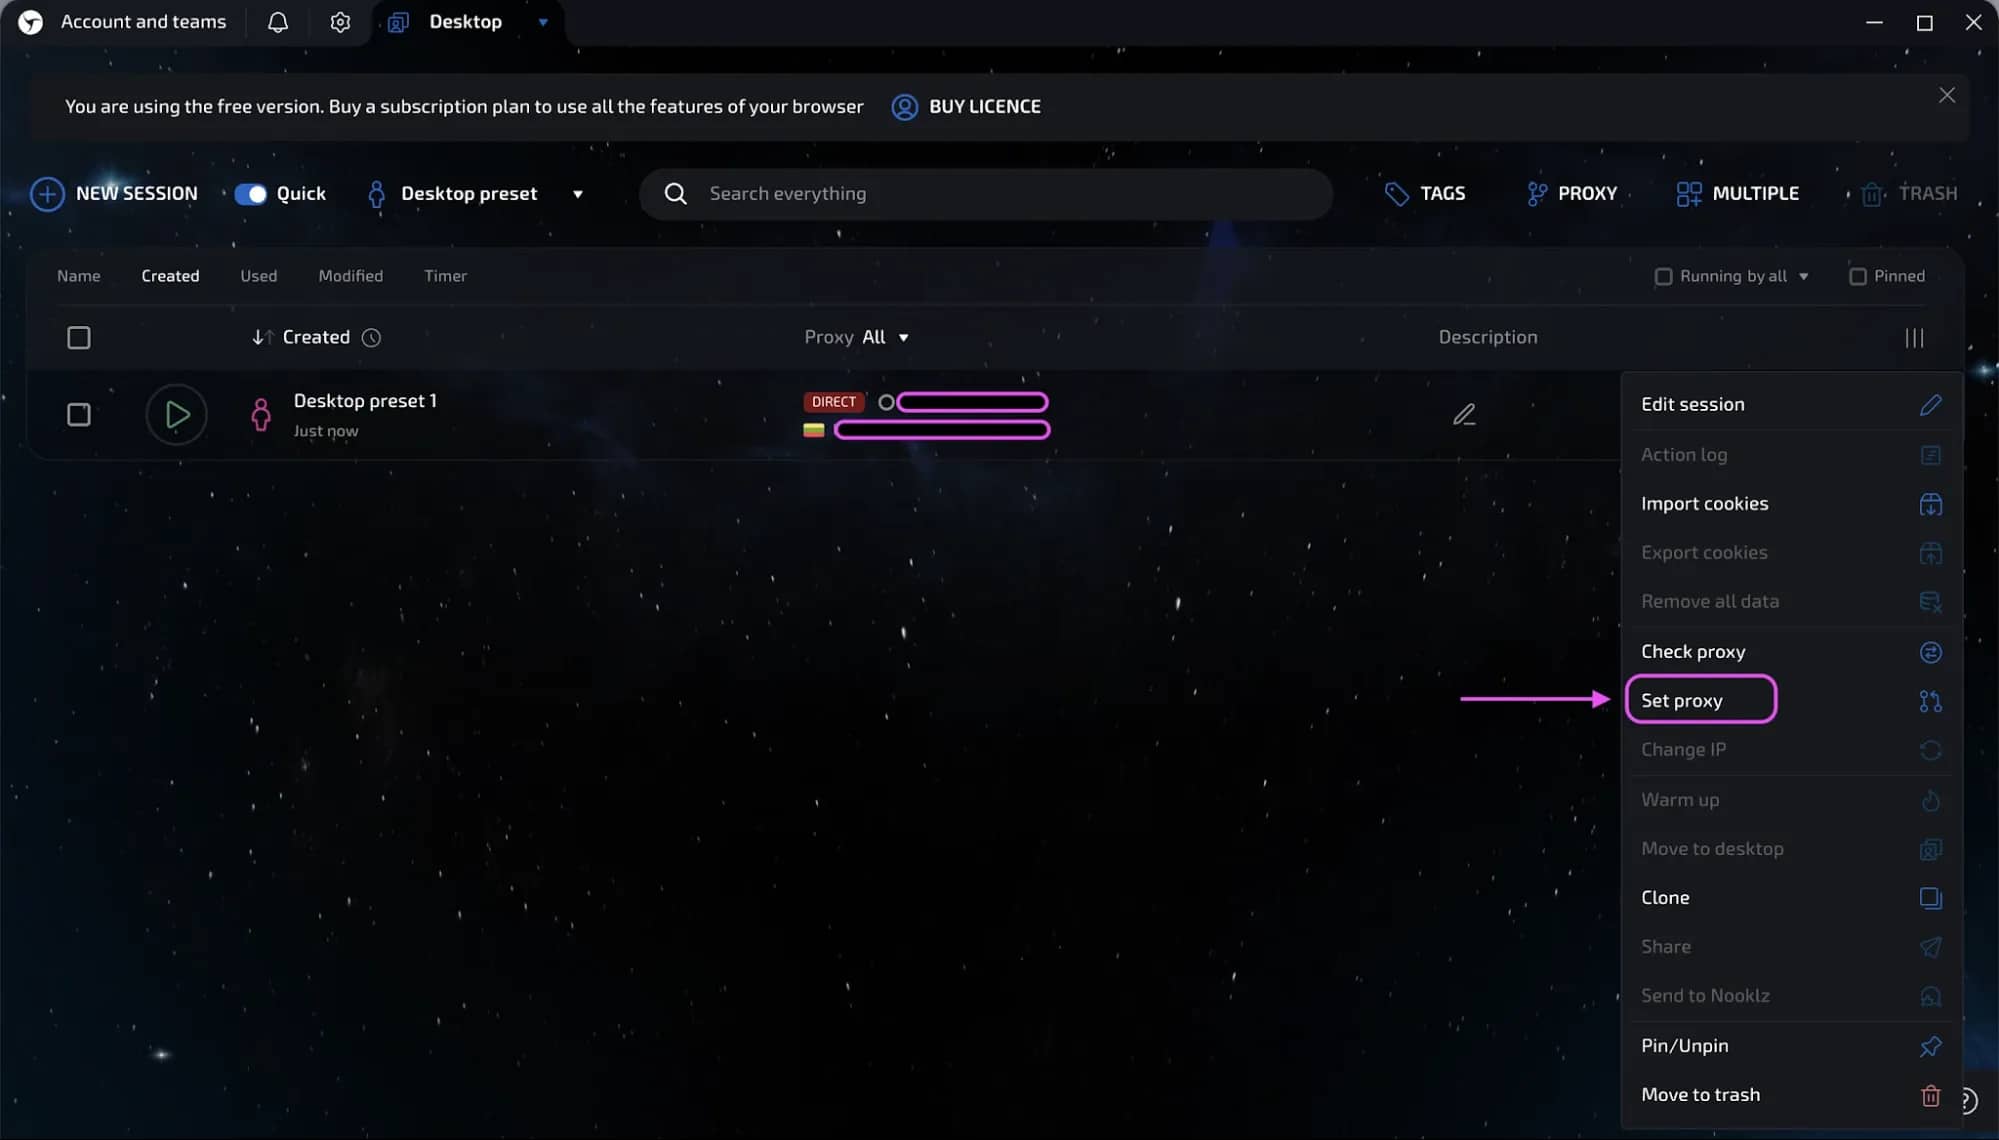
Once your session is set up, click on the three vertical dots on the right side of the session and then click on Set Proxy. This will open a dedicated window where you can enter your proxy details.
Step 3: Select the proxy protocol
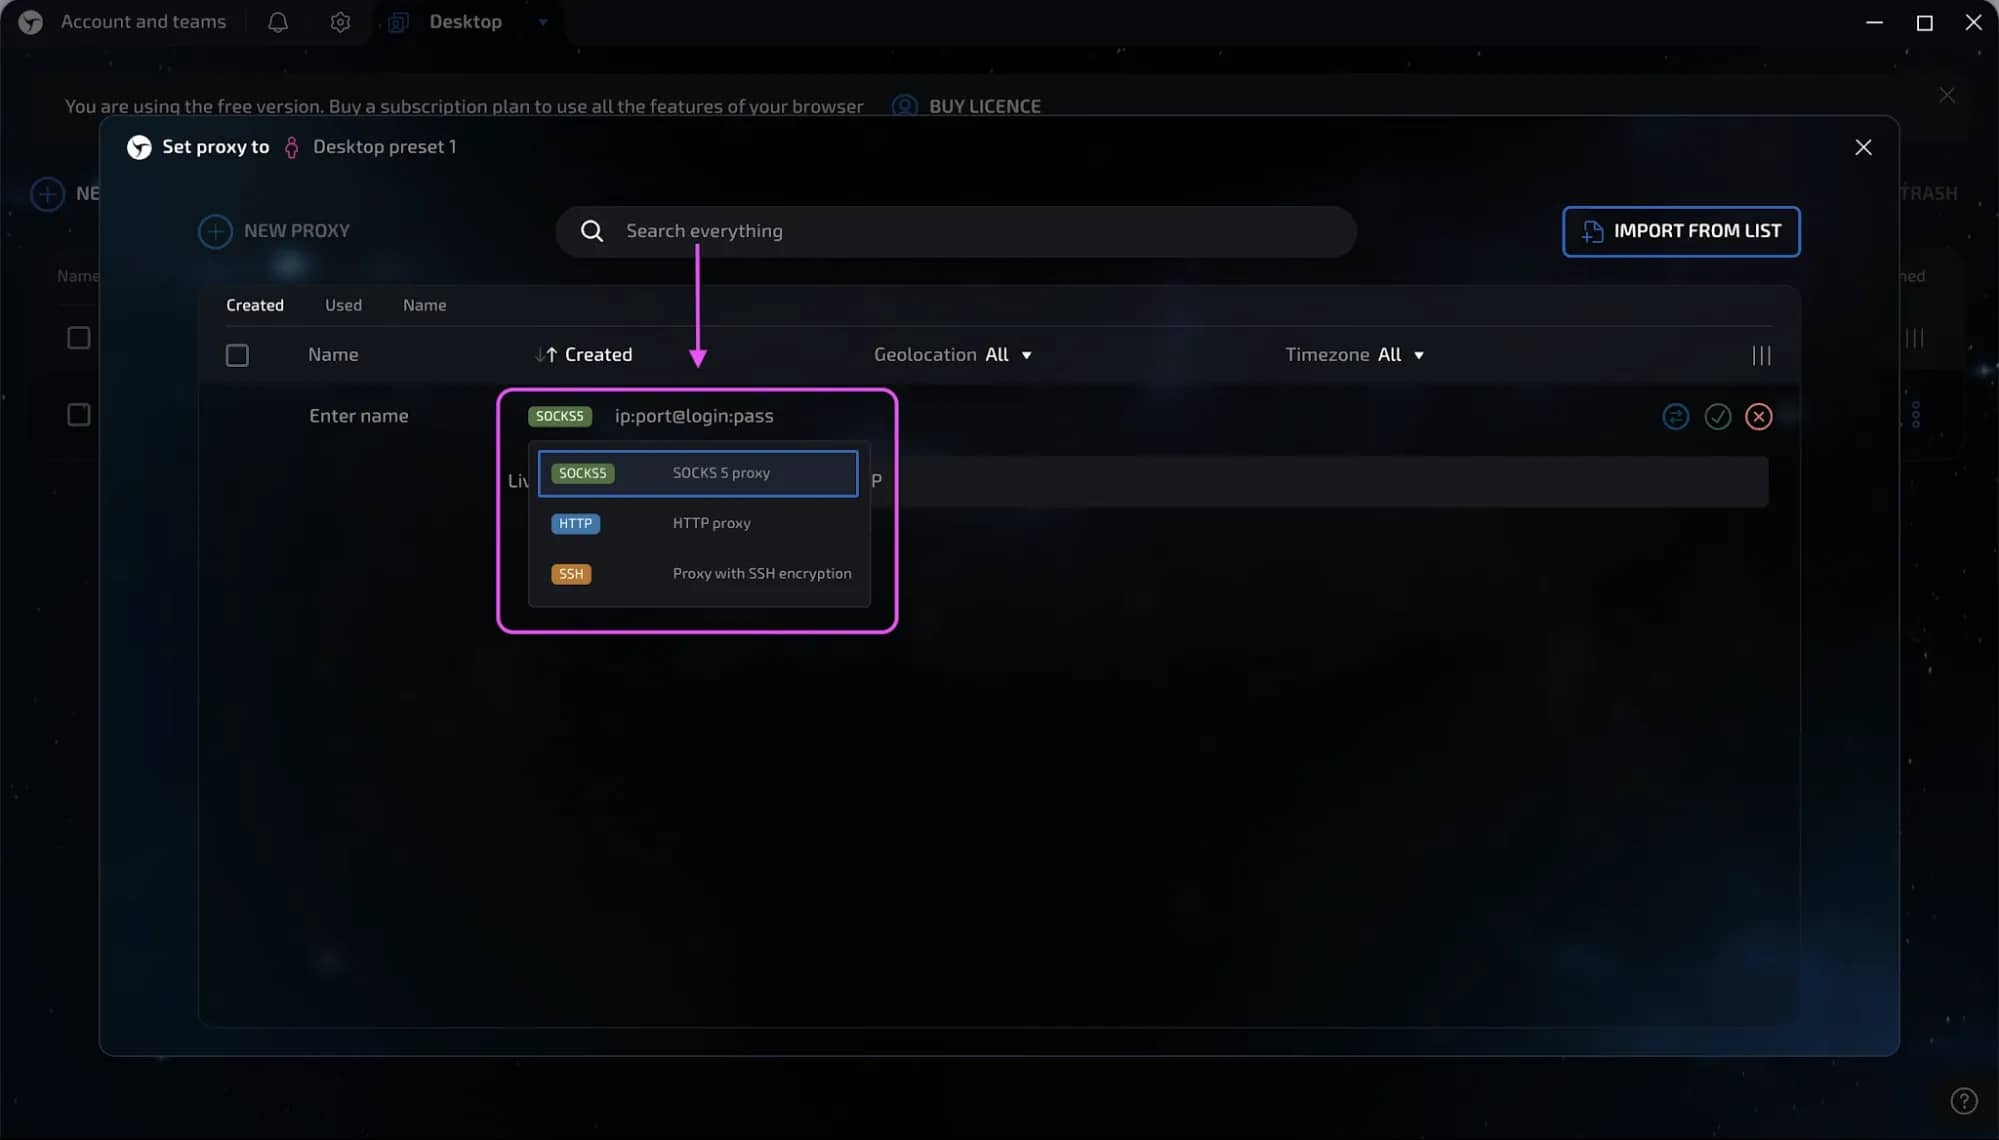
When you open the proxy setup window, select your preferred connection protocol. We highly recommend choosing SOCKS5 proxies or the SOCKS5 protocol because it pairs best with Linken Sphere's advanced fingerprint protection. But both HTTP and HTTPS are valid alternatives as well.
Step 4: Enter your anyIP proxy credentials
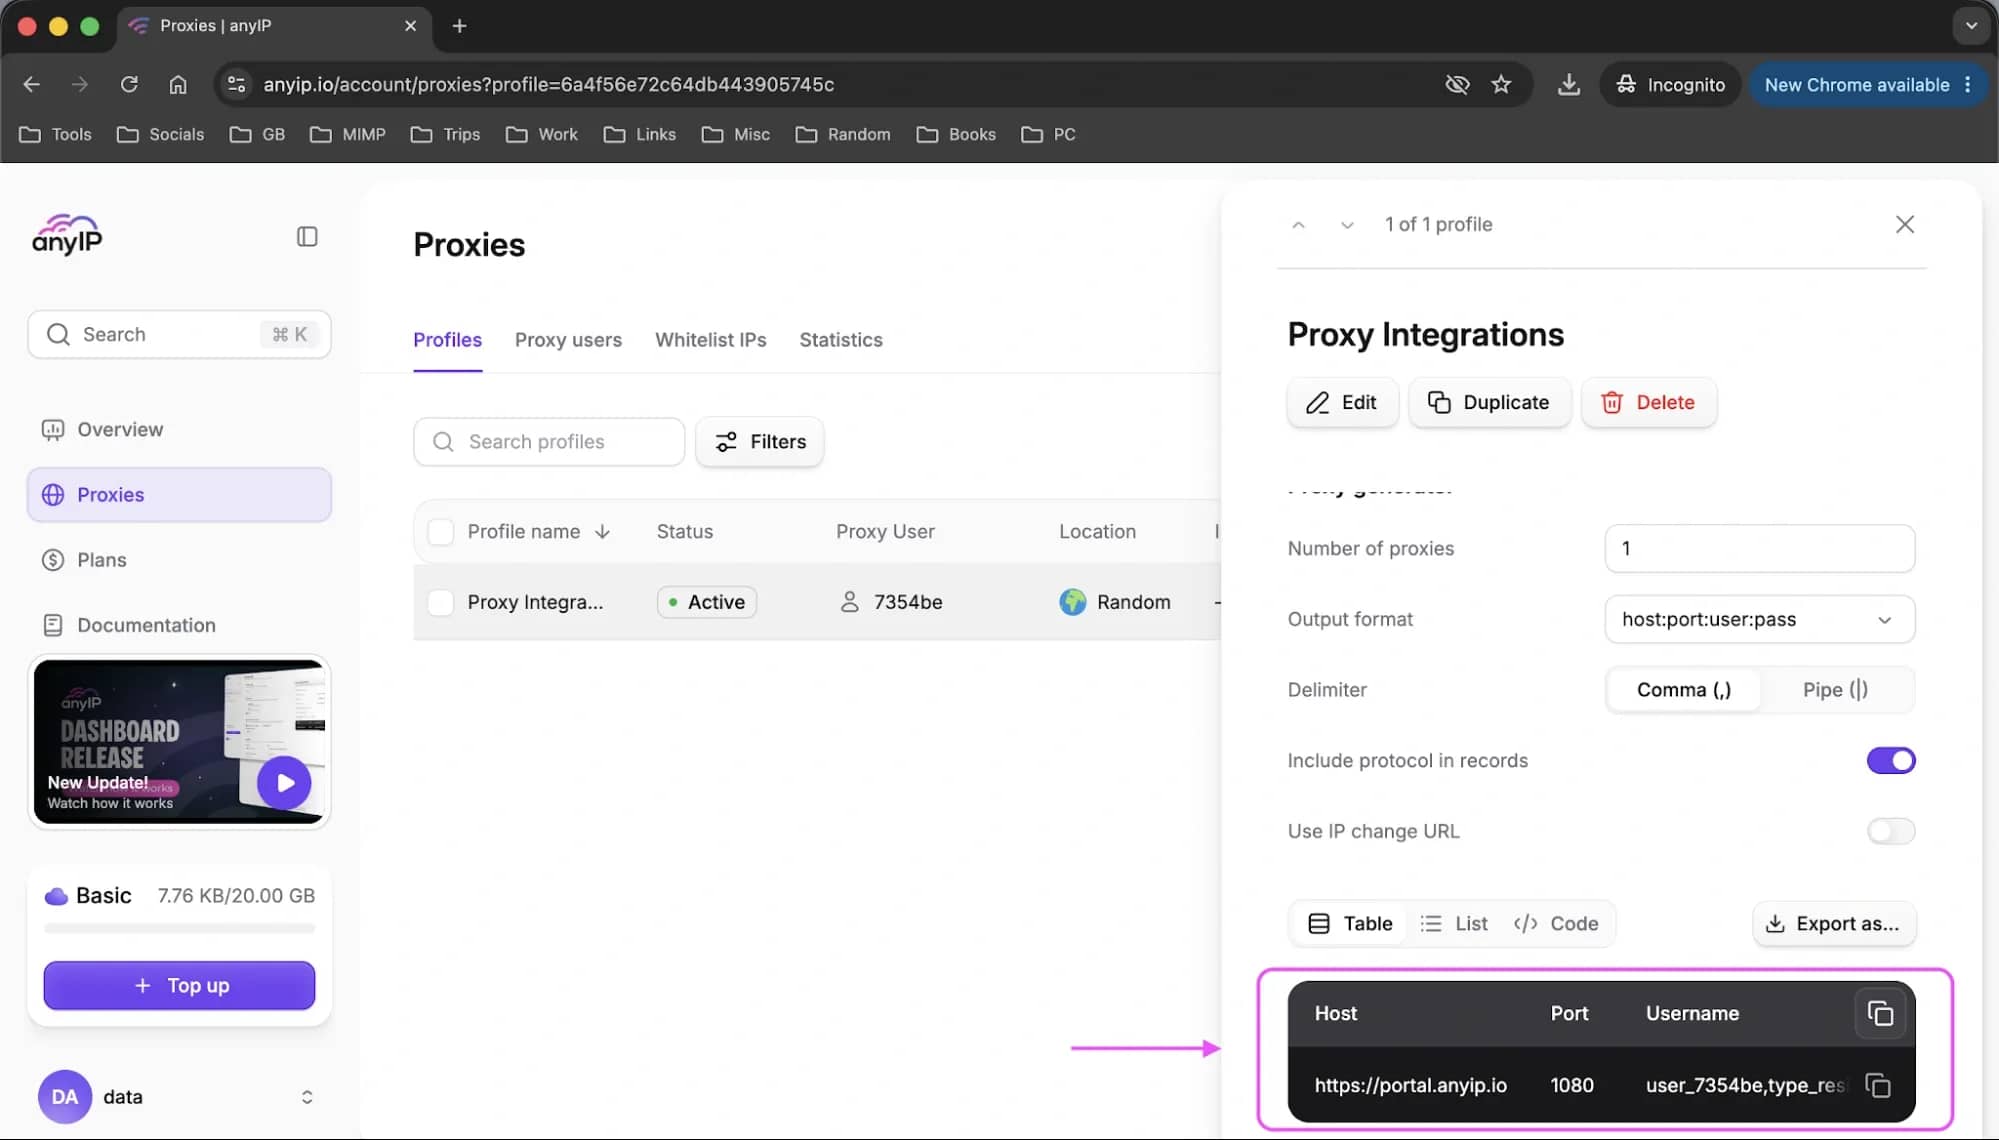
After you select your protocol, you can copy your anyIP proxy details by accessing the anyIP dashboard → Proxies → Profiles. Click on the particular proxy profile and scroll down to access the proxy information.
Example details:
- IP/Host: residential.anyip.io (or your specific regional endpoint)
- Port: The designated numeric port (e.g., 9000)
- Login/Username: Your unique account ID string
- Password: Your secure proxy password
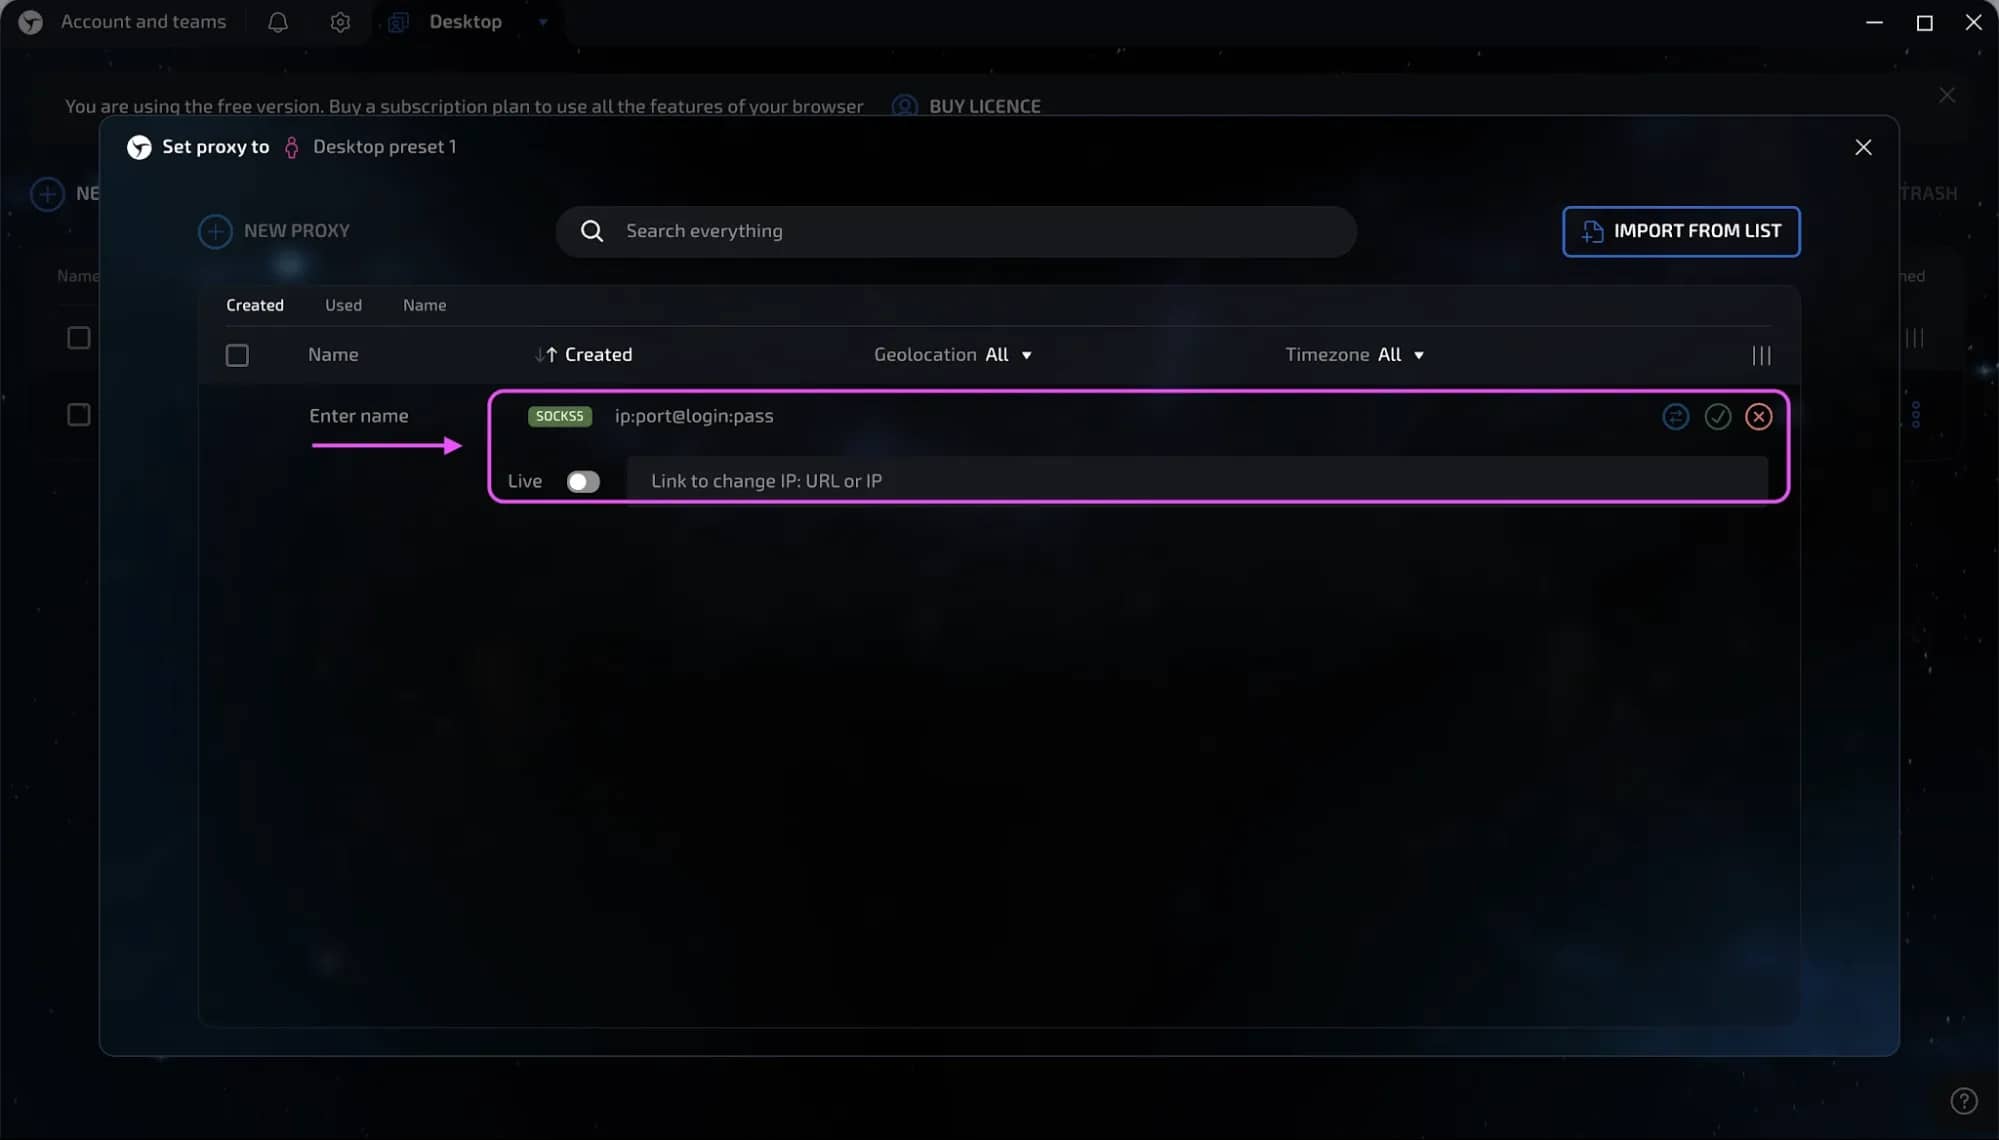
Now that you have your proxy details, you can then open your Linken Sphere session and paste the details right next to the protocol selection.
Step 5: Configure location or session options
With anyIP, you don't need to constantly change web settings on a website dashboard to swap countries. Instead, you can control your target country, specific city, and rotation type directly in the username string box, which depends on your anyIP plan and selected proxy profile.
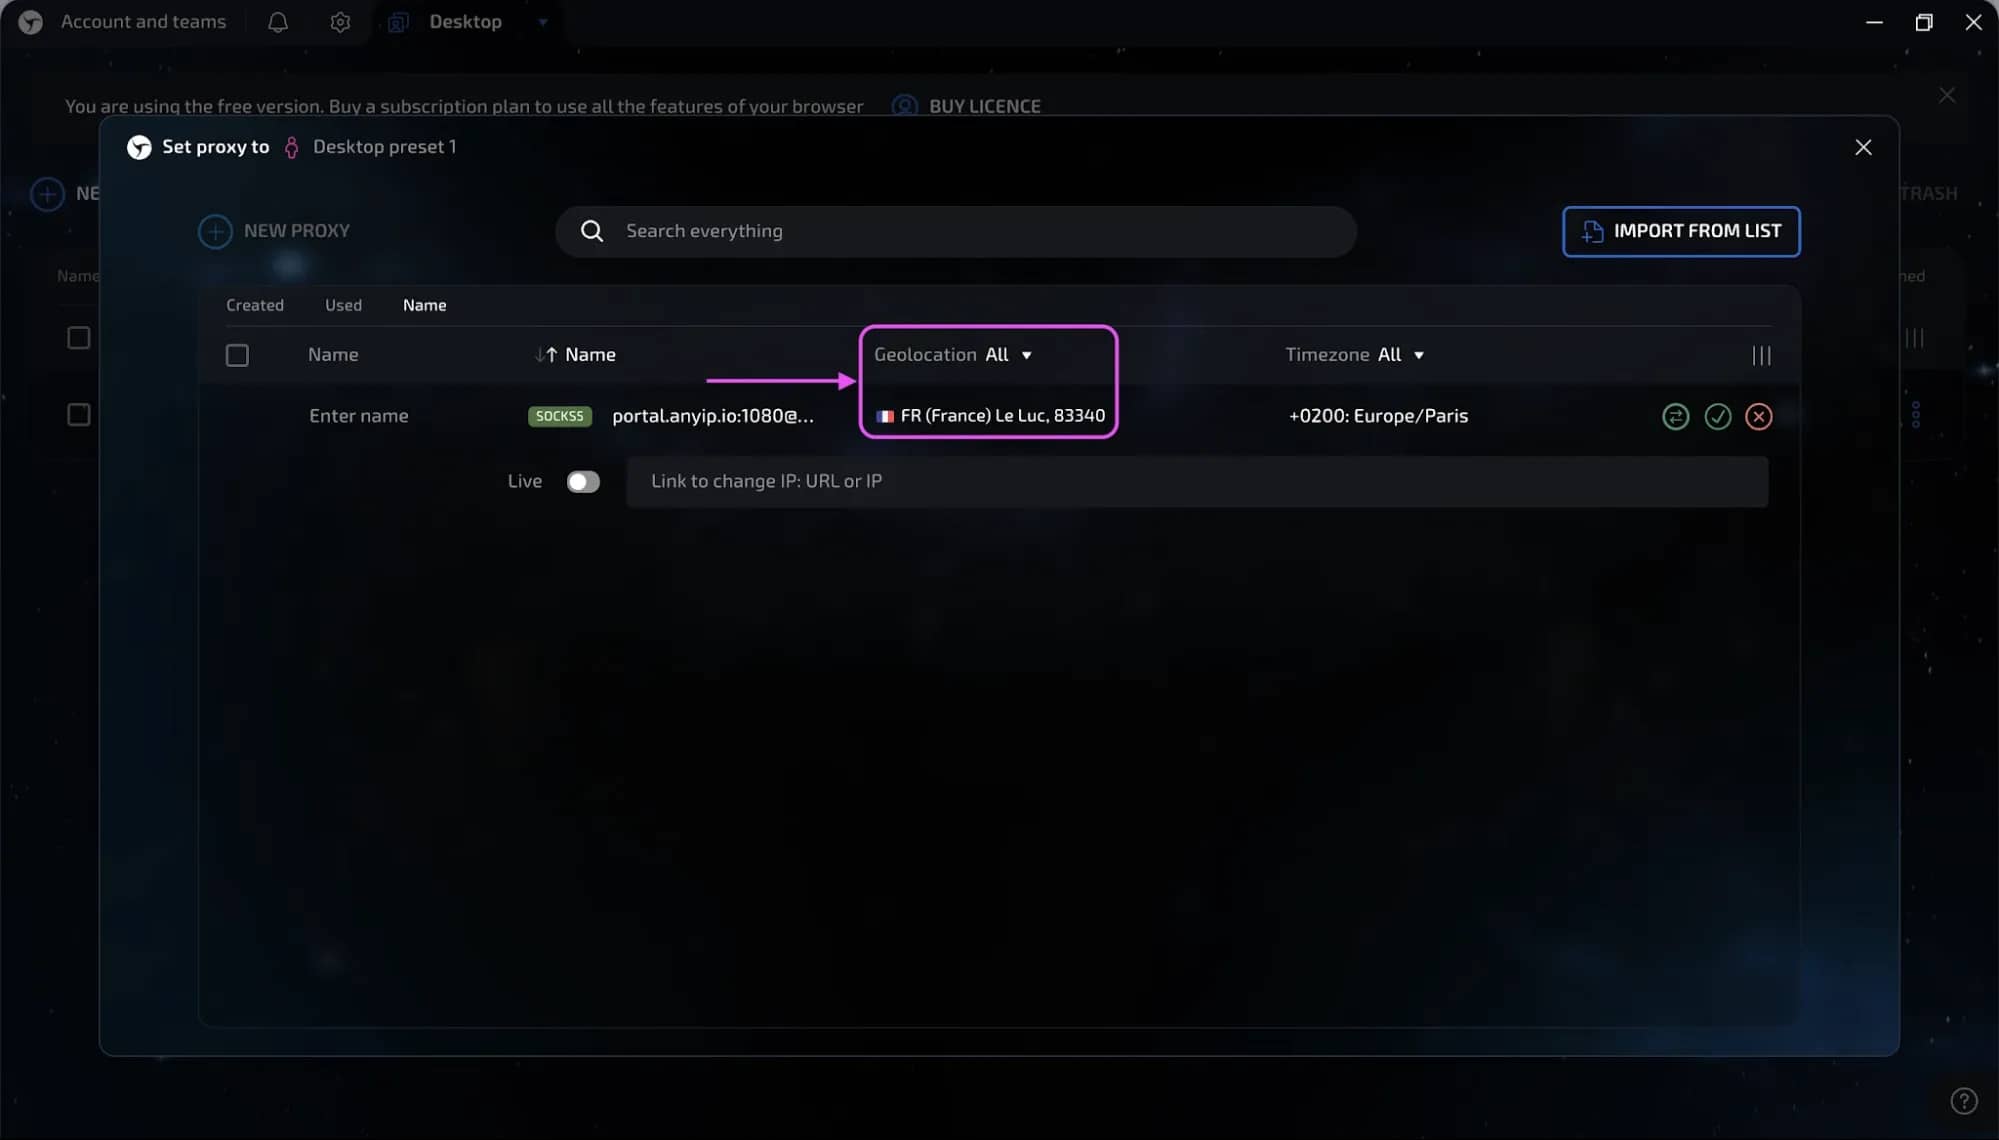
Step 6: Check proxy and geolocation
Once you've pasted your proxy details, you should check the proxy connection by clicking the two-arrow icon next to the tick icon.
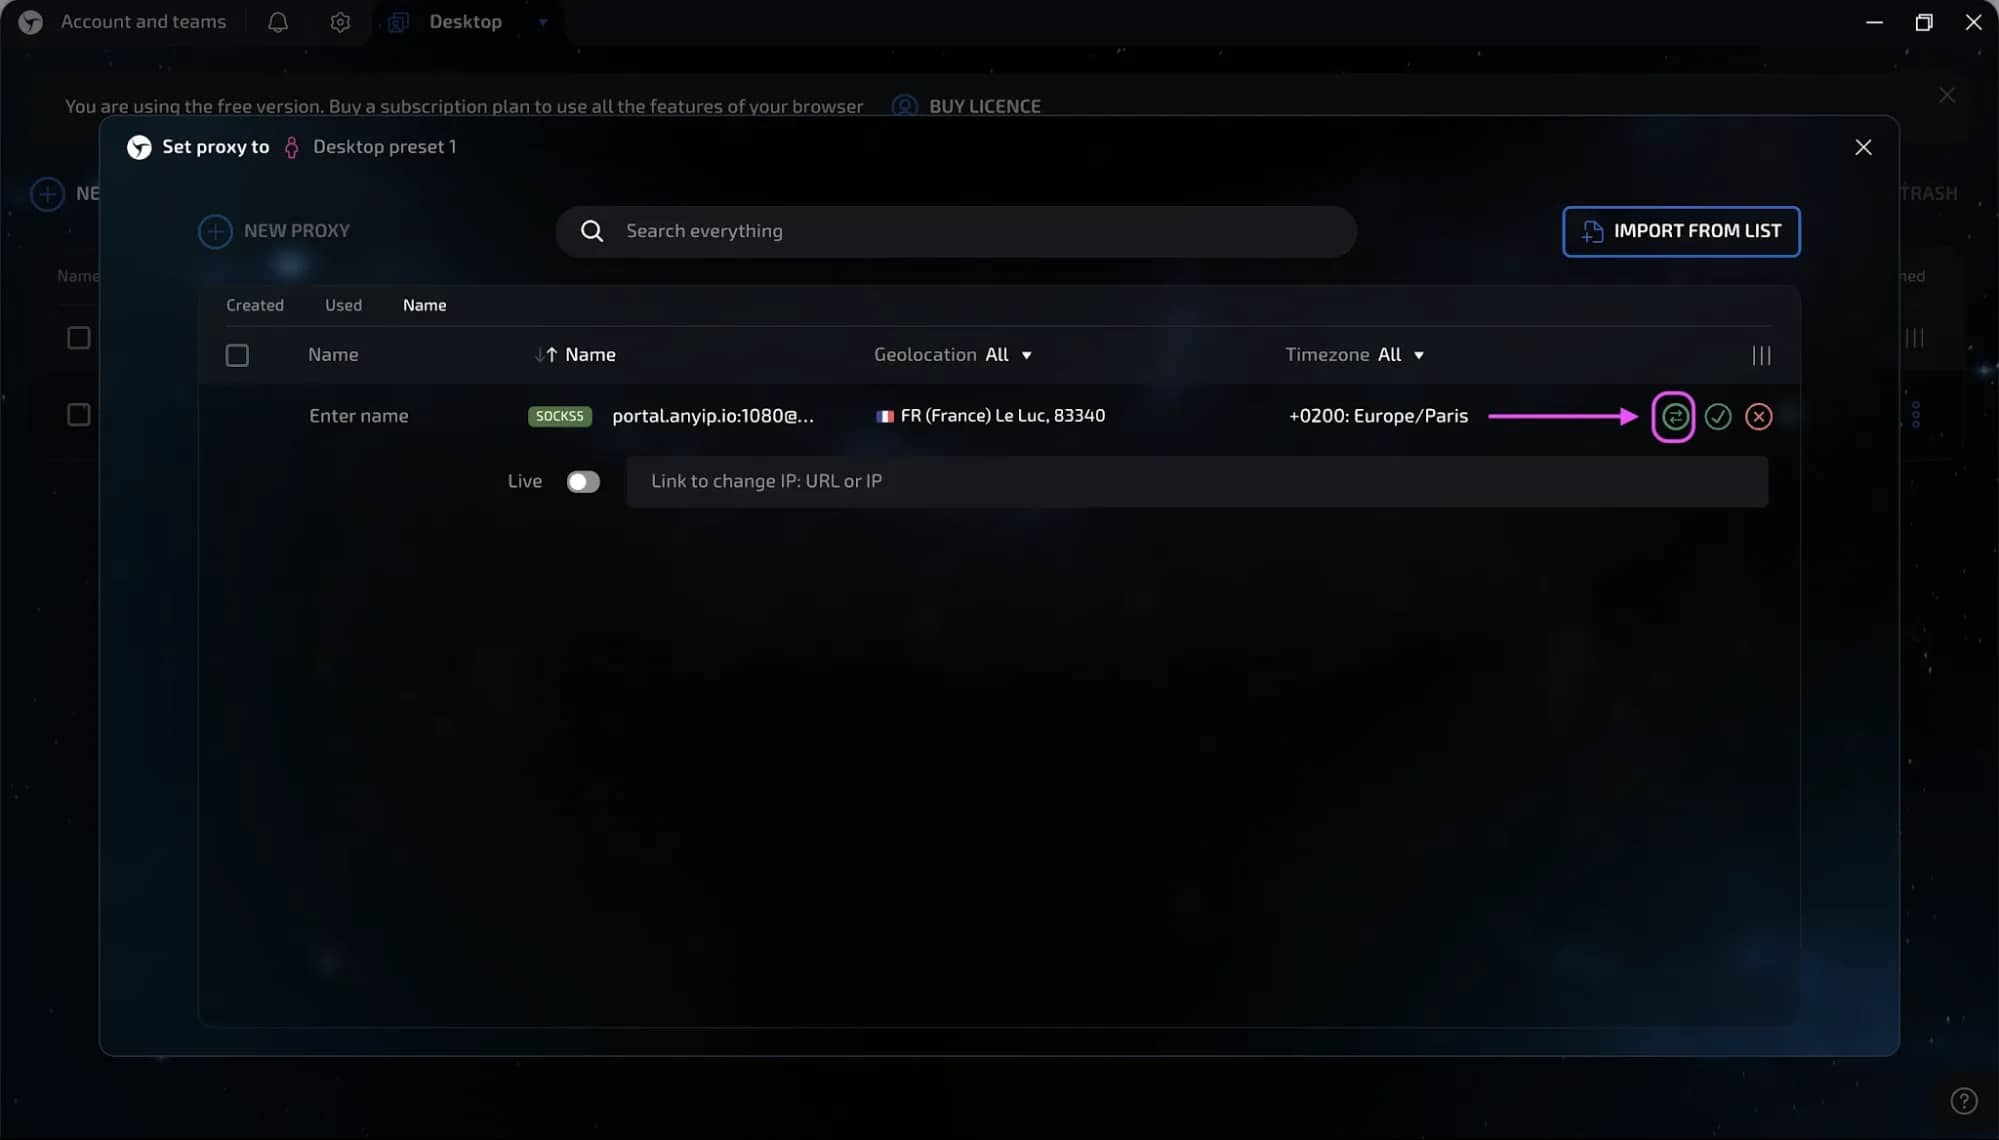
Linken Sphere will almost immediately check the connection and show you whether your proxy is active and ready to use for your newly created session.
Alternatively, you can use anyIP's native proxy checker, which returns more detailed information about your proxies.
Step 7: Save and launch the session
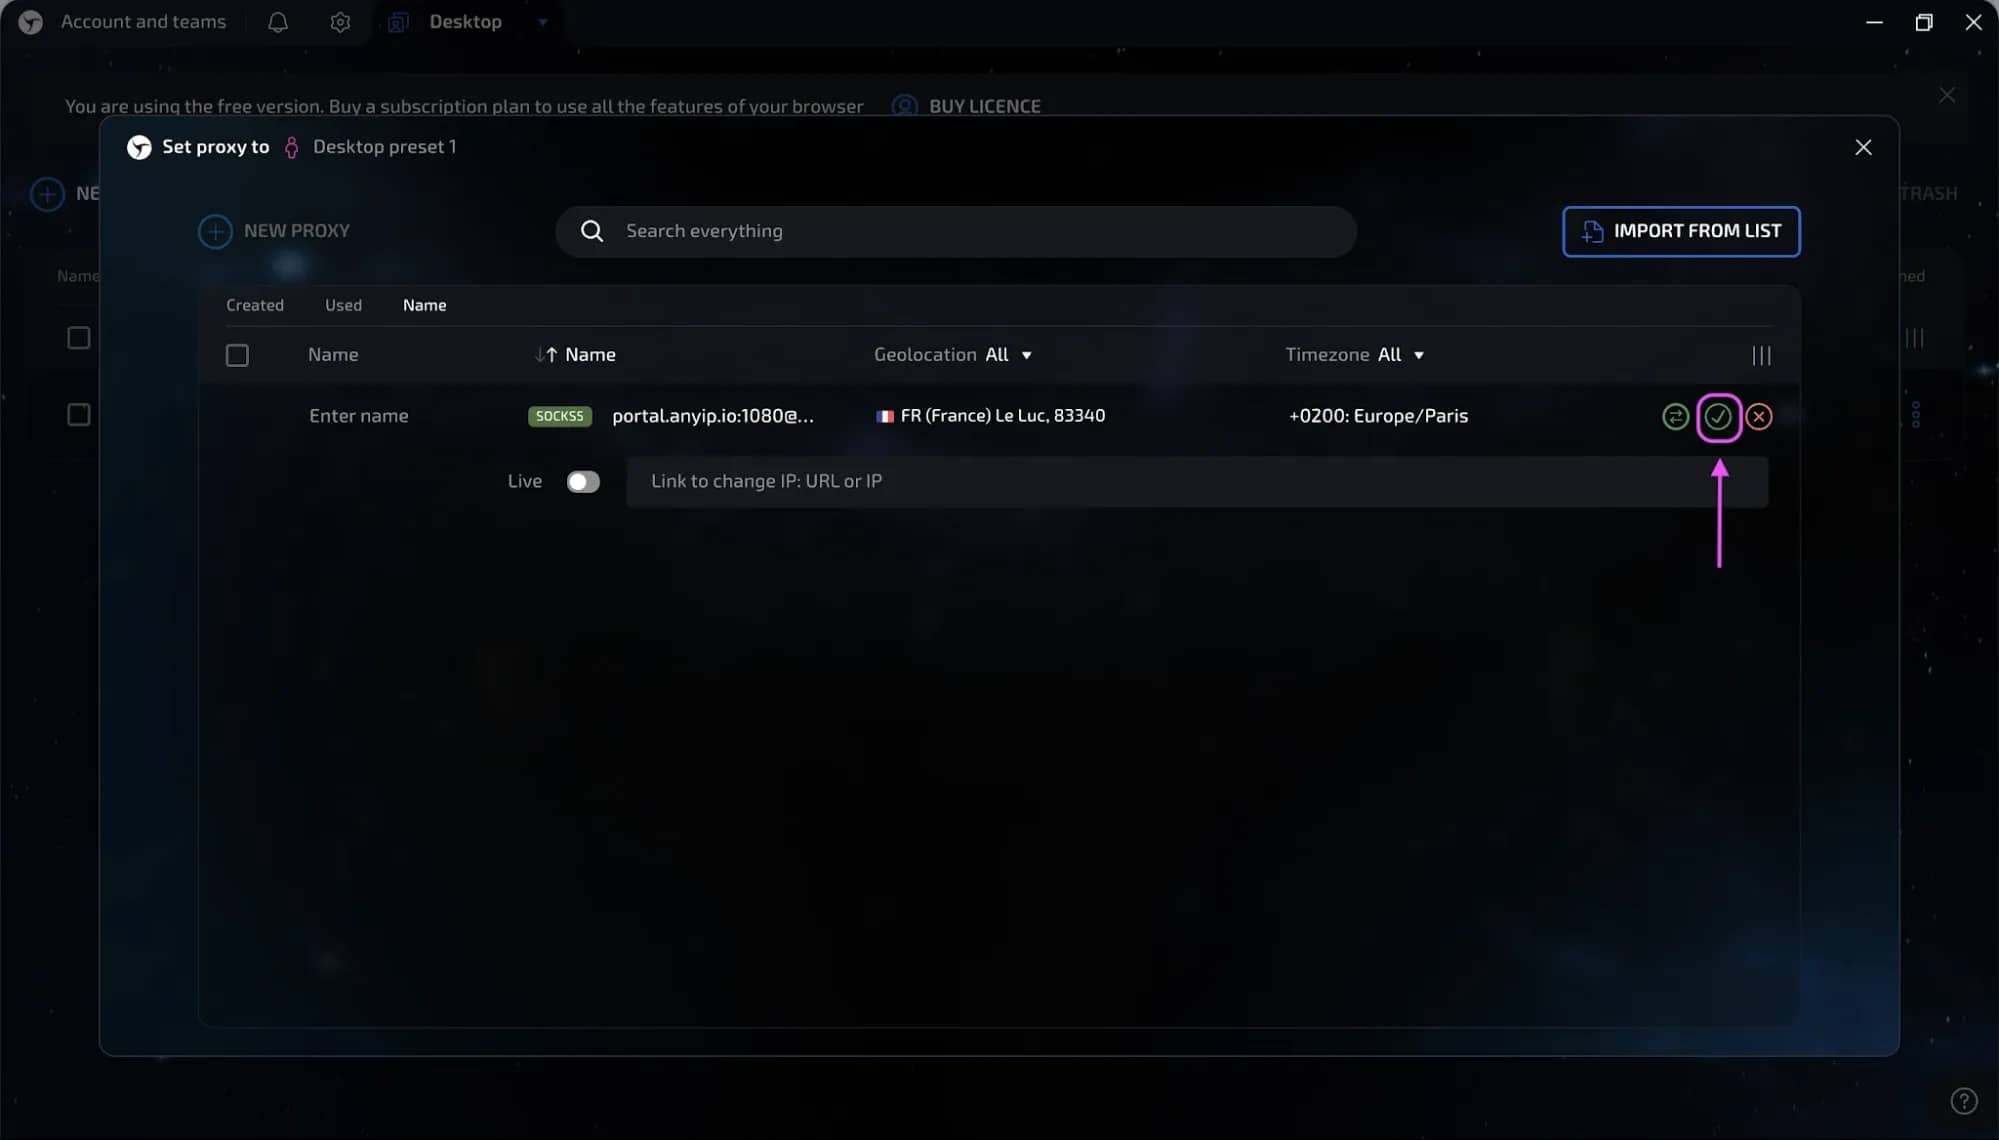
If your connection is working smoothly, go to the same three icons where you checked the proxy status and click on the green tick icon to save your proxy configuration.
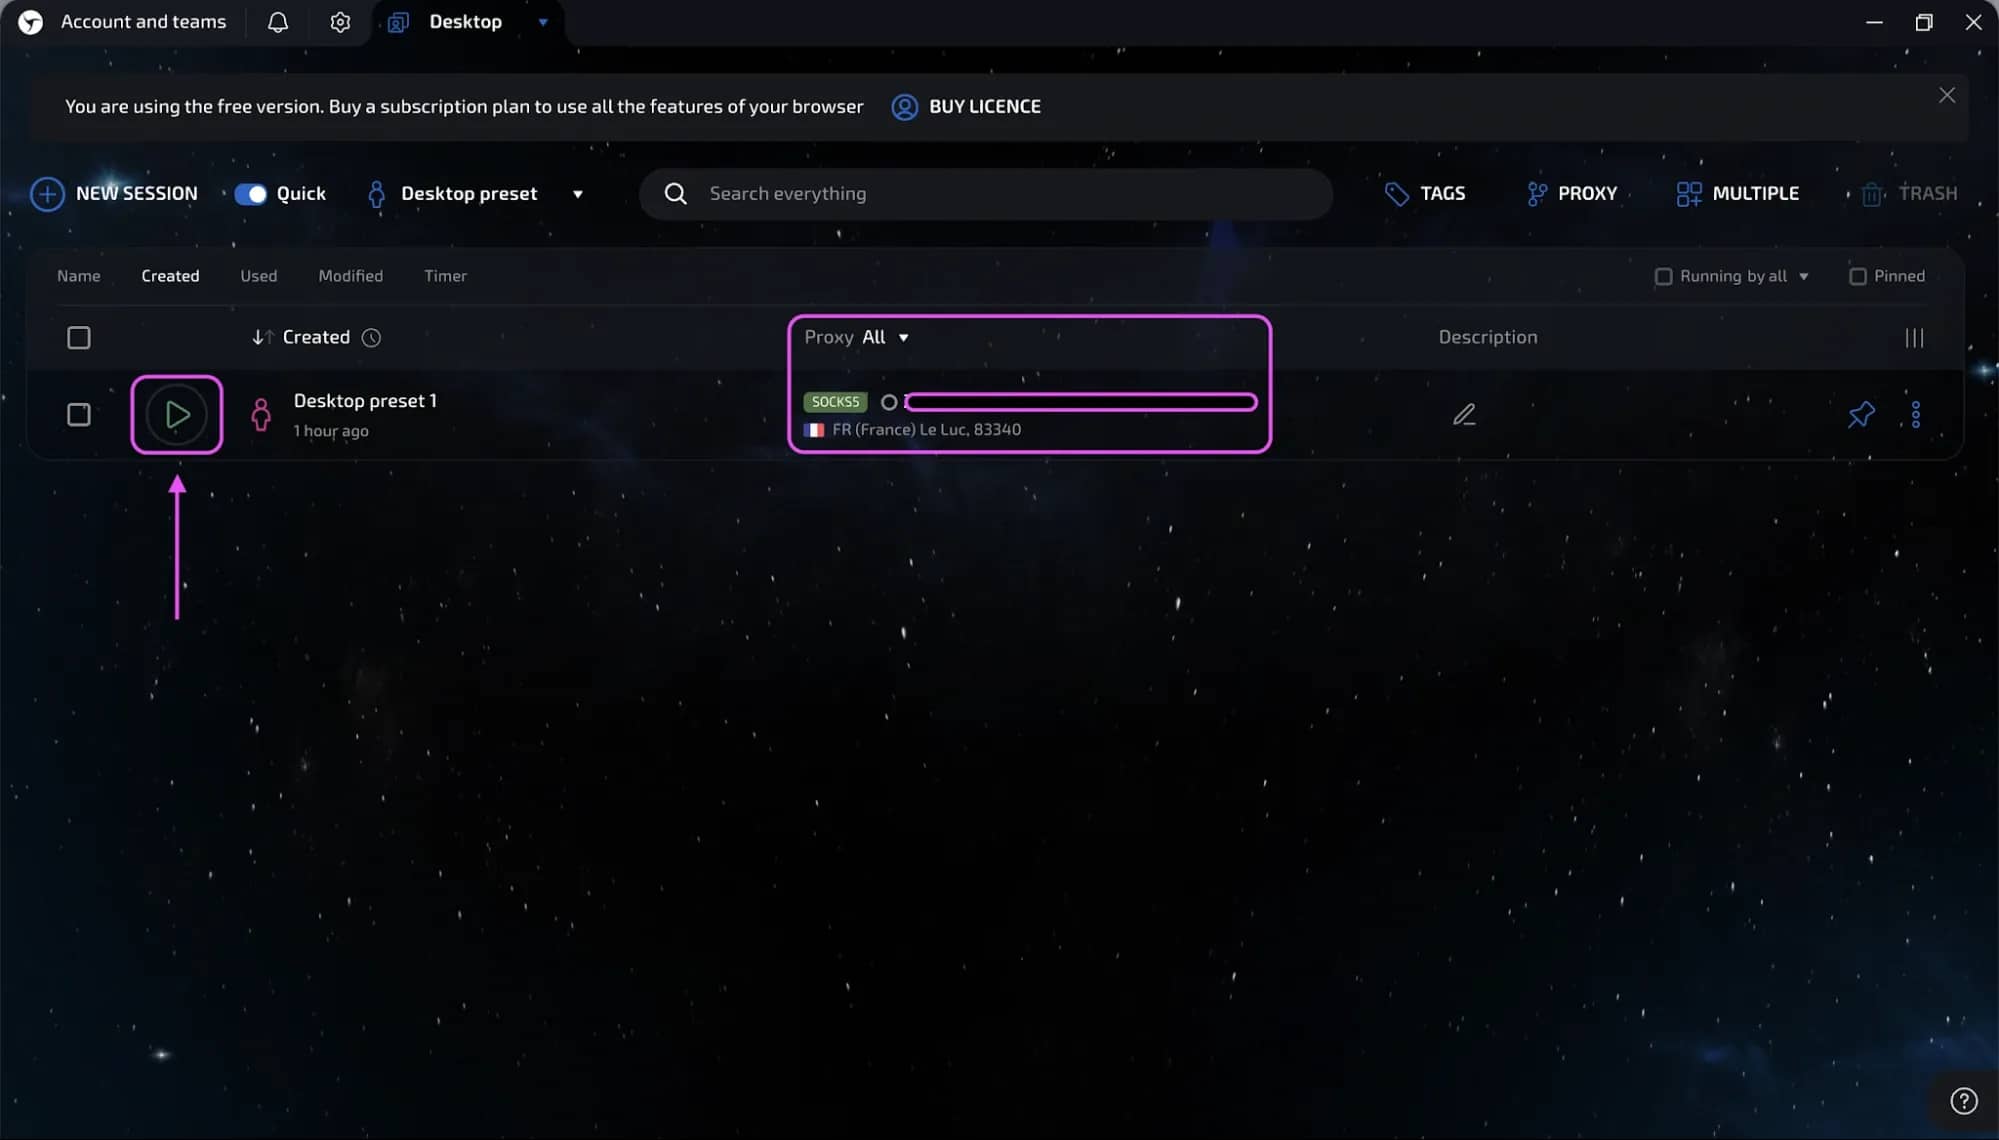
After you save your proxy settings, go back to the session – it should now show your proxy location. All that's left now is to click on Start to begin browsing.
How to Set Up Proxies in Linken Sphere Proxy Manager
If you want to save a pool of proxies to use across multiple browser windows without retyping details each time, use the Proxy Manager.
- Click on Proxy on the top menu bar of the main dashboard.
- Select Add Proxy to open the network storage panel.
- Choose your protocol, type your anyIP credentials, and name the proxy.
- Run a connection check to confirm the node is active, then click Save.
- When creating any future browser session, simply select this saved proxy from your quick-access library list.
How to Import Proxies in Bulk
Having access to all your previously added proxies is great – but what if you need to set up a number of browser profiles and proxies for each one? The answer is to bulk import your active proxies.
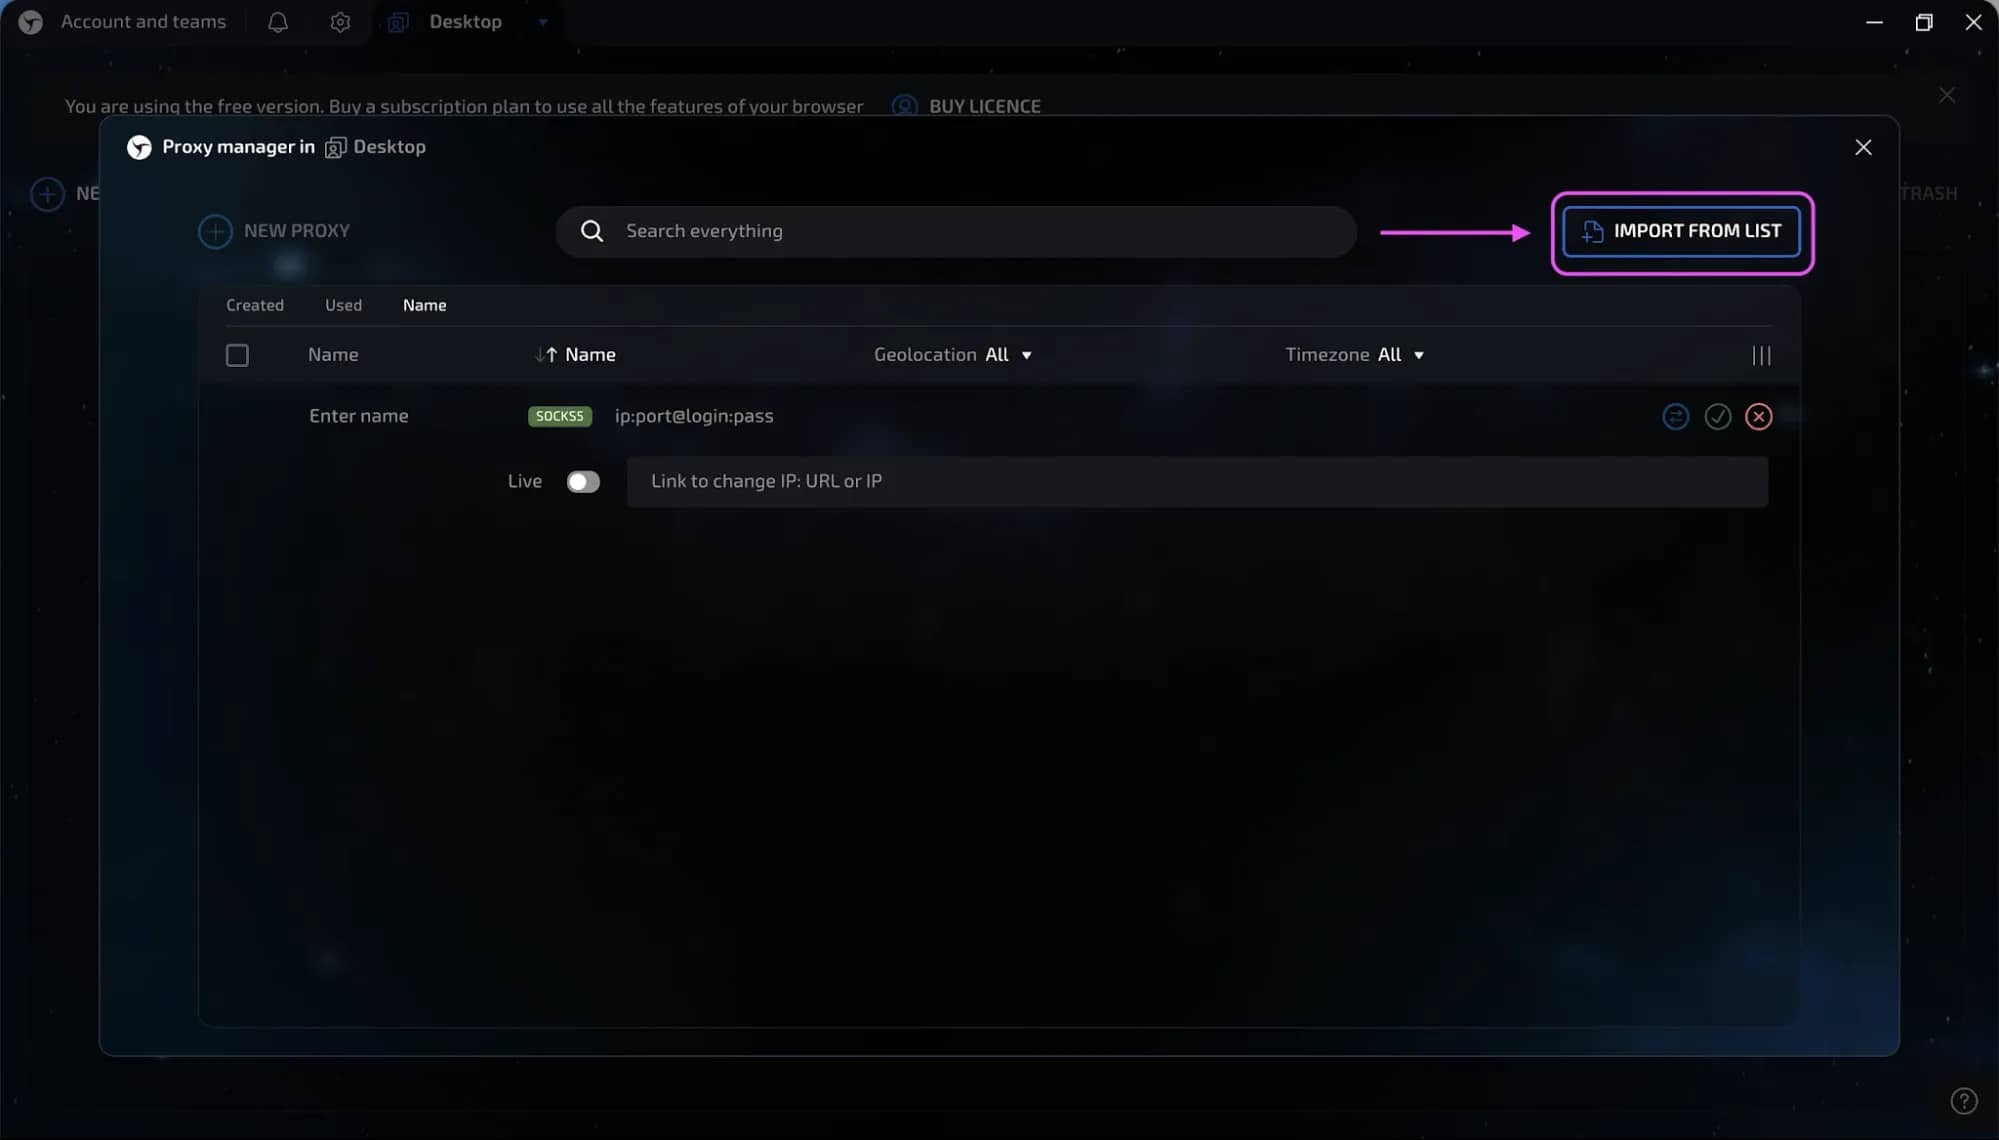
- Prepare your proxy list: Open a standard text editor and organize your proxies using the accepted format: host:port:username:password. Keep in mind that there should only be one proxy per line.
- Import the text file: Open the Proxy Manager, click Import from List, and paste your raw text lines into the data field or upload an existing proxy list text file.
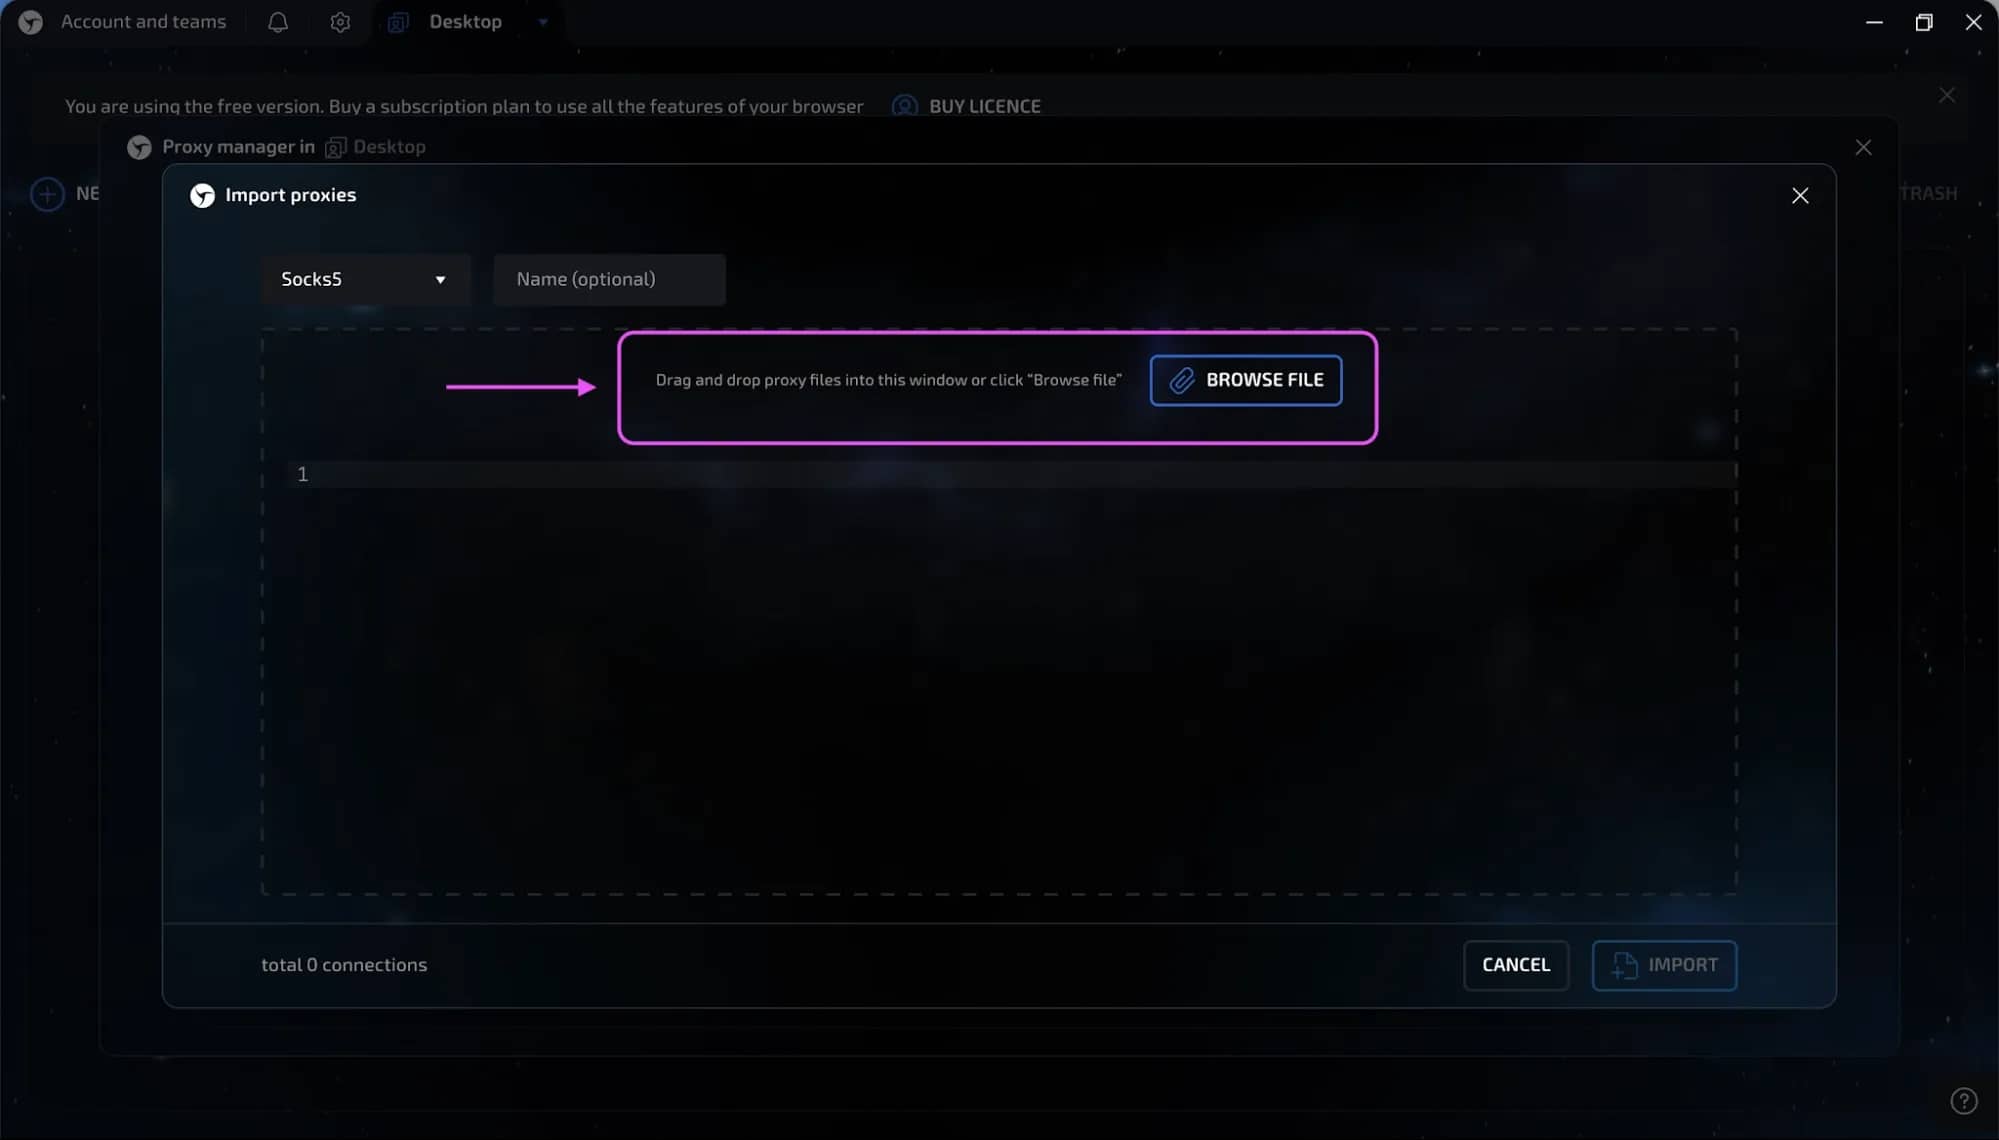
- Mass test: Select all imported lines and hit the bulk Check button.
- Assign: Once confirmed and active, specify which proxy to use for your other Linken Sphere browser profiles.
Which Proxy Type Should You Use in Linken Sphere?
SOCKS5 vs HTTP(S)
HTTP(S) is the standard and is still widely accepted and supported for most online tasks online. But when it comes to performance and capabilities, HTTP is limited to basic web scraping, but it only handles HTTP/HTTPS traffic. In contrast, SOCKS5 is particularly well-suited for Linken Sphere due to its ability to handle low-level network data more efficiently.
On top of that, SOCKS5 can also manage complex User Datagram Protocol (UDP) traffic and Domain Name System (DNS) requests, which in essence means that there's a significantly lower chance of data leakage.
Residential vs mobile vs datacenter
All three proxy types are extremely popular and have dedicated use cases. To choose the right proxy type, you need to understand their individual strengths and considerations.
- Residential proxies: The gold standard for most users. These proxies use real household IP addresses, making them ideal for connecting to stricter platforms. However, this extra protection can also lead to slightly slower connections compared to datacenter proxies.
- Mobile proxies: Mostly used for social media and for managing Instagram, TikTok, or mobile banking apps. Additionally, mobile proxies also typically come with huge IP pools that change frequently.
- Datacenter proxies: Fast and budget-friendly, but easily detected by advanced security firewalls. This is why datacenter proxies are mostly used for basic data collection or high-speed tasks on less restrictive sites.
Sticky vs rotating sessions
- Sticky sessions: These keep you connected to the same IP address for an extended period, such as 30 minutes or 1 day. Sticky sessions are often used for tasks requiring a single login session.
- Rotating sessions: These automatically switch your IP address on every request or page refresh, depending on how you configured your proxies. Use these for web scraping, price comparison tasks, or broad market research to avoid detection.
How to Test Your Linken Sphere Proxy
Even after your initial setup passes, it's a good practice to run a deeper diagnostic test on your environment before you start working. Conveniently, Linken Sphere has automated checking tools that analyze your digital footprint.
- IP geolocation: Confirms your visible location matches your target zone.
- Timezone: Checks that your local browser clock matches the timezone of your proxy IP.
- Language: Confirms your browser language settings match the host country of your IP.
- WebRTC & DNS protection: Makes sure your physical home network routing path is hidden.
Troubleshooting: Linken Sphere Proxy Not Working
Issues and problems are unavoidable in most cases, and it's especially true for using anti-detect browsers and proxies. There are multiple factors that can lead to some obstacles, so this section of the guide will walk you through the most common issues and how to fix them.
Proxy check fails
This usually happens due to pasting the wrong or incorrect credentials. The first thing to do here is to manually check for mistakes and verify whether there are any extra spaces (these are known to cause authentication problems).
Another possible cause could be that either your plan has expired or there's a firewall conflict. If it's the former, simply log into your anyIP account, but if it's the latter – allow access to proxies via your firewall.
Proxy connects, but location Is wrong
Again, check your proxy target string inside your anyIP username. The most likely cause may be a small typo in the country code. In most cases, this can quickly resolve the issue, but if it persists, reach out to anyIP's 24/7 support team to resolve the problem as soon as possible.
Accounts are still being flagged
To avoid this issue, it's best not to reuse the same exact proxy IP address for different browser profiles. This is because if an IP associated with one profile gets flagged, it will be recognized on another profile and flagged or banned.
Bulk import fails
The biggest cause for issues with bulk importing proxy details is incorrect formatting. You might be pasting the right information, but if you're not careful with the one-proxy-per-line format, your bulk import could fail.
Additionally, it's also worth mentioning that HTTP and SOCKS5 lines shouldn't be mixed together in the same file because it'll most certainly fail. To make this process simpler, use anyIP's proxy formatter tool.
Get a Proxy Now with anyIP.io
Enhance your Linken Sphere setup with premium proxies from anyIP.io. We offer complete support for both HTTP and SOCKS5 configurations, rotating proxies and long-lasting sticky sessions for stable account management, and precise country and city targeting strings.
Complete our browser profiles with high-quality proxies and control everything from a single intuitive dashboard. Get a proxy today and boost your operations on Linken Sphere.
Why Google Blocks Accounts and What Your Antidetect Has to Do With It
Google has once again complicated the mechanisms of digital identification by deploying a new, more sophisticated layer of protection based on proprietary HTTP headers. This quiet change caught most of the market off guard, triggering a wave of rushed updates. While others hastily released superficial 'fixes', we realized that we were dealing not with a minor issue but with a fundamental shift that required deep and comprehensive analysis.
SOCKS vs HTTP Proxy: What’s the Real Difference and Which One to Choose?
There are times when you don’t want a website to link the request back to your device. That’s where a proxy comes in, it acts like a middle layer and sends the request for you. The site sees the proxy’s info instead of yours. It’s a go-to trick when you’re trying to see a page that’s not available in your region, pull content that’s restricted by location, or avoid hitting a wall when sending lots of requests.

The Best Alternative to OBS Studio
Working with a webcam on many online platforms can turn into a real challenge. A strict oval or rectangular frame appears on the screen, but your image doesn’t align perfectly with it. As a result, the system blocks further progress, demanding perfect alignment, and your workflow is disrupted before it even begins.